If you're planning a trip to Moab, you're in the right place! Moab is a small town in Utah with SO much to offer. Not only is the area home to two of the five Utah national parks, but you can also find epic adventure opportunities such as rafting, climbing, and off-roading.
If it’s your first time visiting Moab and you only have three days, I recommend this itinerary for your trip. This guide is based on my experience visiting Moab in July 2022 and May 2024.
When to Visit Moab
The best time to visit Moab is in the Spring or Fall, it’s not too hot or cold. Both seasons have average temperatures in the 70ºF’s. In the spring, you can see desert wildflowers and in the fall you can enjoy fall foliage in the La Sal Mountains.
The winter months bring snow, but the typical average temperatures are between 40ºF and 50ºF. It is less crowded during the winter so this is your best chance to find some solitude.
The summer months bring very hot temperatures and the biggest crowds. If you visit in the summer, it is vital to get an early start to each day to beat the heat of the afternoon. Bring a lot of extra water. I visited summer and it wasn’t ideal, but I still had an incredible time.
Read about the best US national parks to visit in the winter
Where to Stay in Moab
Moab has a fair number of hotel options but I still recommend booking early to get the best price and to ensure accommodations don’t fill up. I stayed in both of the following options and loved them both.
Under Canvas Moab
If you enjoy glamping, Under Canvas offers an incredible experience! This accommodation is a community of safari tents complete with comfortable beds, phone chargers, a lot of hang out space and more. Despite the tents not having power, I did not get too hot in the summer.
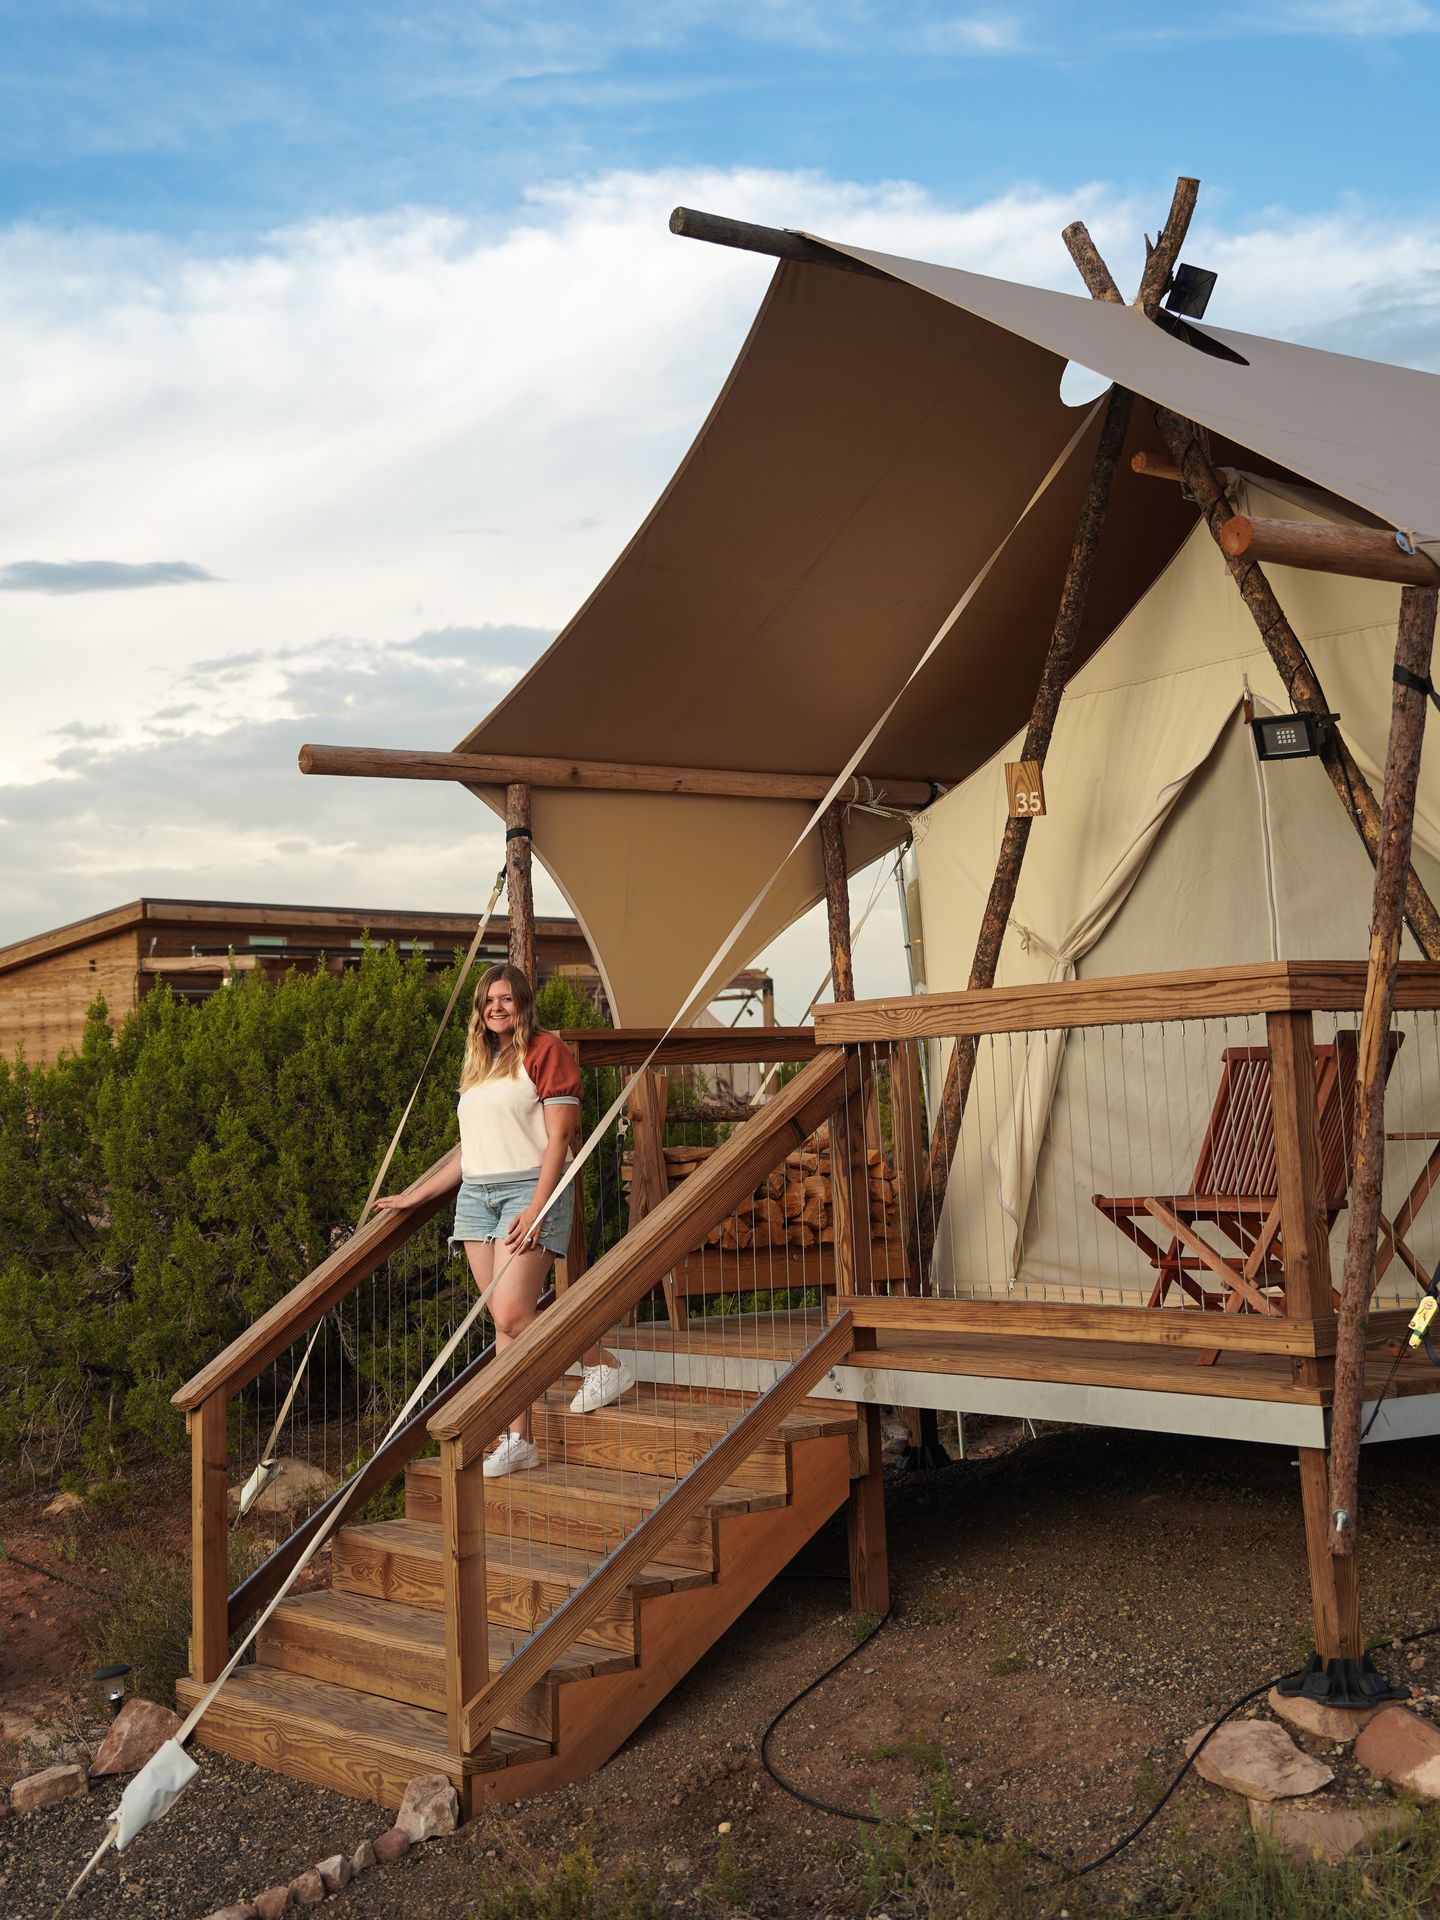
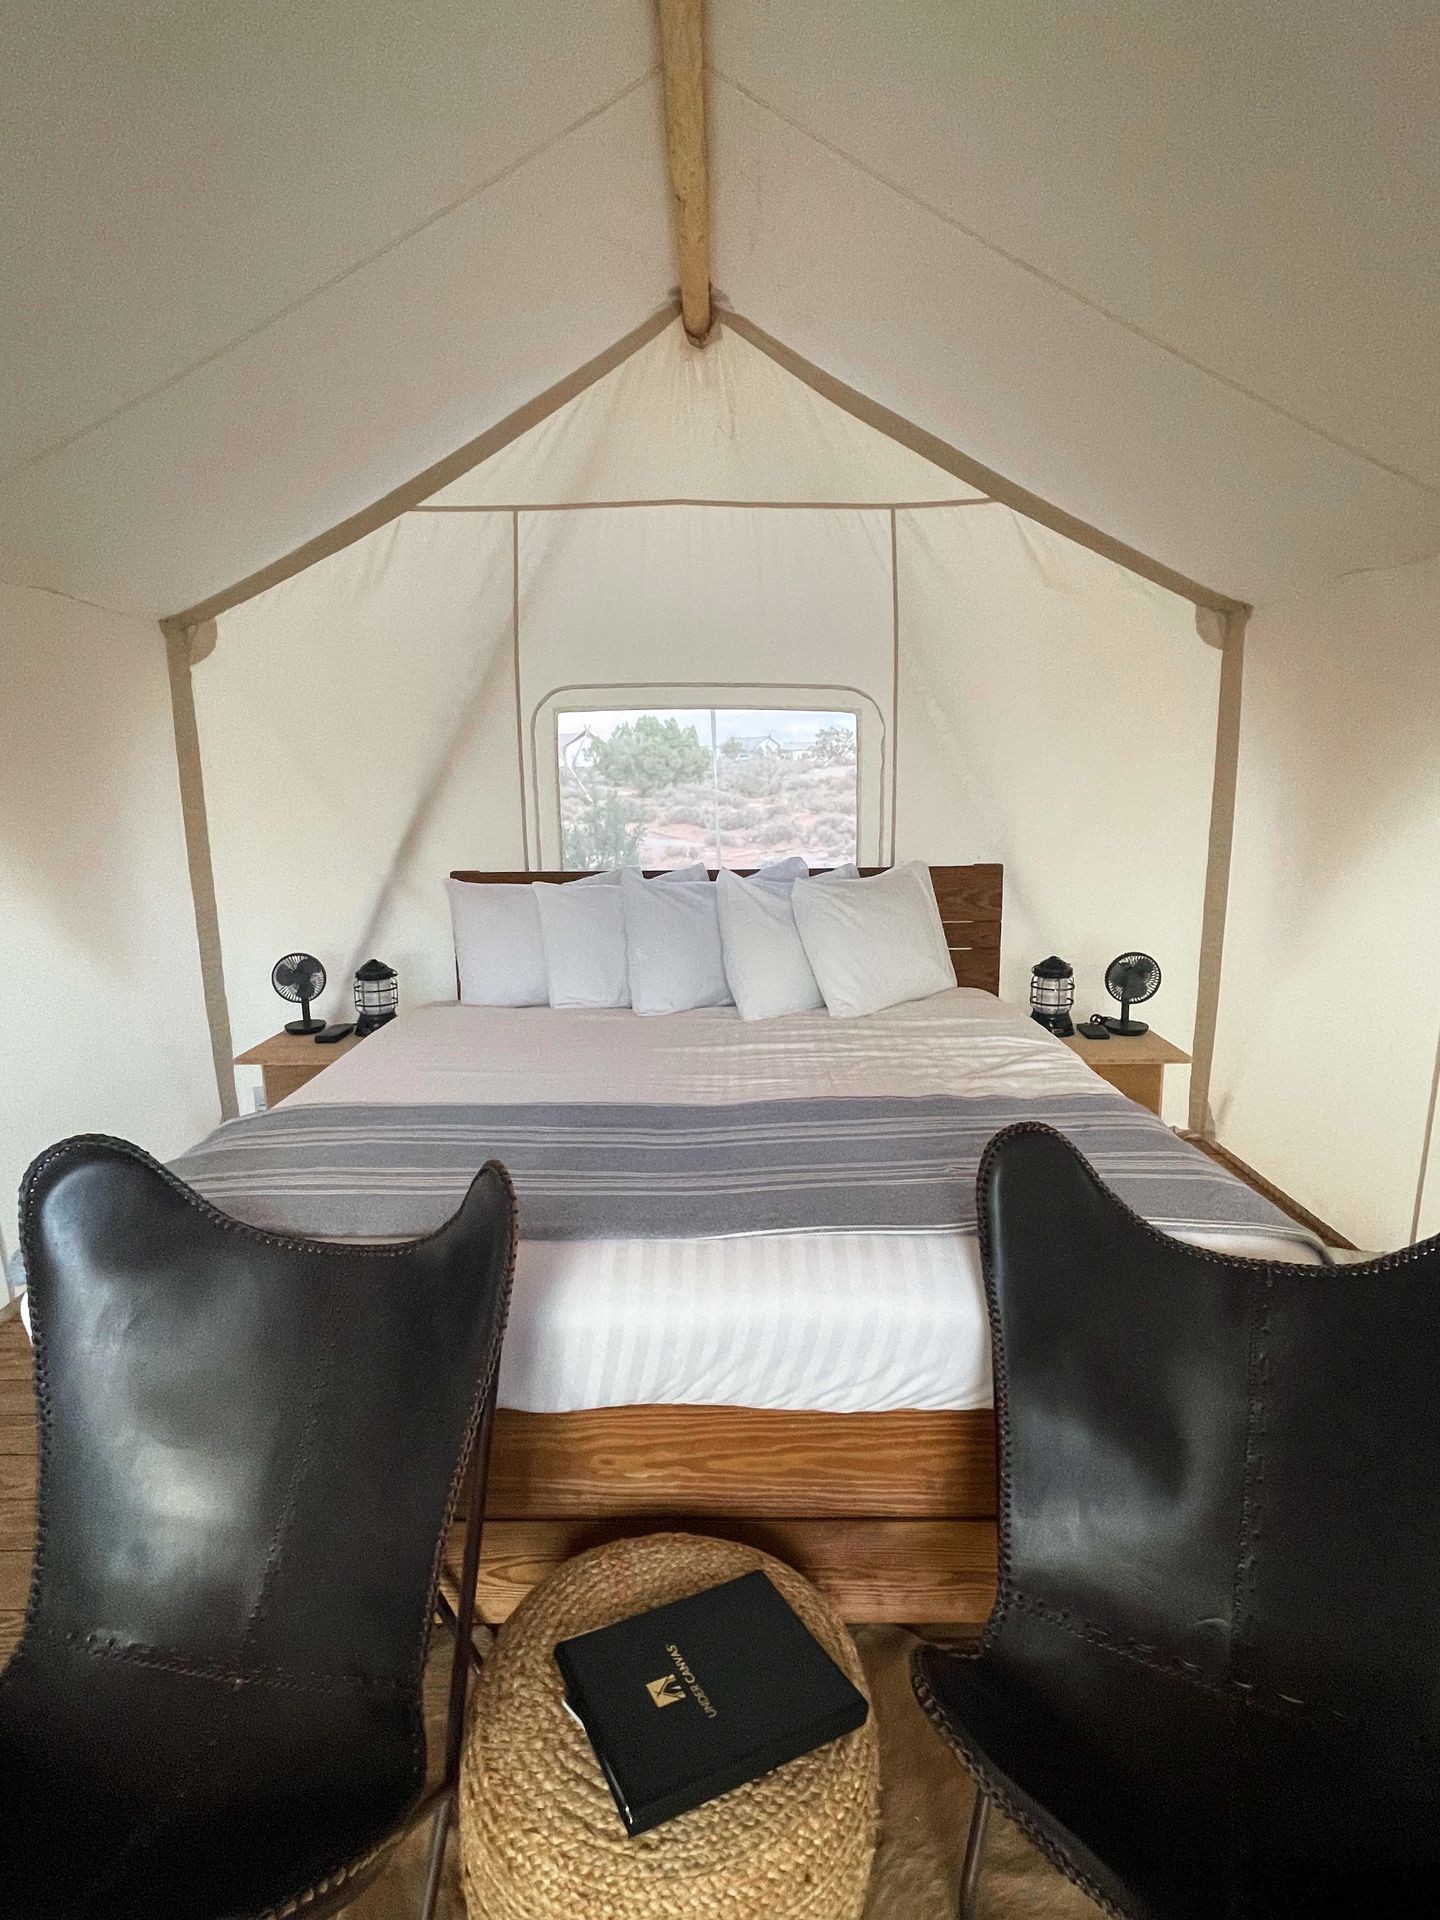
The property provides a nice bath house near tents, a hammock hang out space and a patio area with lots of fire pits. Amenities include complimentary s’mores kits, free ice, free coffee and more. The tents include a window vent, little fans and wood burning fireplaces if it were to get cold.
One of the best parts of the stay was enjoying the sunrise and sunset from the property. There are beautiful views of the surrounding red rocks of Moab.
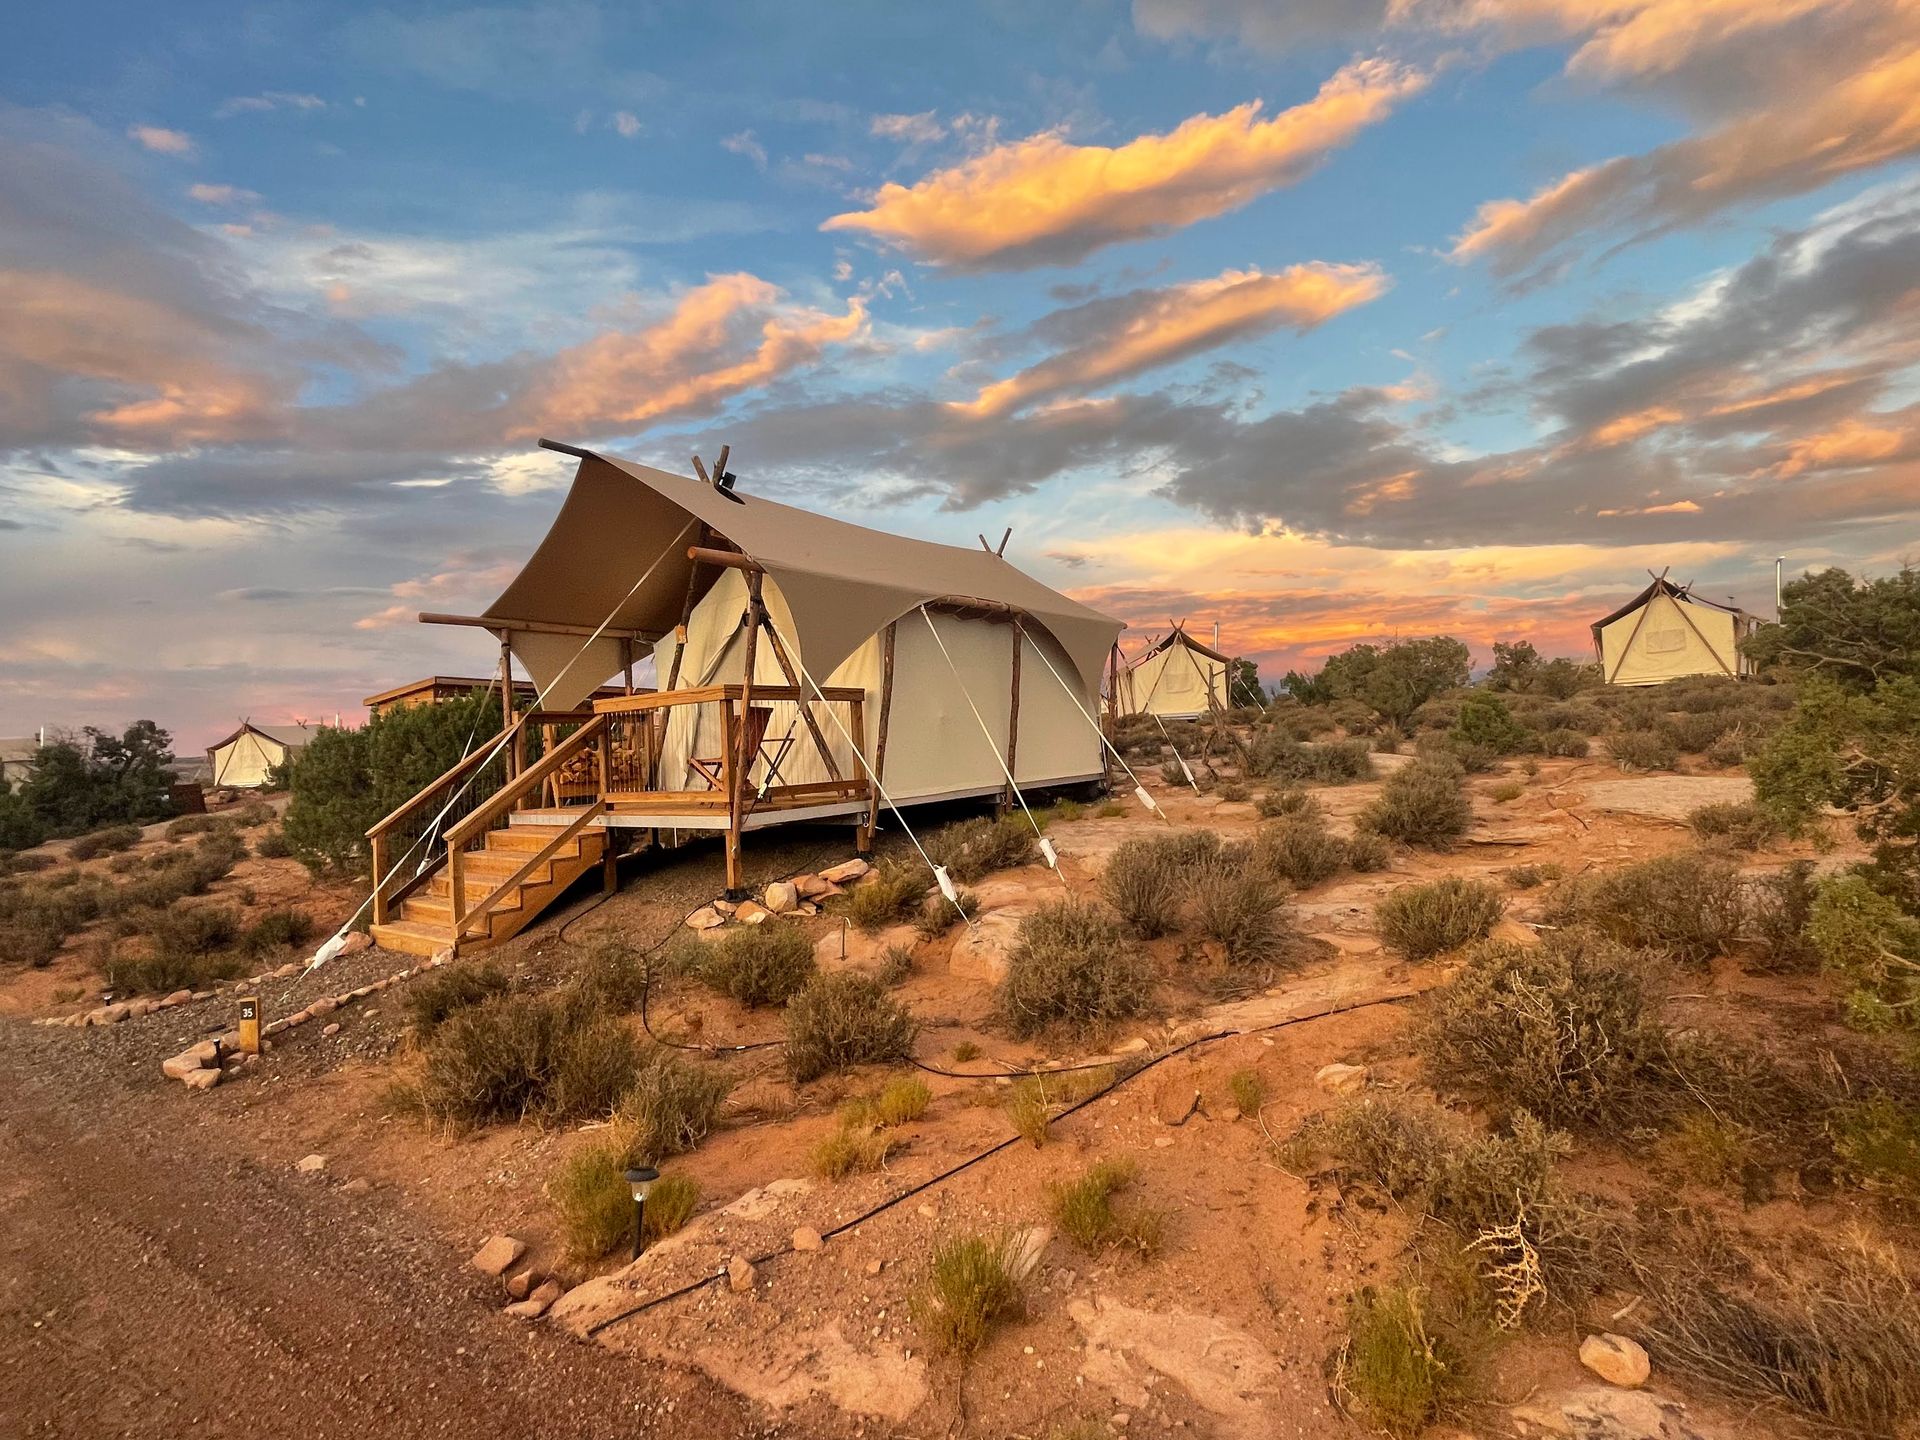
Under Canvas is not cheap but it was worth the price in my opinion. It truly felt luxurious despite going without a private bathroom and electrical power. If you are looking for a unique experience, definitely check this out.
Under Canvas has 10 locations throughout the US, mostly outside of national parks. Other locations include Yellowstone, Zion and Acadia. I would happily stay at any of their other locations!
Book Under Canvas Moab on Hotels Dot Com
Book Under Canvas Moab on Booking Dot Com
Expedition Lodge
For a more affordable lodging option within walking distance of shops and restaurants, Expedition Lodge is a great place to stay. The hotel is family friendly and has a nice pool with a water slide and hot tub. This is a great option for a quick Moab weekend getaway!
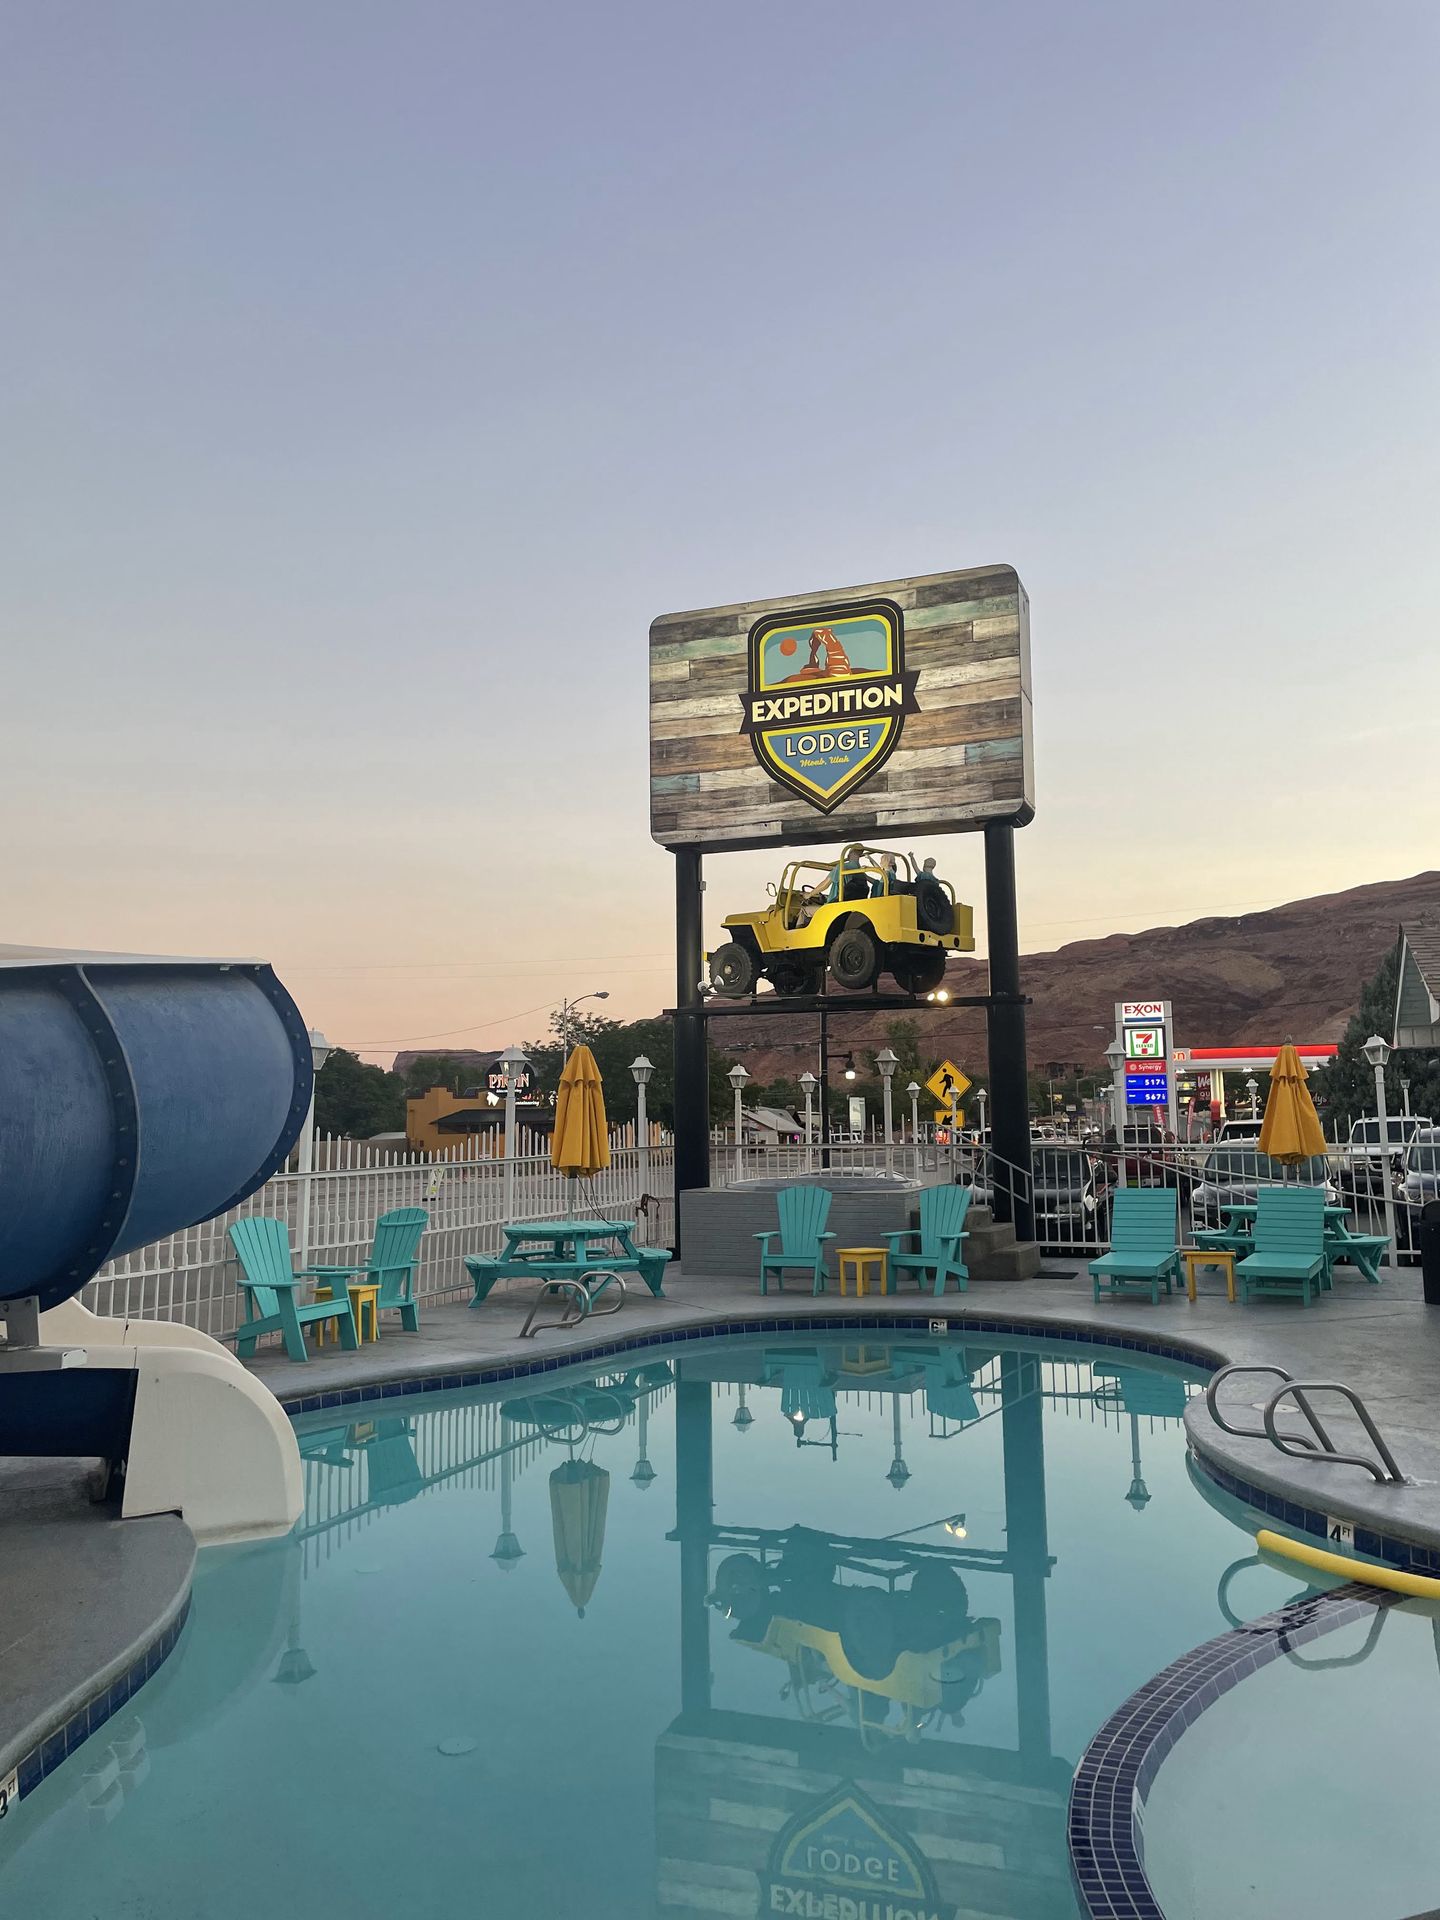
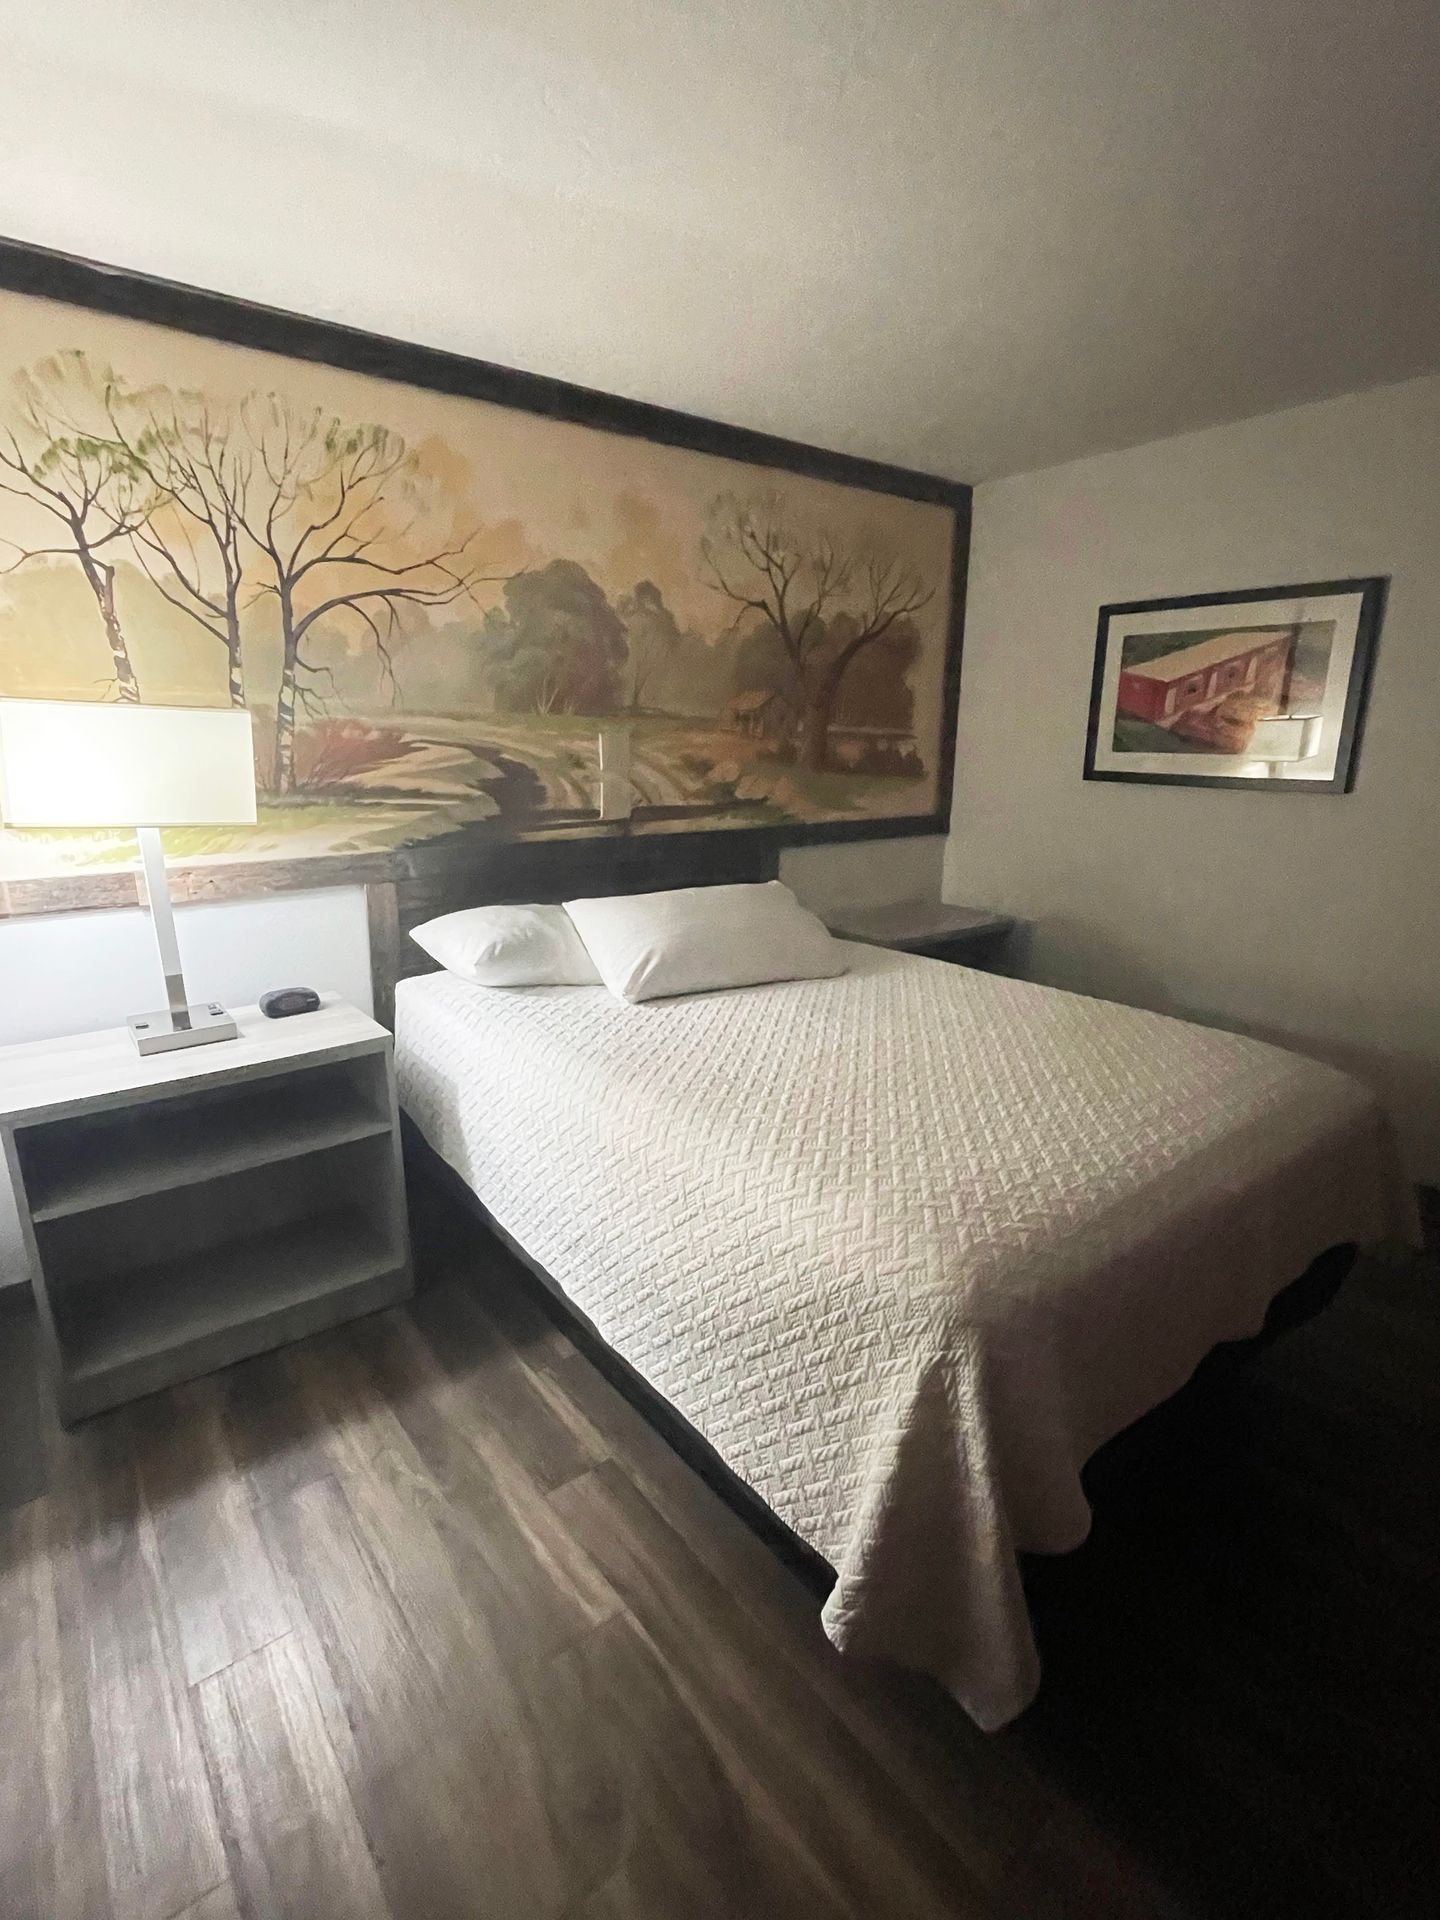
The hotel has colorful, retro decor including a vintage mini-fridge in each room. The space used to be a residential dwelling and they even kept the master bathroom, with a pink bathtub, intact. The hotel’s location makes it so easy to get around town and this is a wonderful place to relax after a day of exploring.
Book the Expedition Lodge on Hotels Dot Com
Book the Expedition Lodge on Booking Dot Com
Tips and Things you Need To Know Before Visiting Moab
- Reservations are no longer required for entering Arches National Park in 2026. I expect this will lead to bigger crowds, so I recommend entering the park early to get parking spots.
- Arches National Park and Canyonlands National Park each cost $30 for a seven day vehicle pass. If you are visiting both of these parks plus any other national park with a fee in the next year, you’ll save money by purchasing the America the Beautiful Pass. This pass grants you admission to all national parks for a year for $80.
- I highly recommend the Guide Along audio tour during your time in Moab. You will download the tour in advance and can play it in your car as you drive around the parks. It provides history, advice on where to stop, geology background and more. You can purchase the Canyonlands and Arches tours in a bundle, or bundle all of the Utah Mighty Five parks together.
- Cryptobiotic soil crust is a fragile type of soil that includes living organisms such as algae and fungi. This type of soil is very common in Moab and the Utah desert. Just one footstep onto this soil can break the crust that takes decades to recover. This means it is SO important to always stay on the trail when exploring this magical area.
Moab Itinerary Overview
This itinerary contains high adventure activities and difficult hiking trails. Be aware of your own abilities and come prepared with the 10 hiking essentials. If you are new to hiking, visit my beginner hiking guide!
This schedule also packs a lot into 3 days. If you prefer to take things slower, I recommend adding on a couple more days to your trip!
Day One in Moab
Take some short hikes in Arches and go on an UTV tour!
Short Hikes in Arches National Park
Arches National Park is not too large and full of short trails, so pretty quick to get around to see many sights.
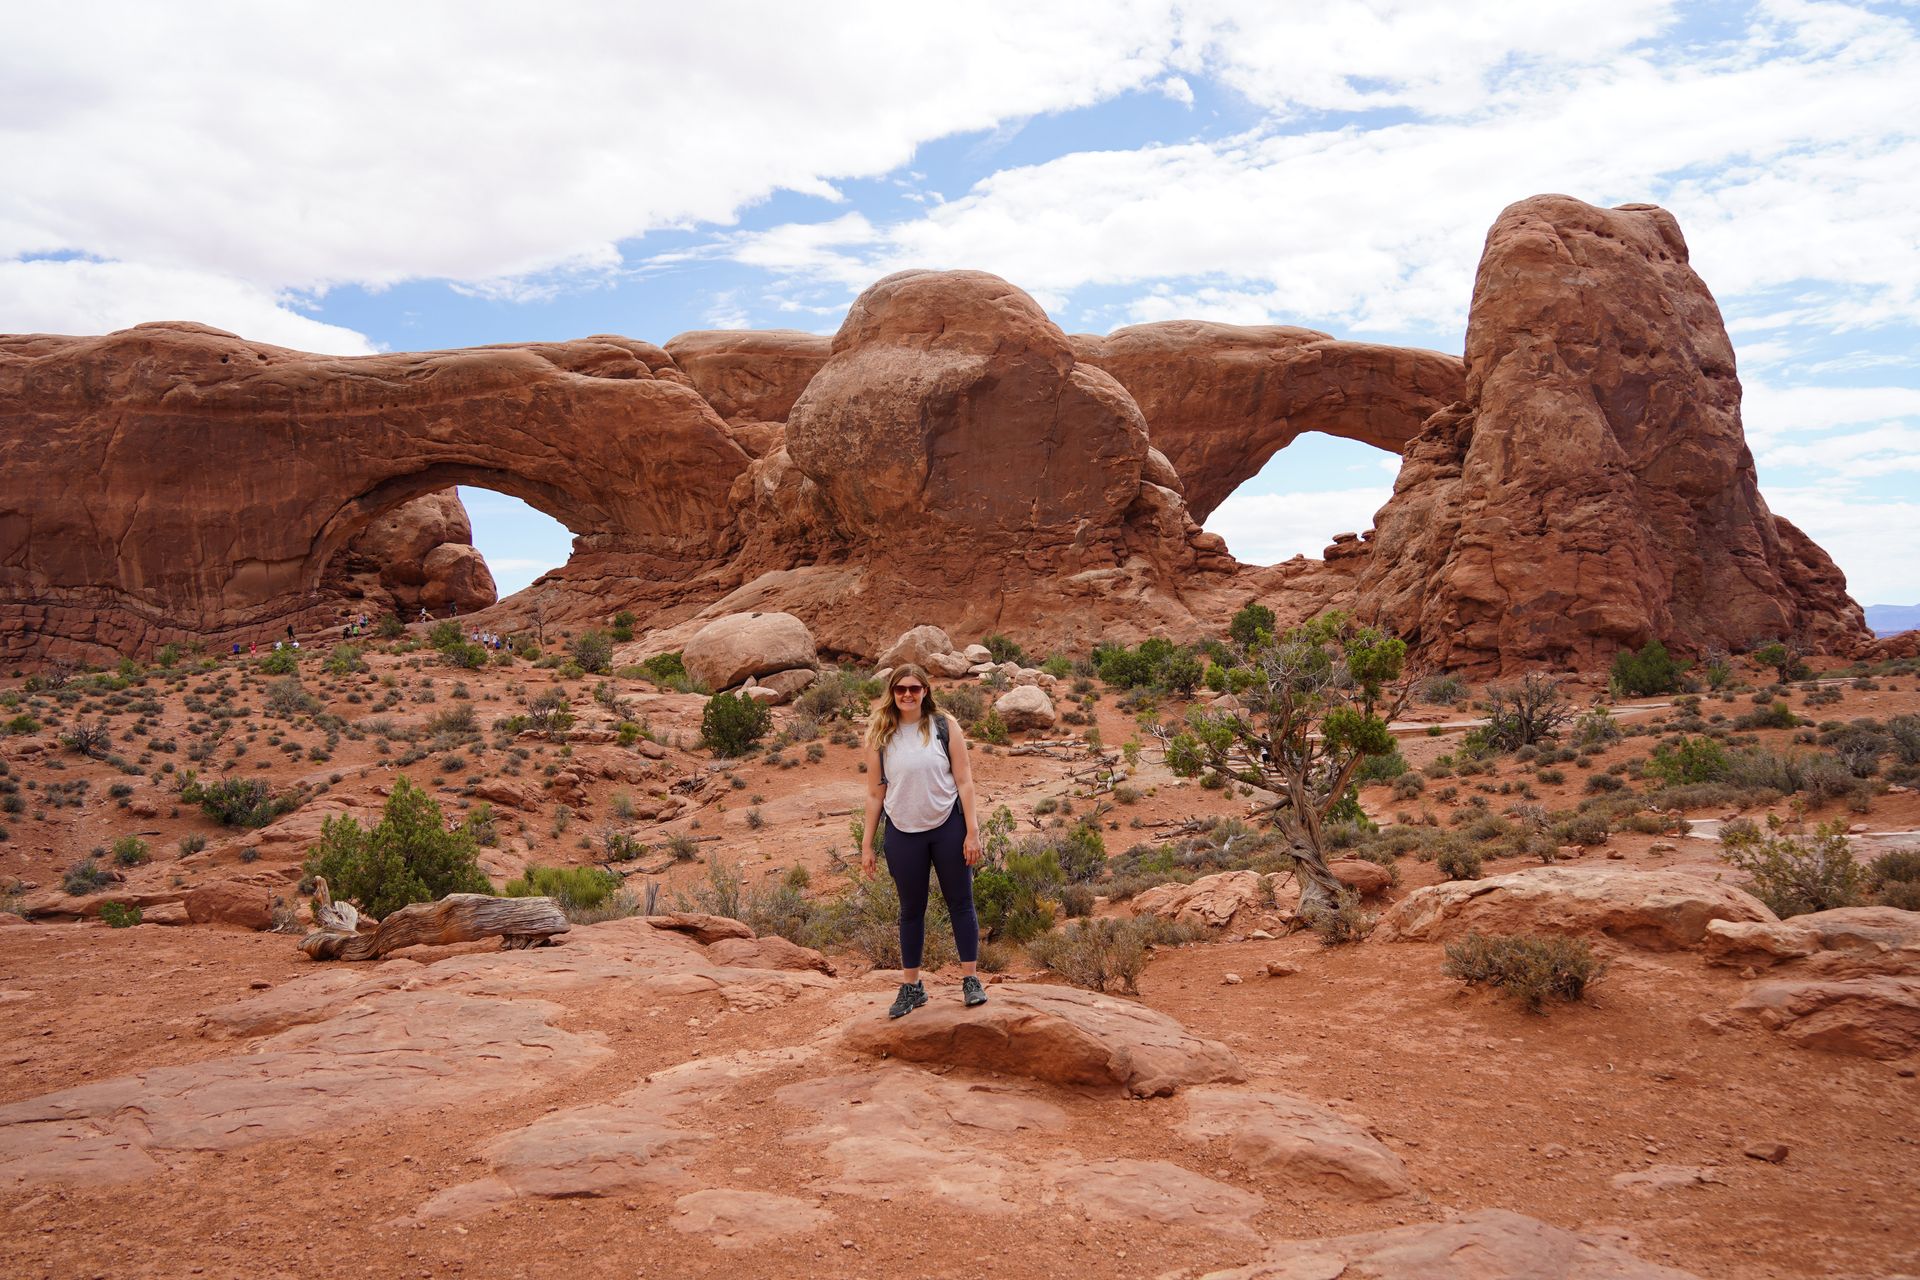
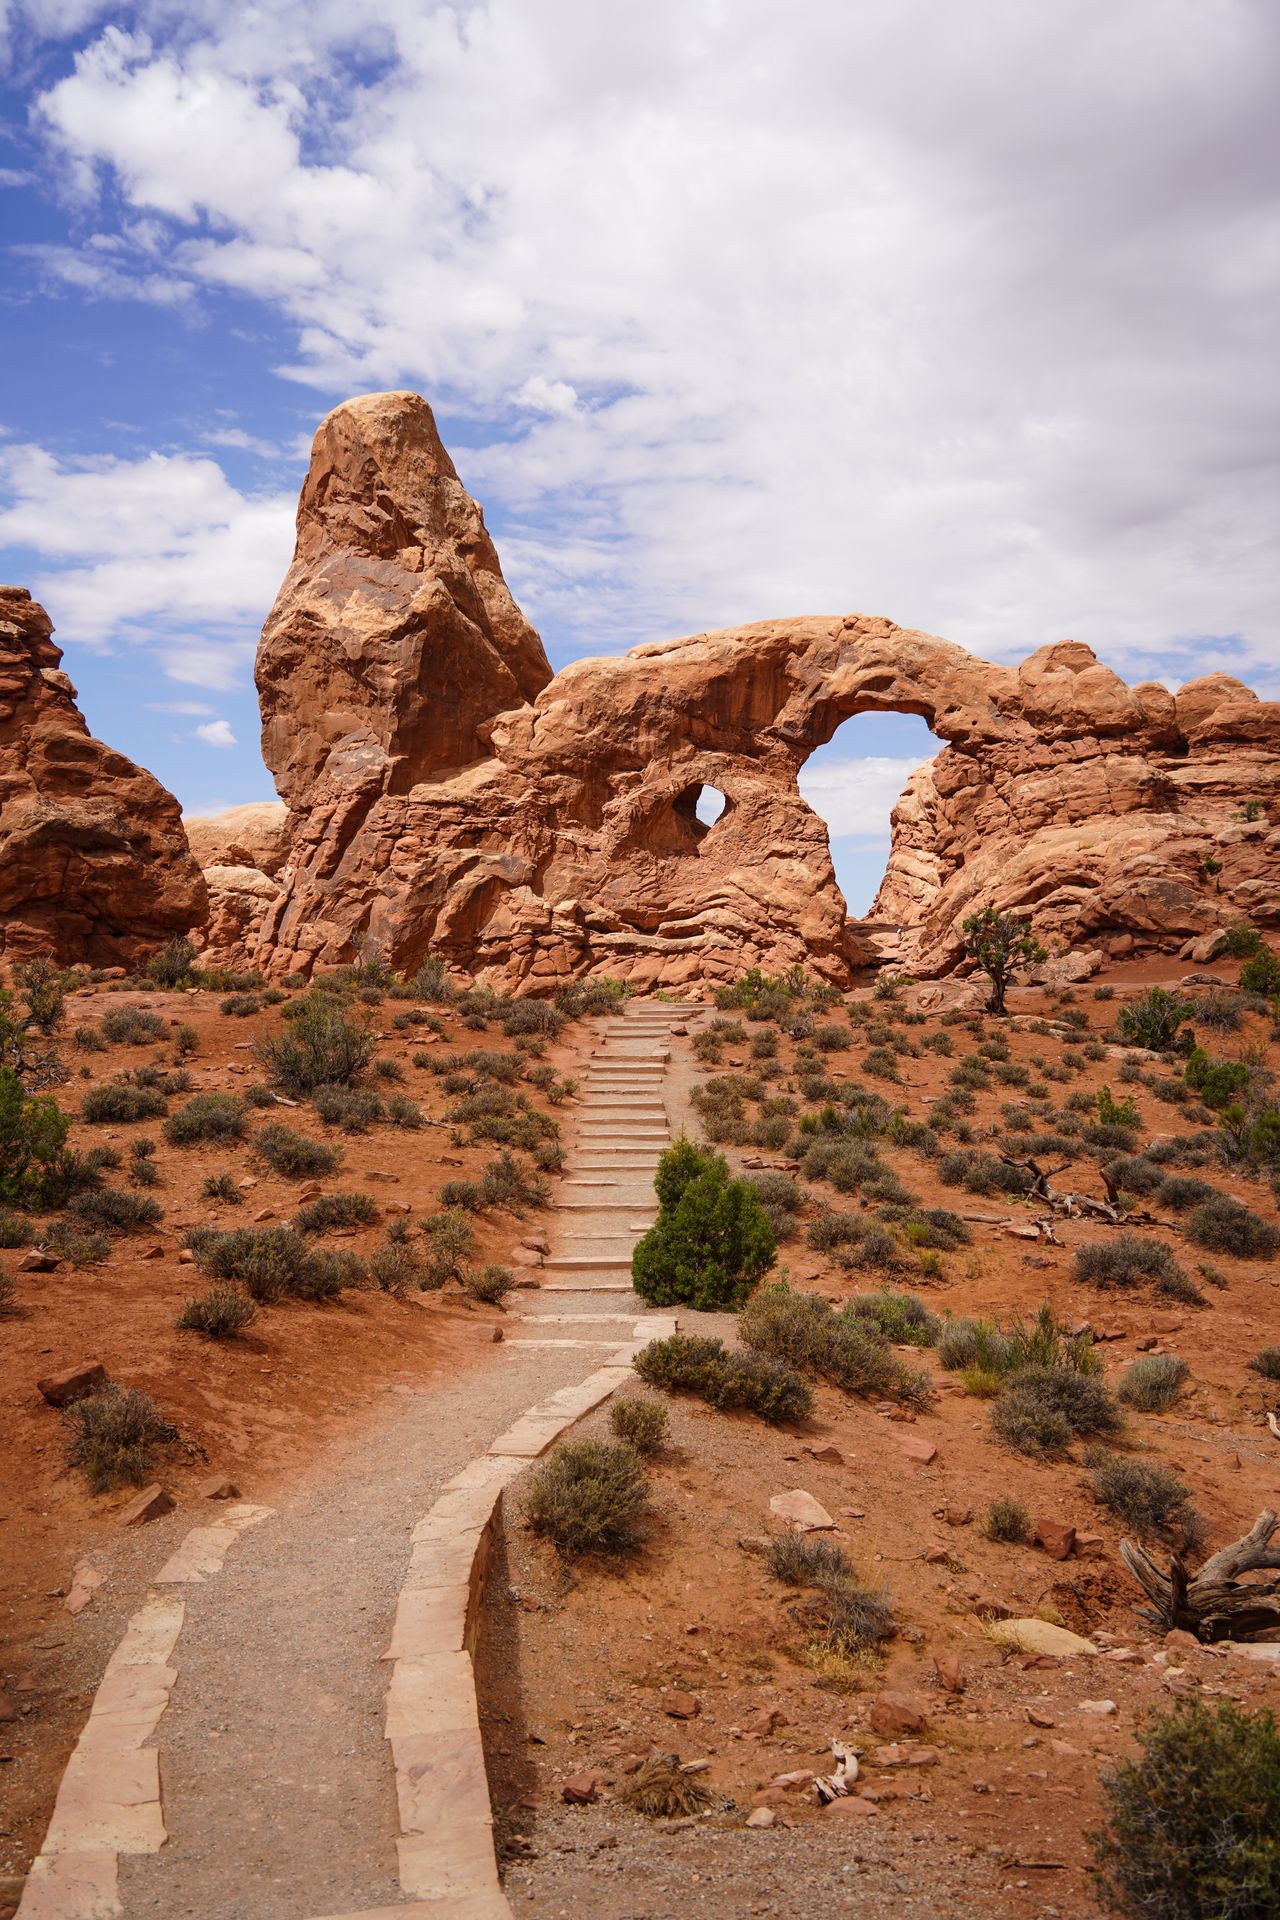
I recommend getting an early start and exploring one or two (or maybe more) of the short hikes in Arches. Two short trails that you can’t miss are the Window Loop and Turret Arch trail and the Double Arch.
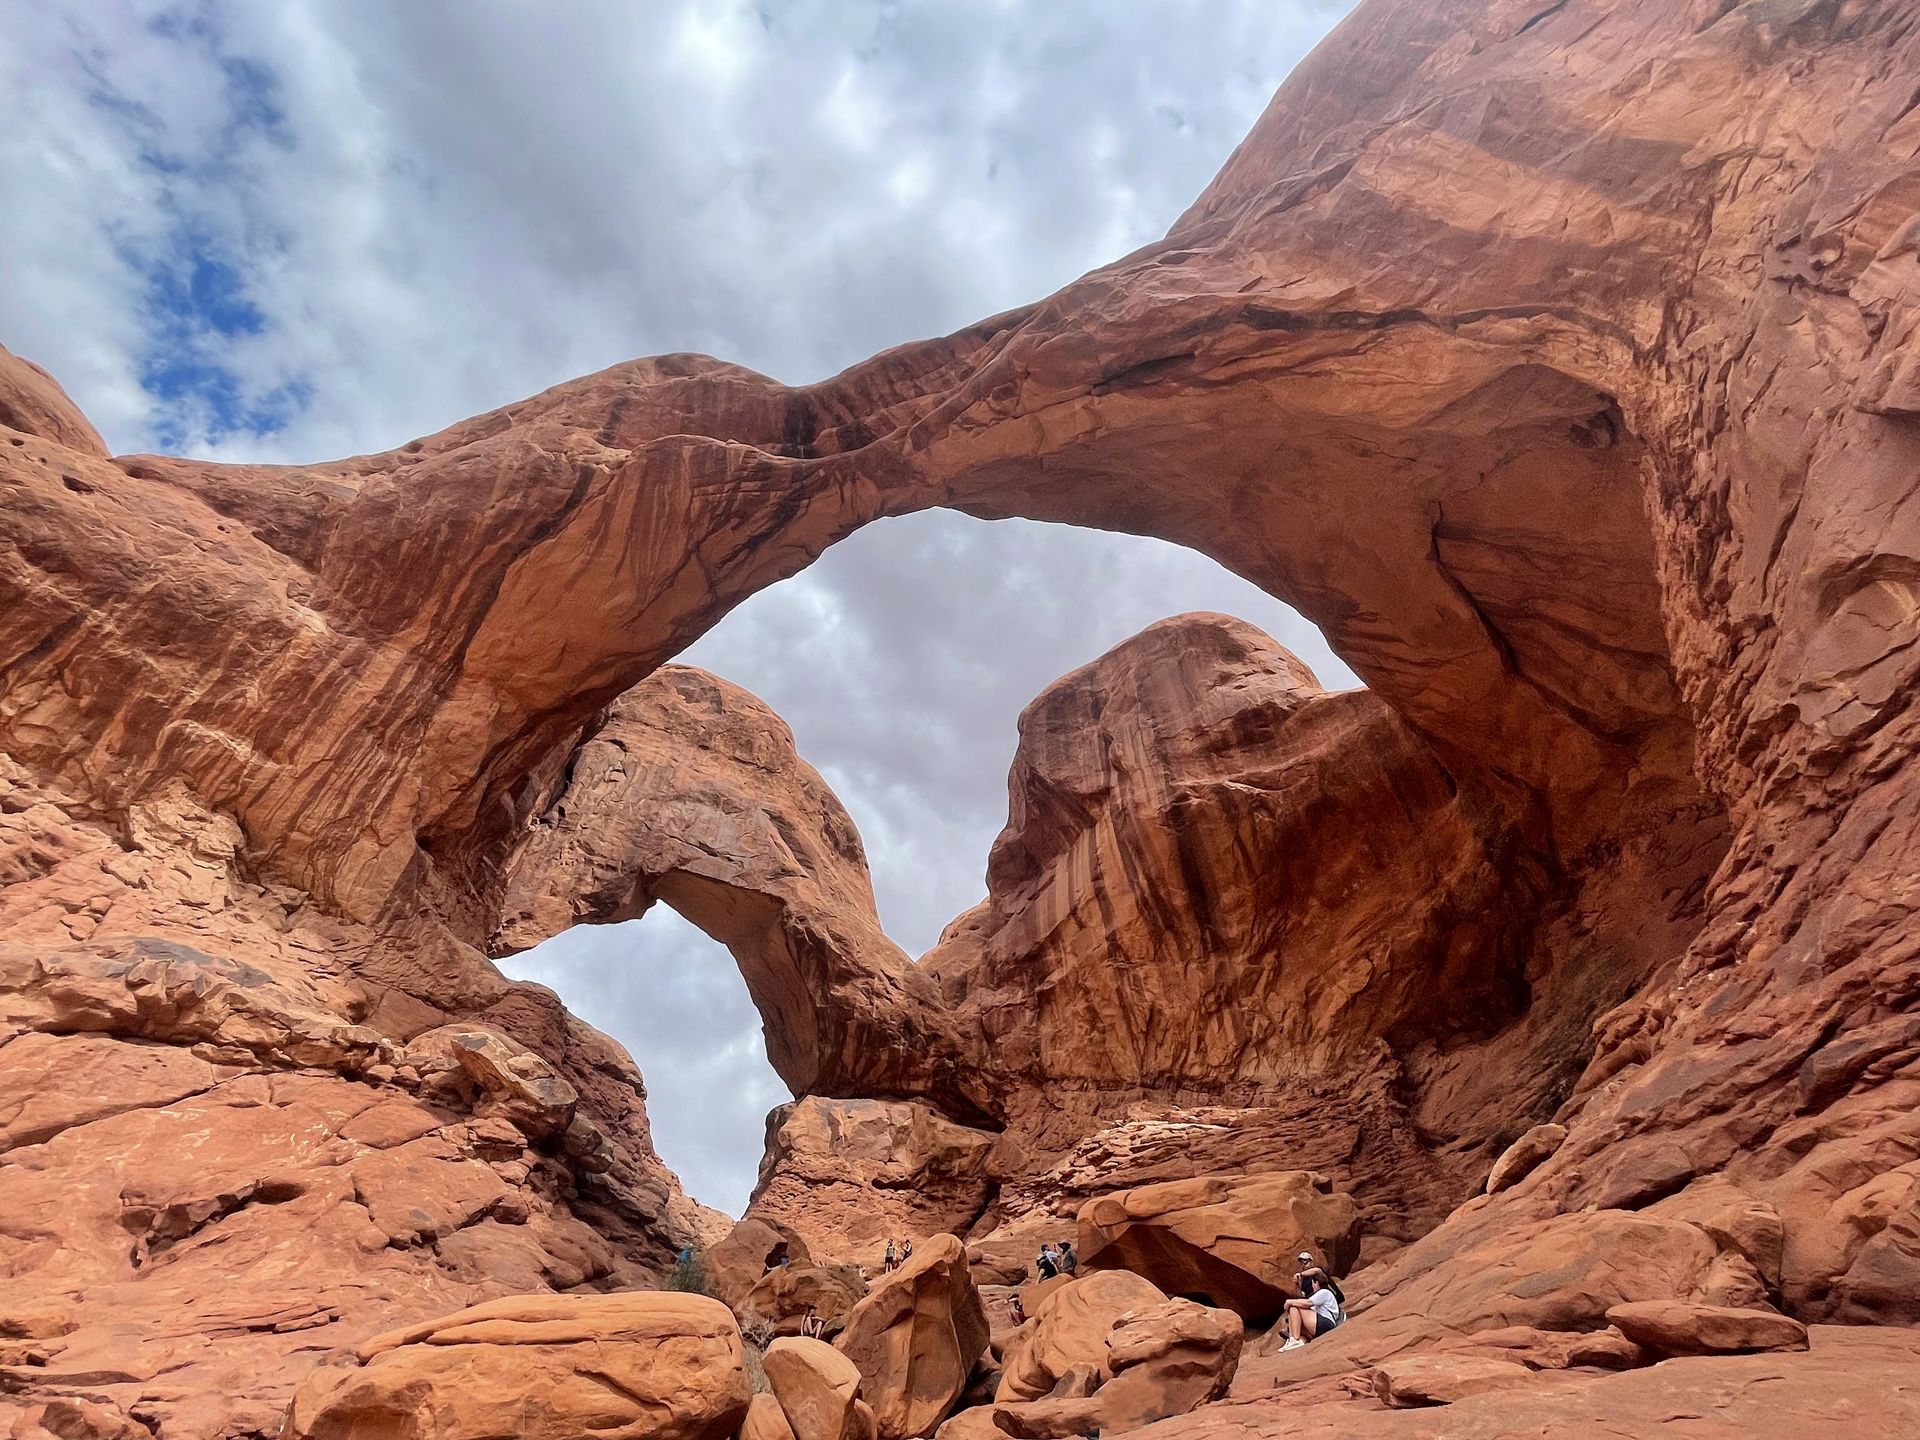
Double Arch is one of the most iconic arches in the park. You’ll get to see two arches that extend from the same foundation. It is an easy half mile round trip to reach this arch (you can see it from the parking lot).
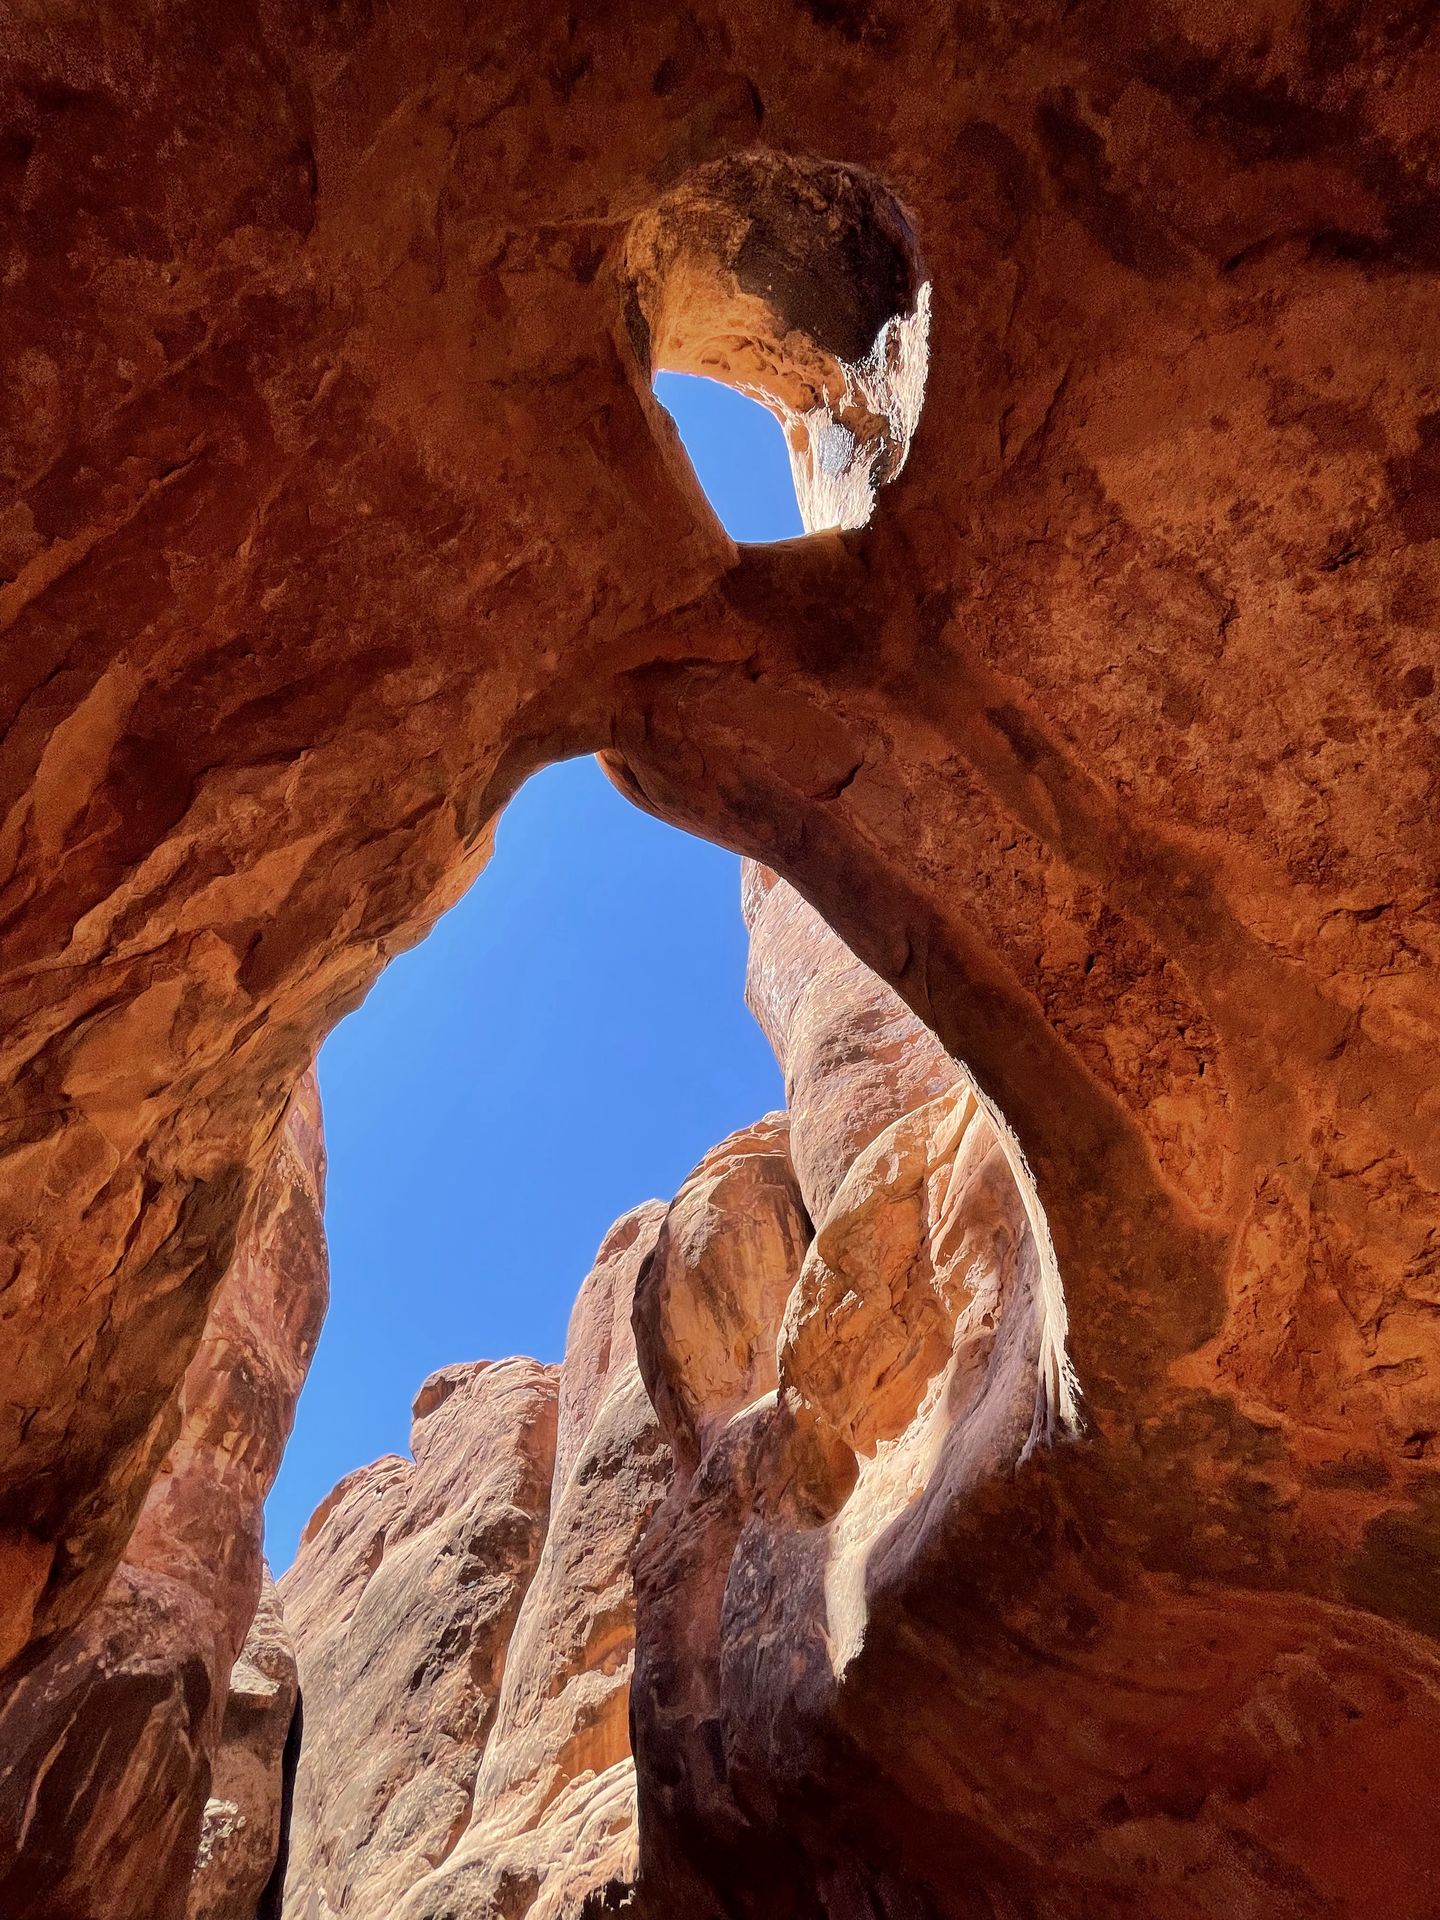
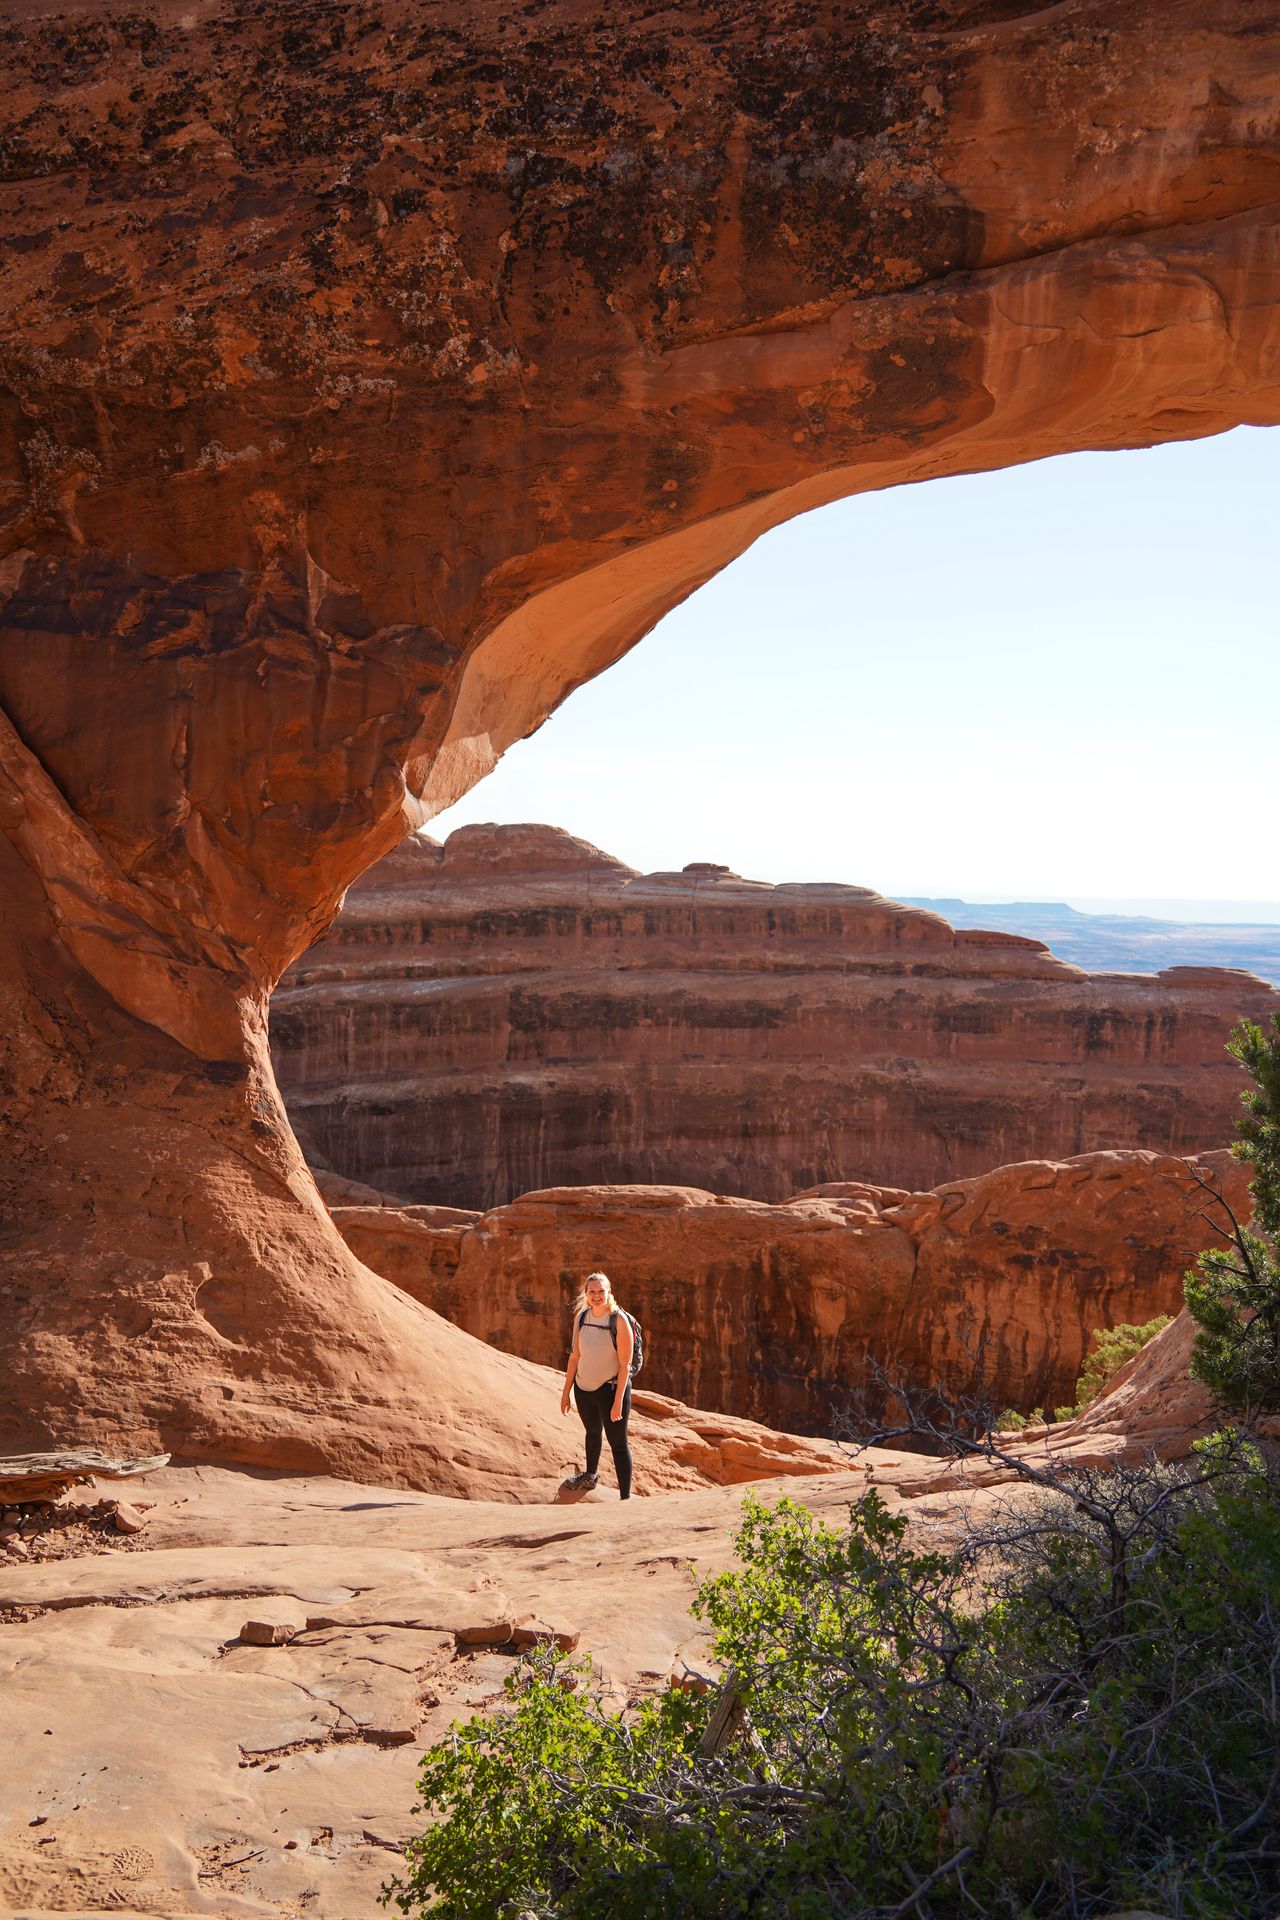
The Window Loop and Turret Arch trail is a quick walk to see an arch that resembles a giant turret and two large windows in a rock face. Most people walk to the arches and then turn around. However, you can loop behind the windows and back to the parking lot via an easy primitive trail. This creates a 1.2 mile hike and you’ll find much fewer people behind the windows.
The Double Arch and Window Loop trails start from the same parking area and you can walk between them without moving your car.
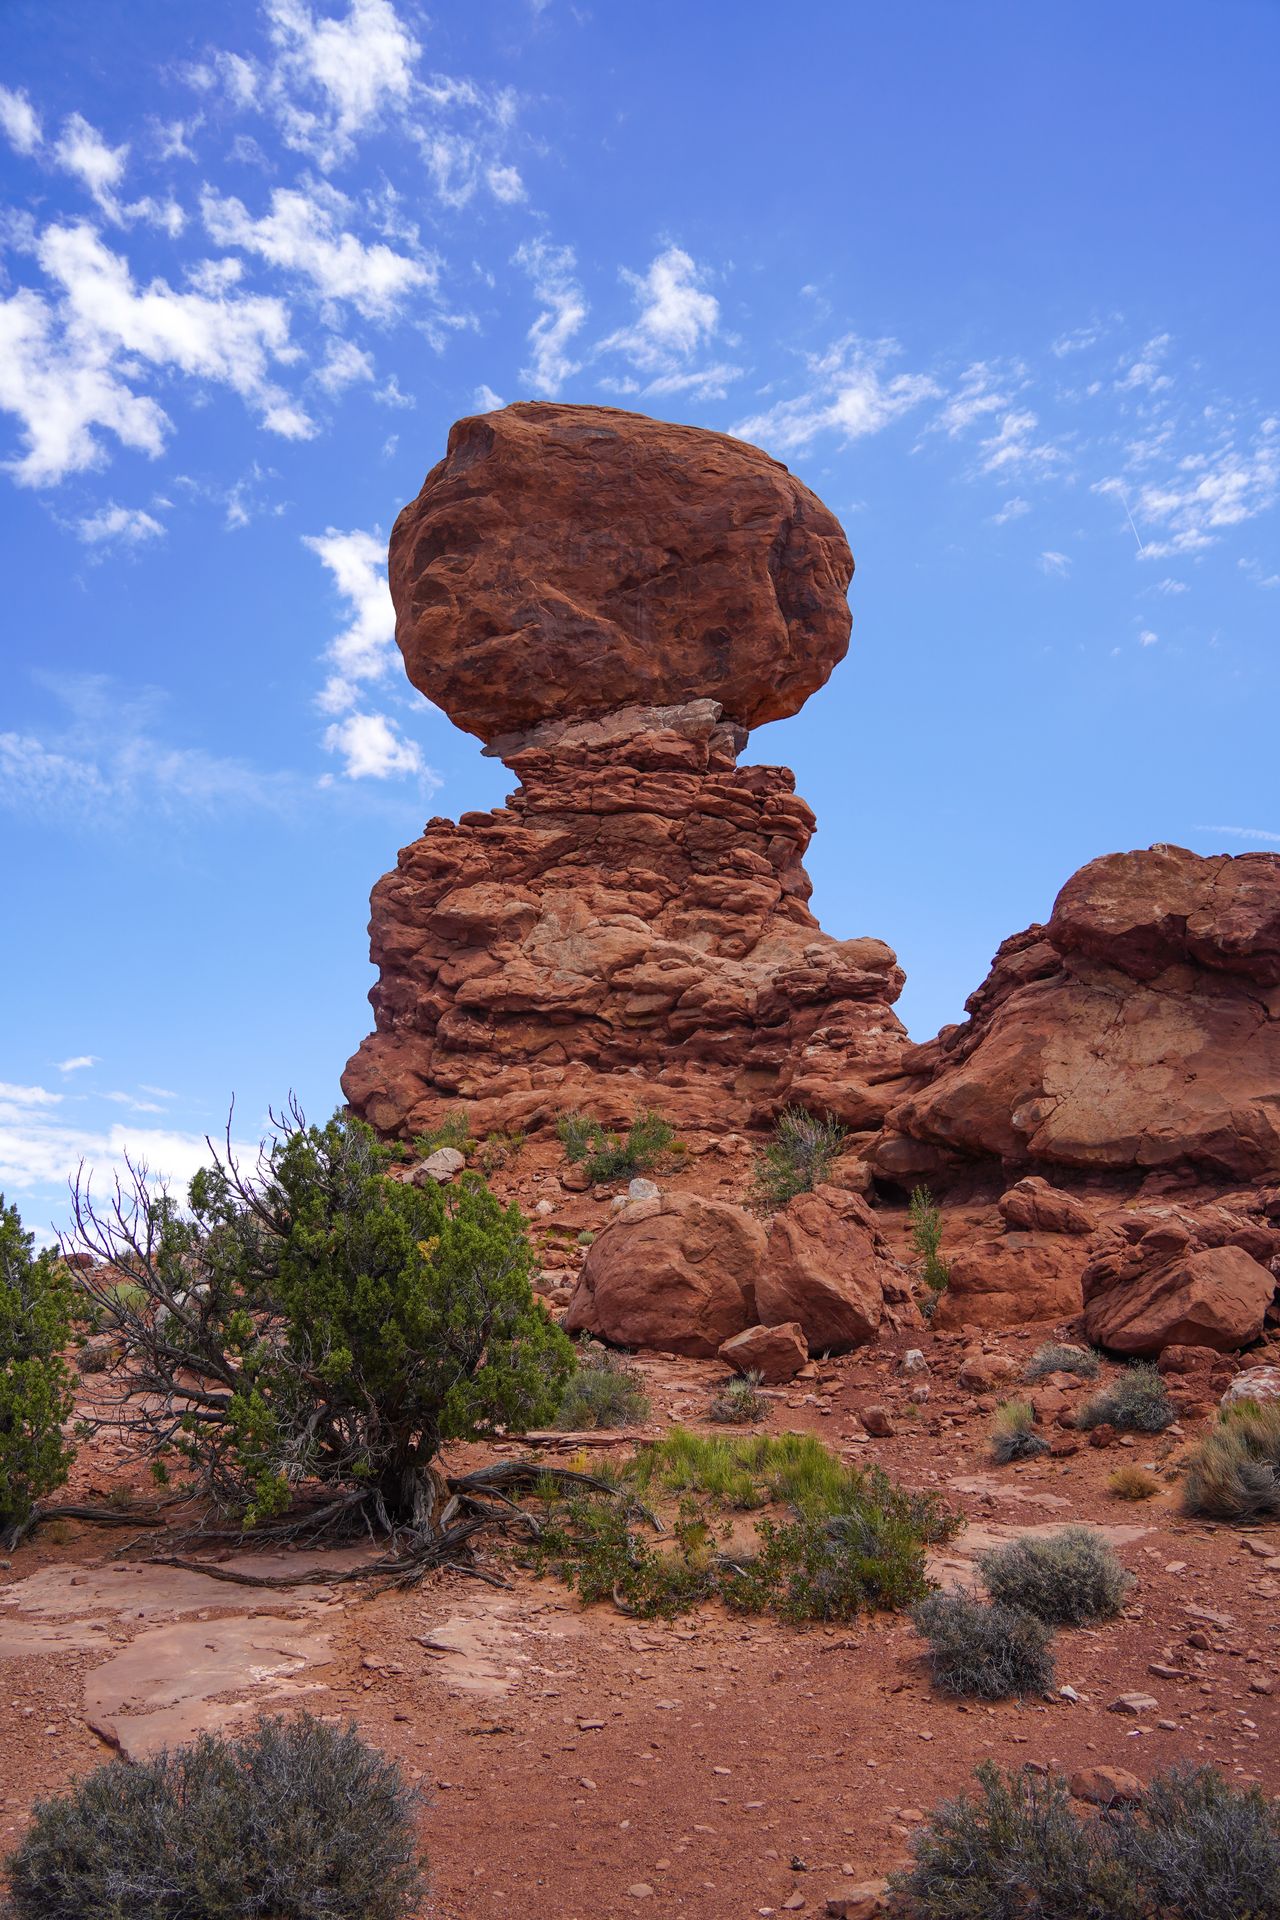
As you’re driving to or from the Windows and Double Arch, make a stop at the Balanced Rock. This rock formation is 128 feet tall and looks as if a giant rock is balancing on top of a smaller platform. You can walk all the way around the Balanced Rock on an easy trail that is less than half a mile.
Quesadilla Mobilla
After some warm-up trails, head to Moab for lunch!
Quesadilla Mobilla is a food truck that serves all manner of different quesadillas! I enjoyed the sweet and spicy quesadilla that included sweet potatoes, black beans, peppers, spinach and more. It was bursting with flavor and I really appreciated that they have first class vegetarian options.
If quesadillas aren’t your thing, this food truck is neighbors with the Moab Food Truck Park, which has a ton of options to choose from.
Pick up permit for Fiery Furnace
As you’ll see on day two, I recommend a permitted backcountry hike in the Fiery Furnace, a very unique and special “trail” in Arches. If you do get a permit, it’s worth taking the time to pick it up the day before your entry at the Moab Information Center in town. You will need to watch a video and answer some questions to receive the permit from the ranger.
UTV Tour
Moab offers some of the best OHV (Off Highway Vehicle) trails in the country! The most popular route is Hell’s Revenge, a slickrock trail that includes steep climbs and descents, drop offs and rock obstacles. I went on a tour with High Point Hummer where we got to drive our own UTVs while following the guide.
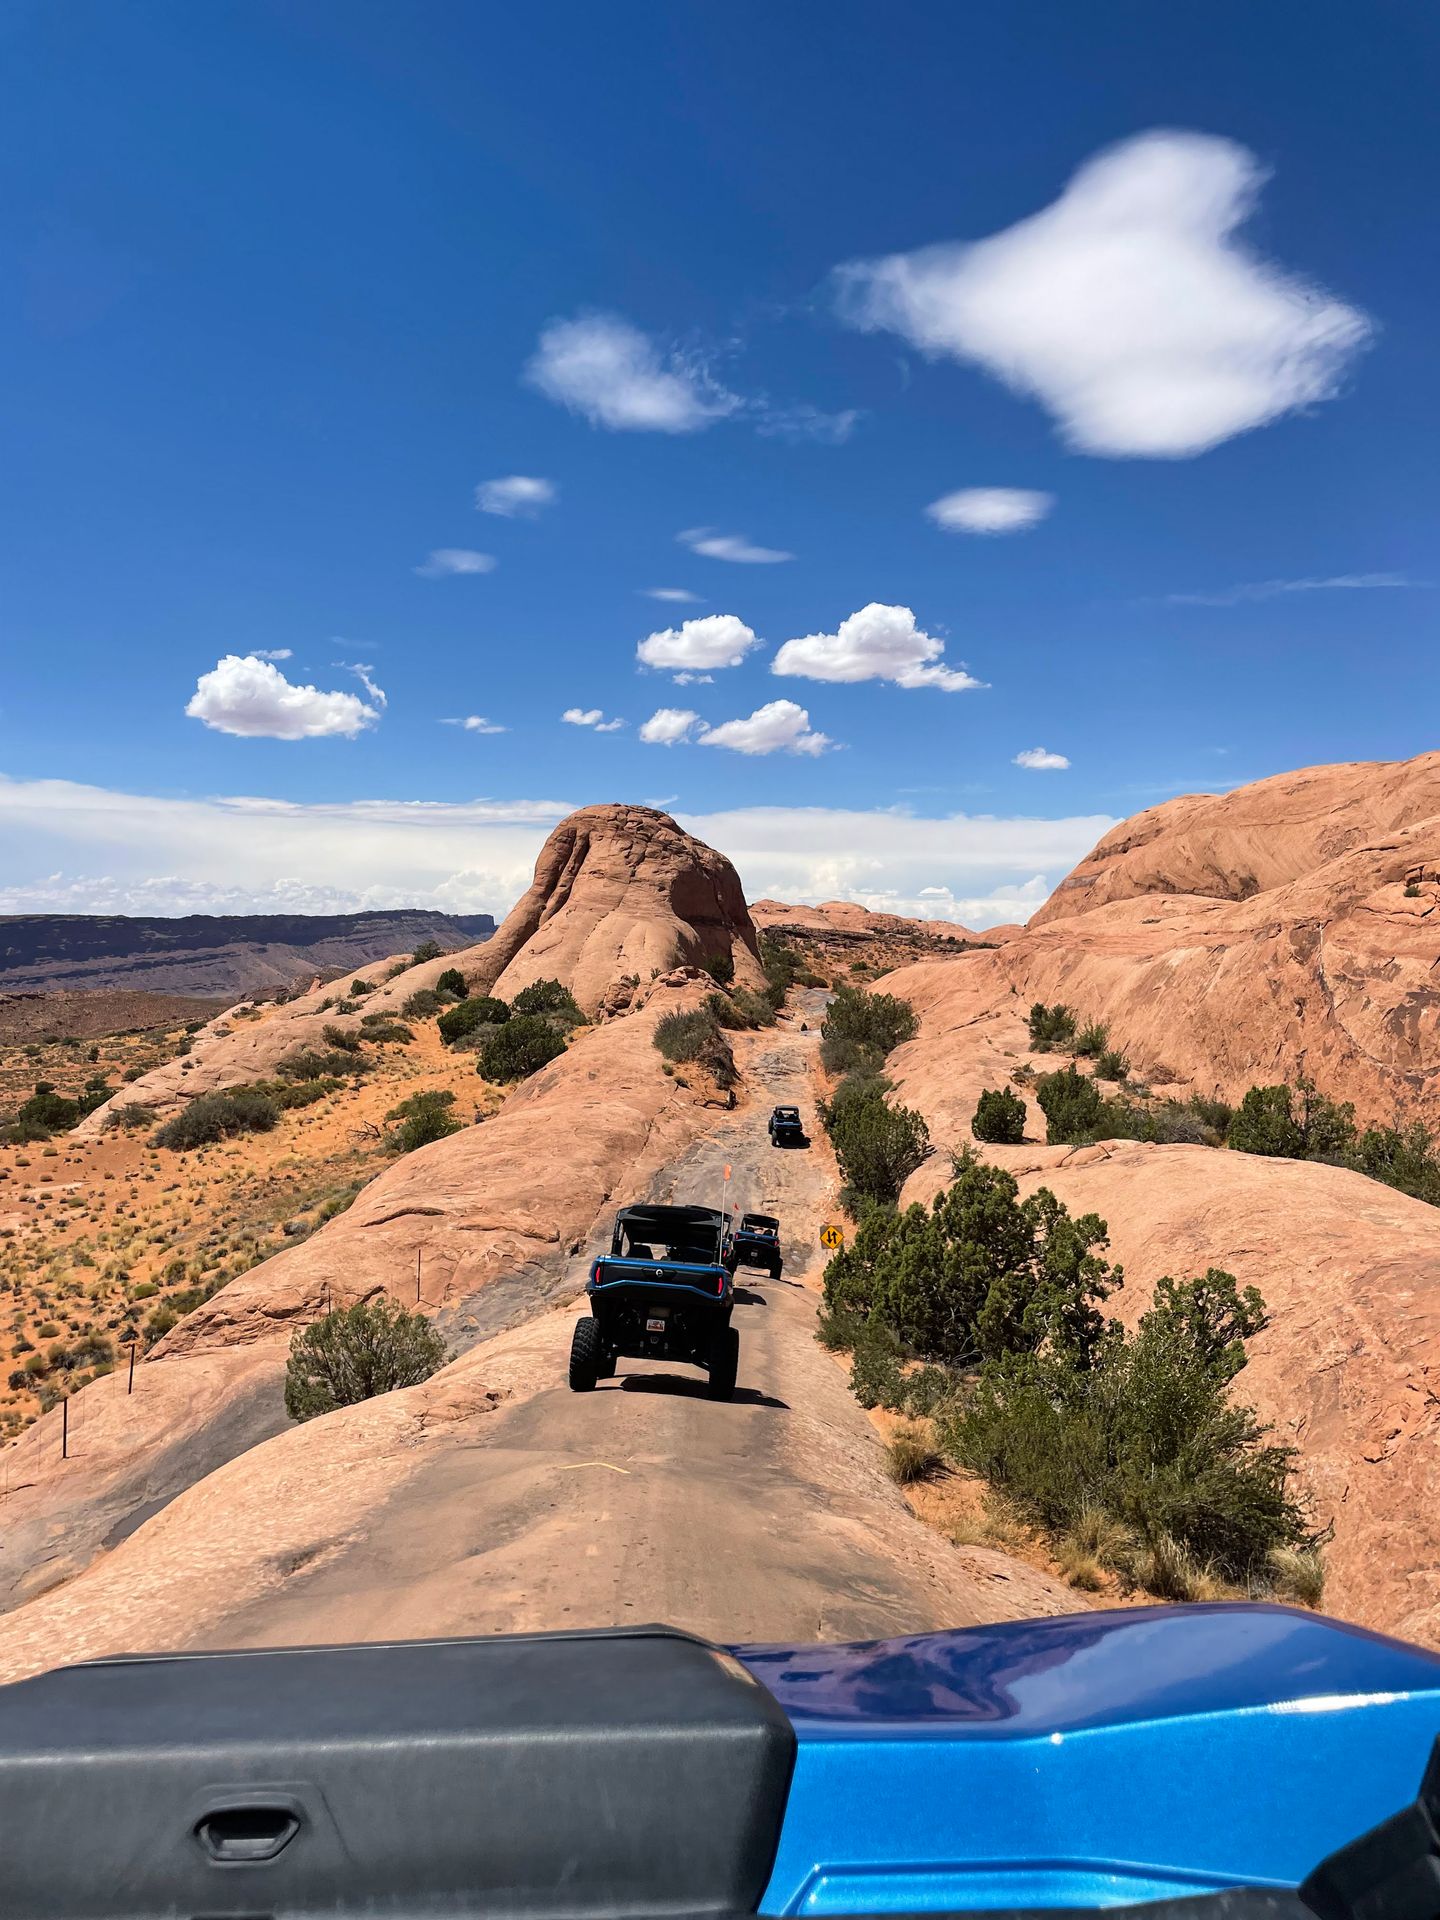
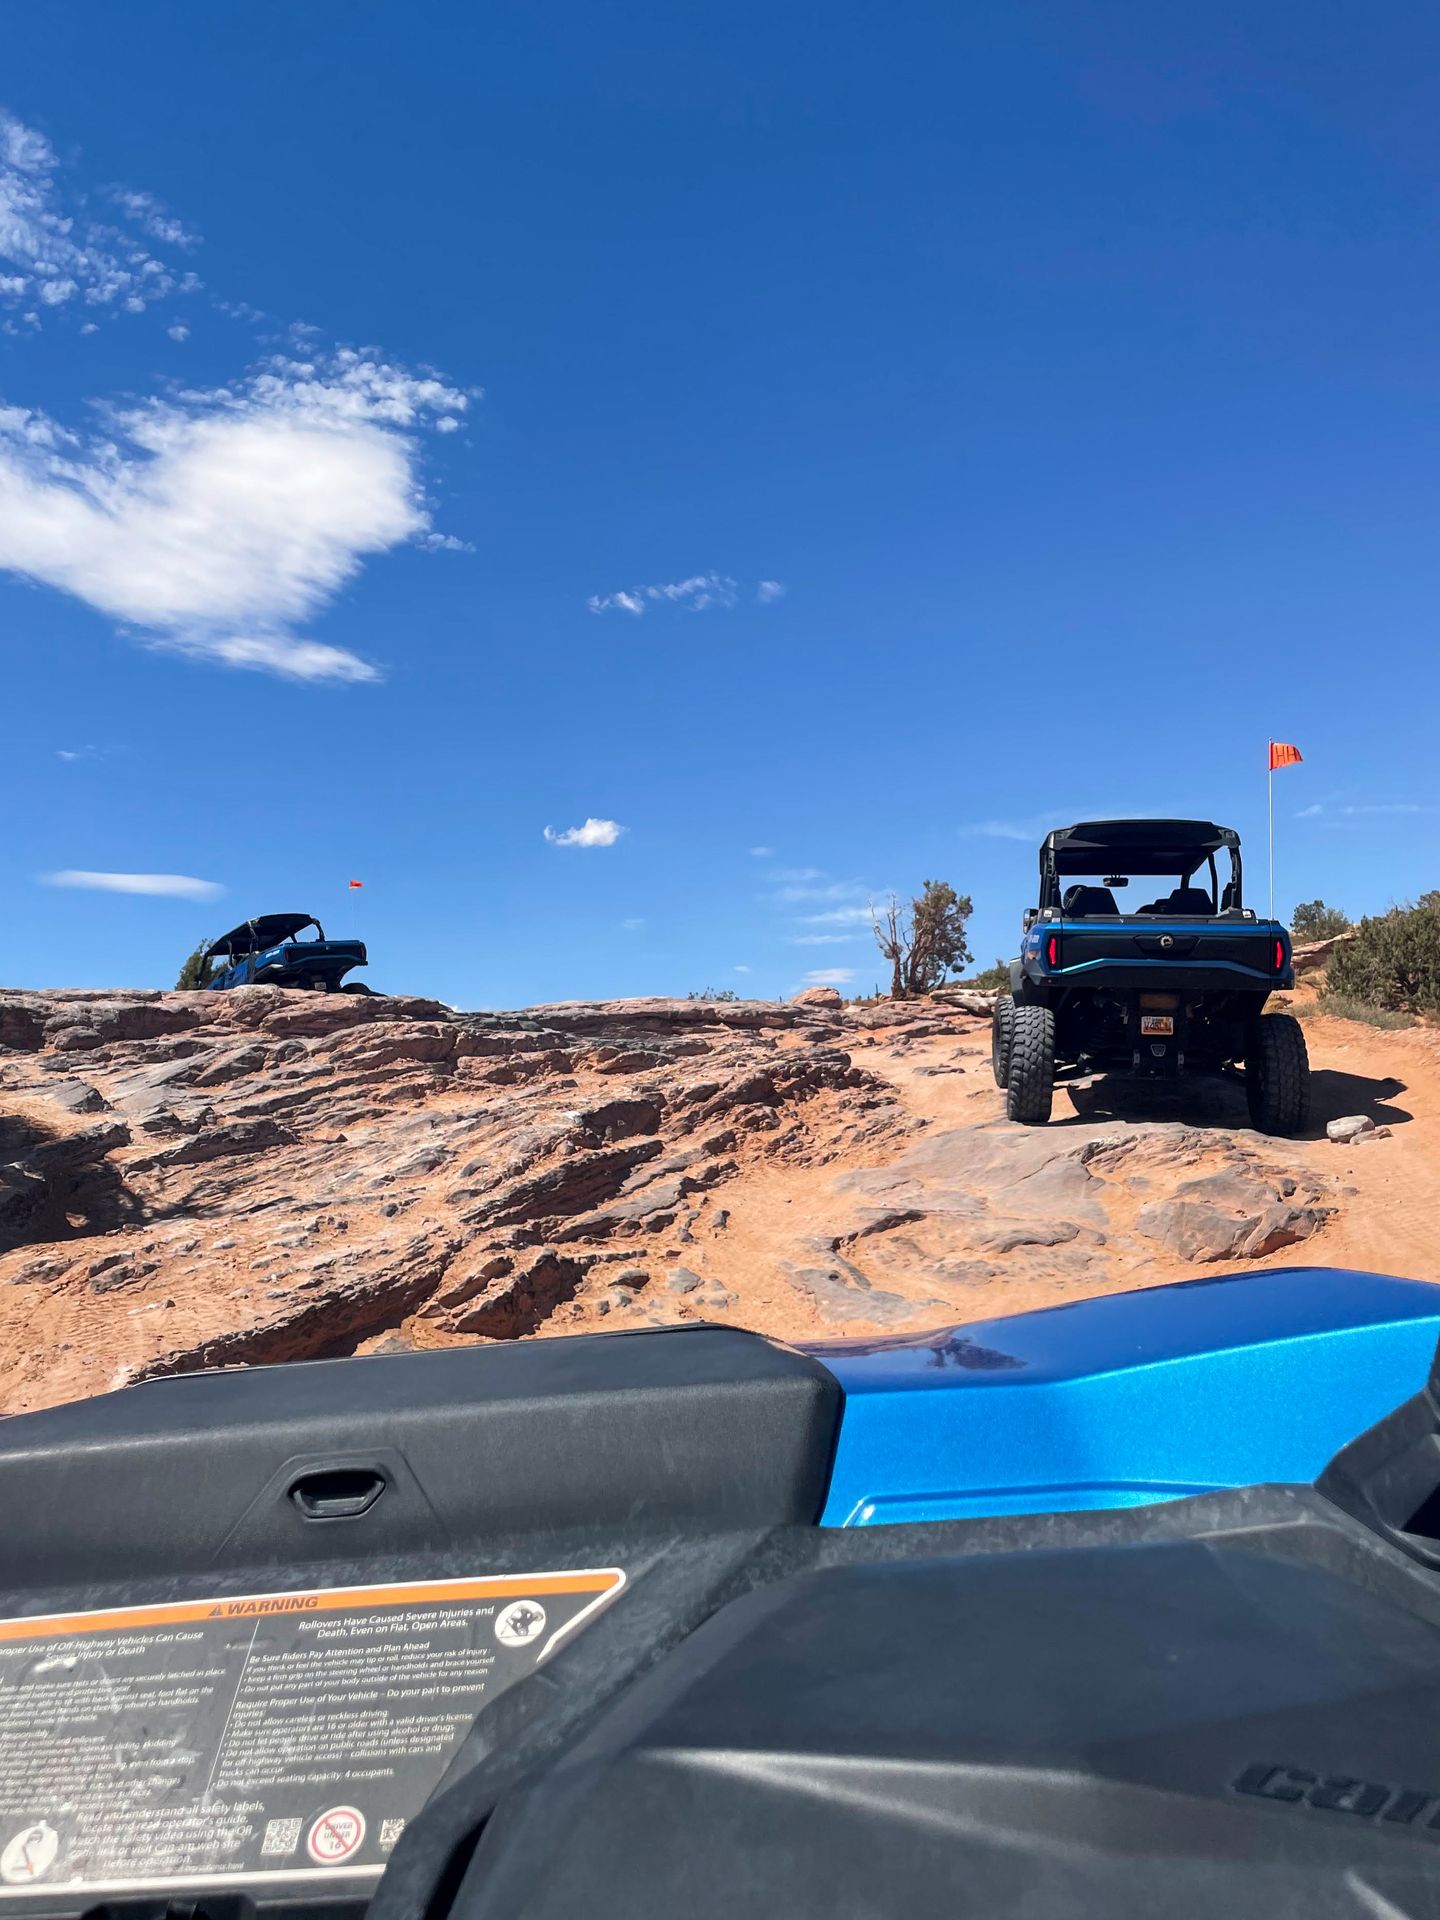
The trail had beautiful views and it was a blast to maneuver over the hills and giant boulders. You start out strong by climbing a steep hill with drop offs to begin the trail. There is no experience required to go on our guided tour (it was our first time!), just be sure to listen carefully to the instructions from your guide.
About halfway through the tour, we had the chance to get out and enjoy a great view of the Colorado River. Towards the end of the journey, we made a stop to see several dinosaur tracks preserved in the rocks. The tracks are millions of years old!
If driving your own UTV sounds intimidating, there are also options in Moab for Jeep tours as a passenger too. Either way, it’s worth making some time in Moab to explore the off roading terrain.
Antica Forma
Antica Forma is a must visit in Moab if you love pizza! They serve a variety of wood fired pizza options along with pasta, salads, appetizers and more. I really enjoyed the provola pizza with buffalo mozzarella, fresh basil and pecorino romano. The pizza crust was perfectly baked and the ingredients were fresh and flavorful.


The restaurant has both indoor and patio seating and I was seated quickly on a Friday night. This is a gem in Moab whether you are looking for take out or a nice sit down meal after an adventurous day.
Day Two in Moab
Hike in Arches, have lunch in Moab, explore Canyonlands and watch the sunset at Dead Horse Point State Park.
Delicate Arch
Start your second day in Moab with the most iconic hike in Arches: Delicate Arch. This is the arch on the Utah license plate! The arch is popular for a reason and epic to see up close.
The opening of the arch is 46 feet tall and its the largest freestanding arch in Arches National Park. This trail is great for sunrise because it allows for beautiful lighting on and behind the arch.
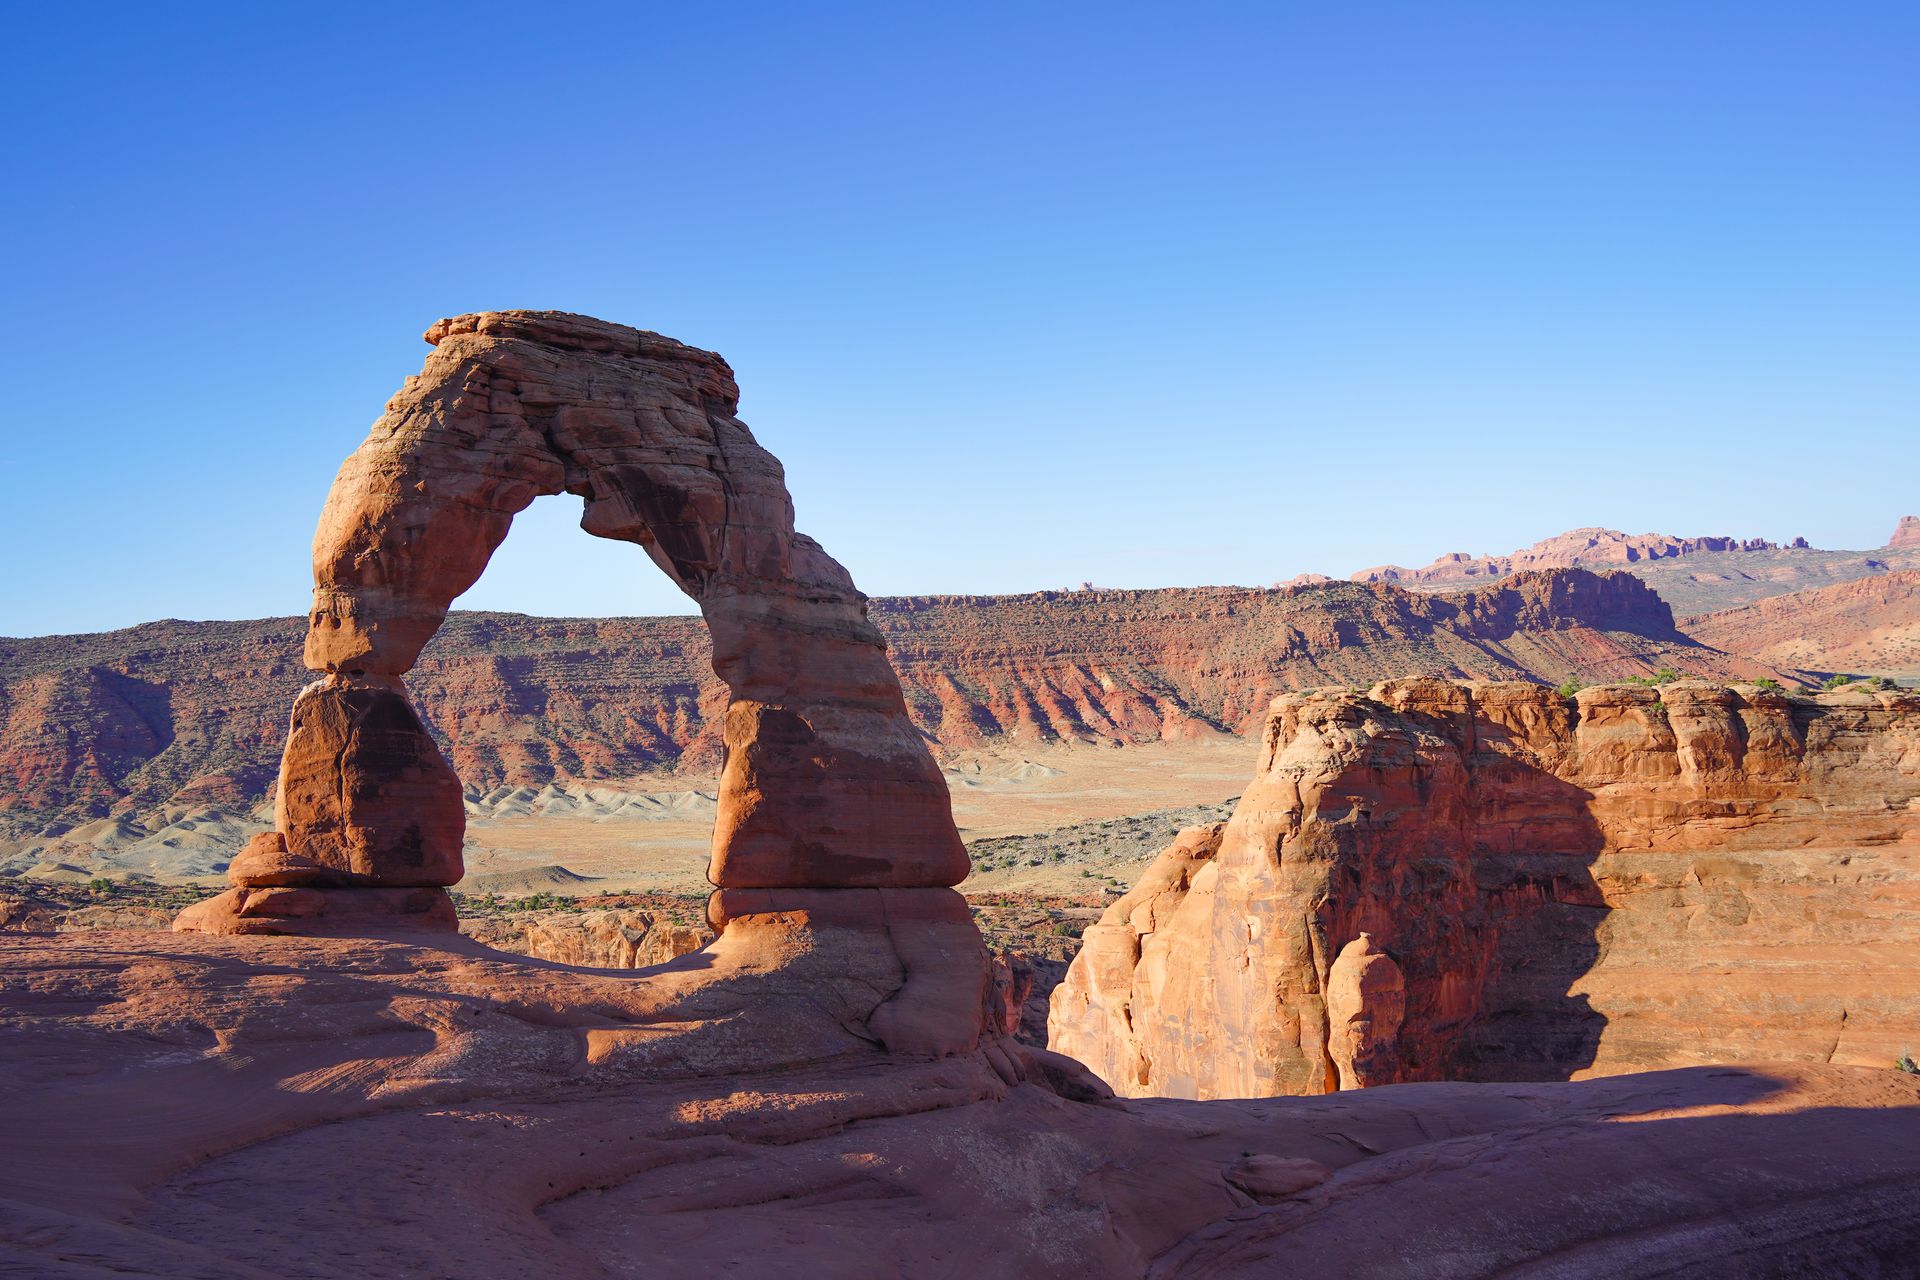
No matter when you go, do not expect to have this trail to yourself. It gets very busy. The parking lot can also fill up during busy times, so you may want to have a back up plan.
The trail to reach the arch is 3.2 miles and has a little over 600 feet of elevation gain. You will be hiking up a steep section of slickrock during the second part of the trail, so be prepared with plenty of water and proper hiking shoes. You will want your shoes to be able to grip the rocks!
The hardest part is the steep section. At the very end, you will walk on a ledge that has a bit of drop off as you approach the arch. When you reach the arch, you can walk up to it and take a photo underneath it.
At the start of the trail, there is a spot to see petroglyphs and a log cabin. The petroglyph rock art panel was created sometime between A.D. 1650 and 1850, while the log cabin was built in the early 1900’s. It is worth taking in this bit of history after your hike to Delicate Arch.
Down the road from Delicate Arch, there is another parking area with a viewpoint of Delicate Arch from a distance. This is a great option to see the arch if you’re unable to take the main trail.
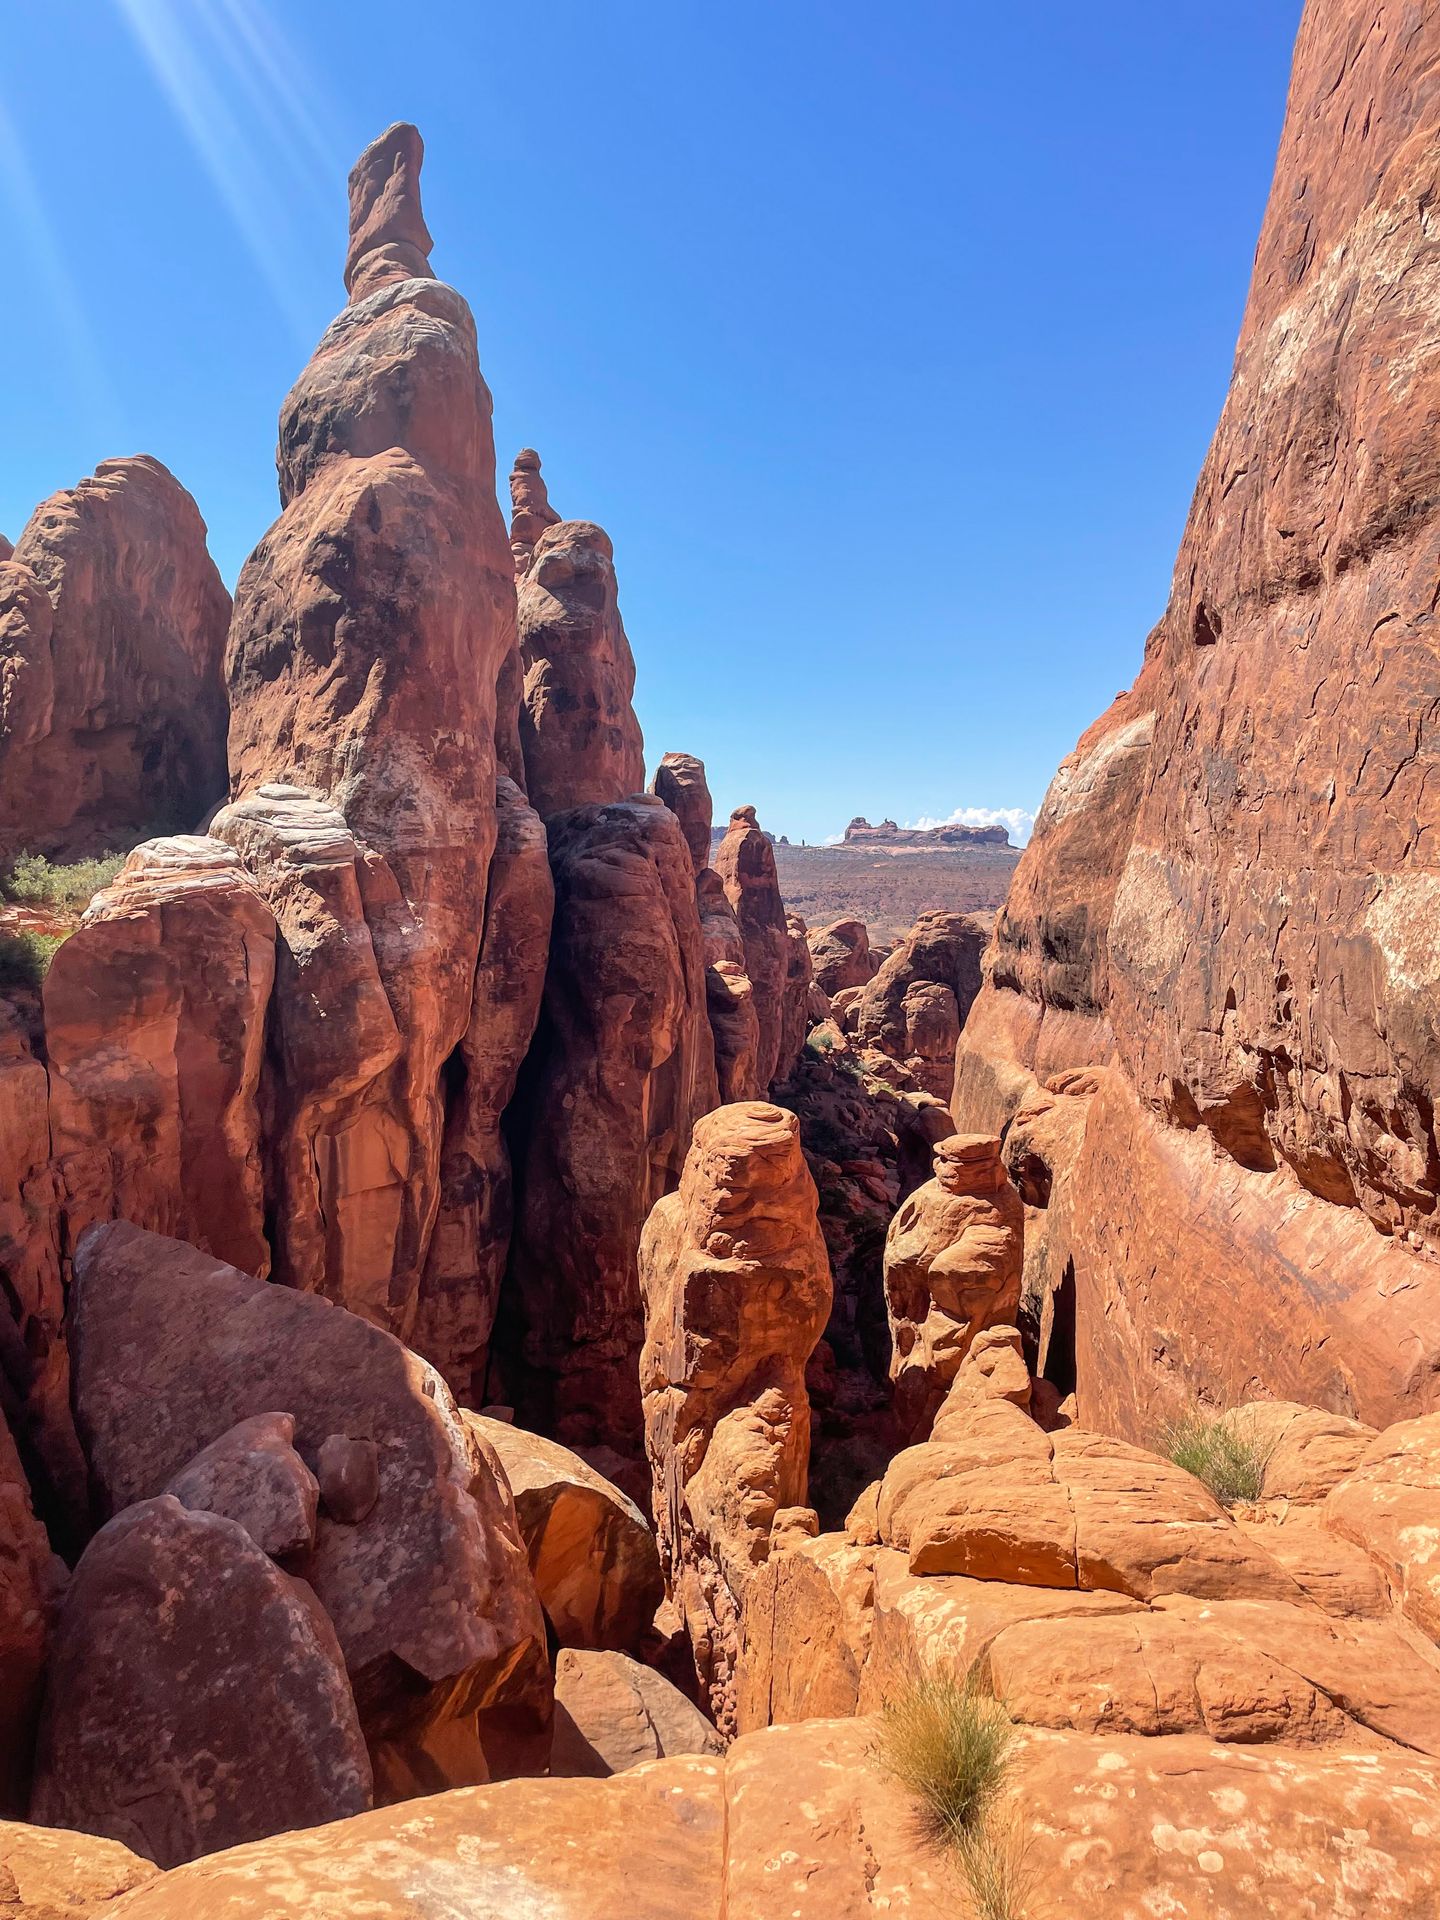
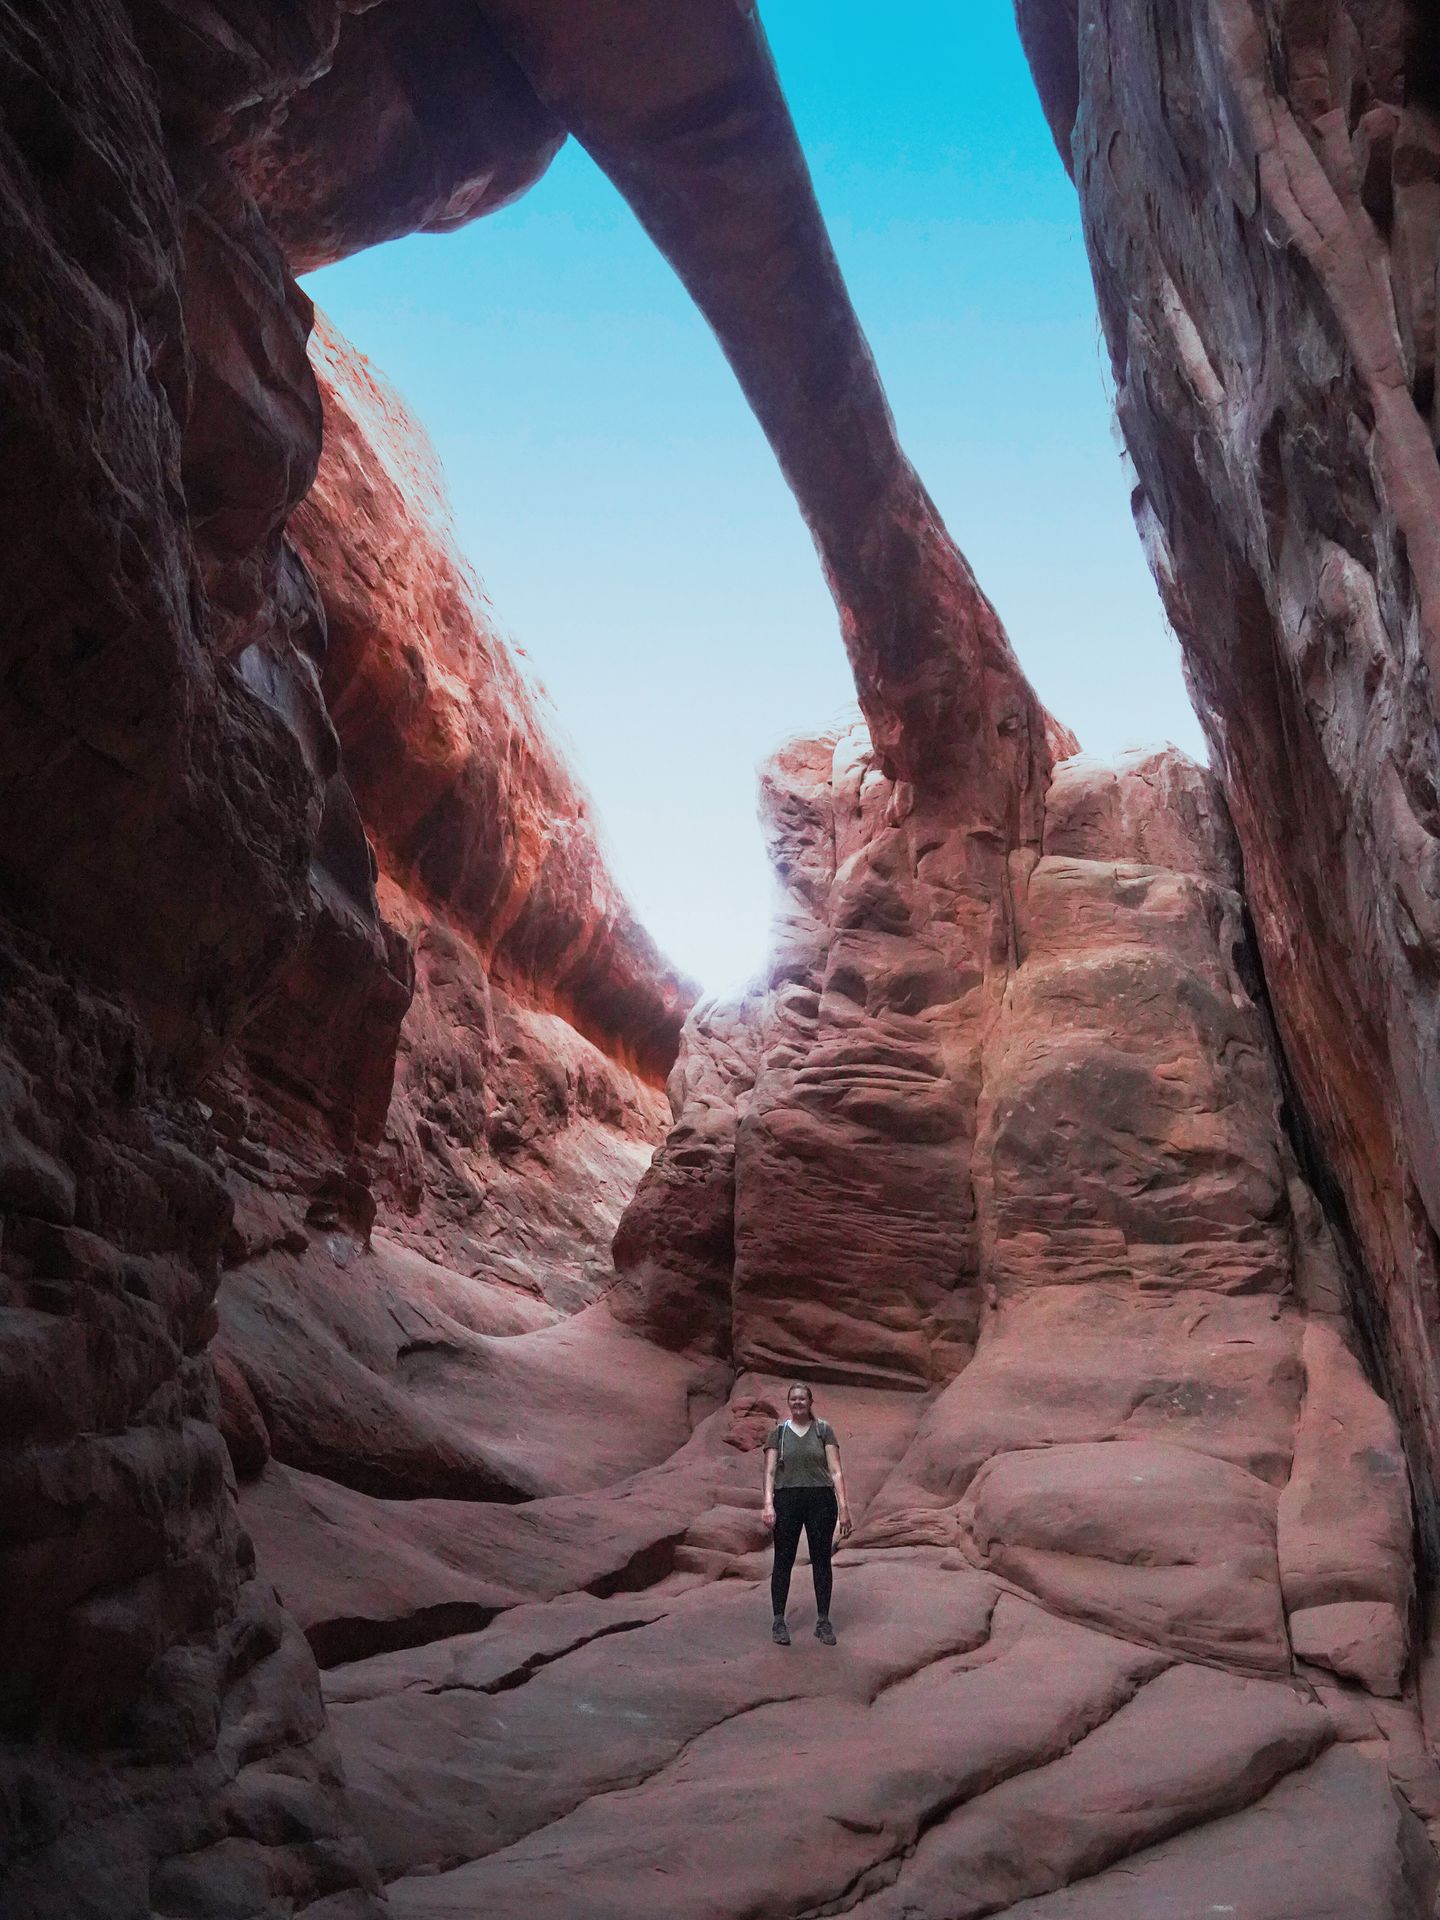
Fiery Furnace
The Fiery Furnace is an incredible maze of towering orange rock faces. It is very easy to get turned around in this fragile area, so the park service has implemented a permit system for entry. Self-guided permits go on sale a week in advance and can go quickly, so be sure to log on right when they go on sale if you want to explore this area.
I would only recommend the self-guided trail for experienced hikers. If you are newer to hiking, the park service also leads guided tours of Fiery Furnace!
If you were able to obtain and pick up a permit to hike Fiery Furnace self-guided, head there after the Delicate Arch! The Fiery Furnace doesn’t get as hot or crowded as Delicate Arch, so you don’t necessarily need to rush to do it first thing in the morning.
Fiery Furnace is special because you can explore wherever you would like, as long as you only travel on rock and sand and do not disturb any cryptobiotic soil crust. While you can explore freely, I followed the main loop and the AllTrails map for my first visit.
Most people take the loop counterclockwise, which makes it easier to follow the tiny arrows that form the standard loop. I did the route clockwise and was still able to find the way. This meant that I passed several groups coming from the other way, but I didn’t feel that going clockwise took away from the experience at all.
The route that I took was 4.2 miles and included some areas of narrow passages and rock scrambling. There were a few large steps that were difficult, but overall it was a really fun trail. If you go, make sure to explore past the “dead end” signs. This is where you’ll find some incredible hidden arches!
Expect to find some very unique and beautiful features past the dead ends. Surprise Arch runs parallel to the rock wall and seems to appear out of nowhere. Skull Arch is three arches in one and resembles a skull. There is also an arch that is about 7 feet tall, and you can walk under it and discover a cave with a window. The arches, narrow passages and towering rock formations make this a stunningly unique trail.
Hiking the Fiery Furnace is a magical experience and should be on your Utah bucket list! It was my favorite part of my trip to Moab.
Sand Dune Arch
The Sand Dune Arch is a quick trail (0.3 miles) that leads to an arch surrounded by sand. The arch is inside of a small canyon, so there is often shade here. It is popular with families because kids love playing in the sand dunes. It’s worth a quick stop to see this unique spot.
If you have time, continue a half mile from the Sand Dune Arch to see the Broken Arch. This arch got its name from a little notch in the top making it look “broken”.
Skyline Arch
Skyline Arch is another very quick trail not far from Sand Dune Arch. The trail is less than half a mile with minimal elevation gain. You will approach an arch that is high up on a rock face. The arch is visible from the road, but the short short hike allows you to get a closer look.
Moab Garage Co
Head into town for lunch before spending the afternoon in Canyonlands and Dead Horse Point!
Moab Garage Co is a great spot to grab lunch in Moab. The cafe is super cute and full of colorful decor inspired by automobiles. There are signs for the Michelin man, license plates, helmets and a mix of light colored wood and white tiles.
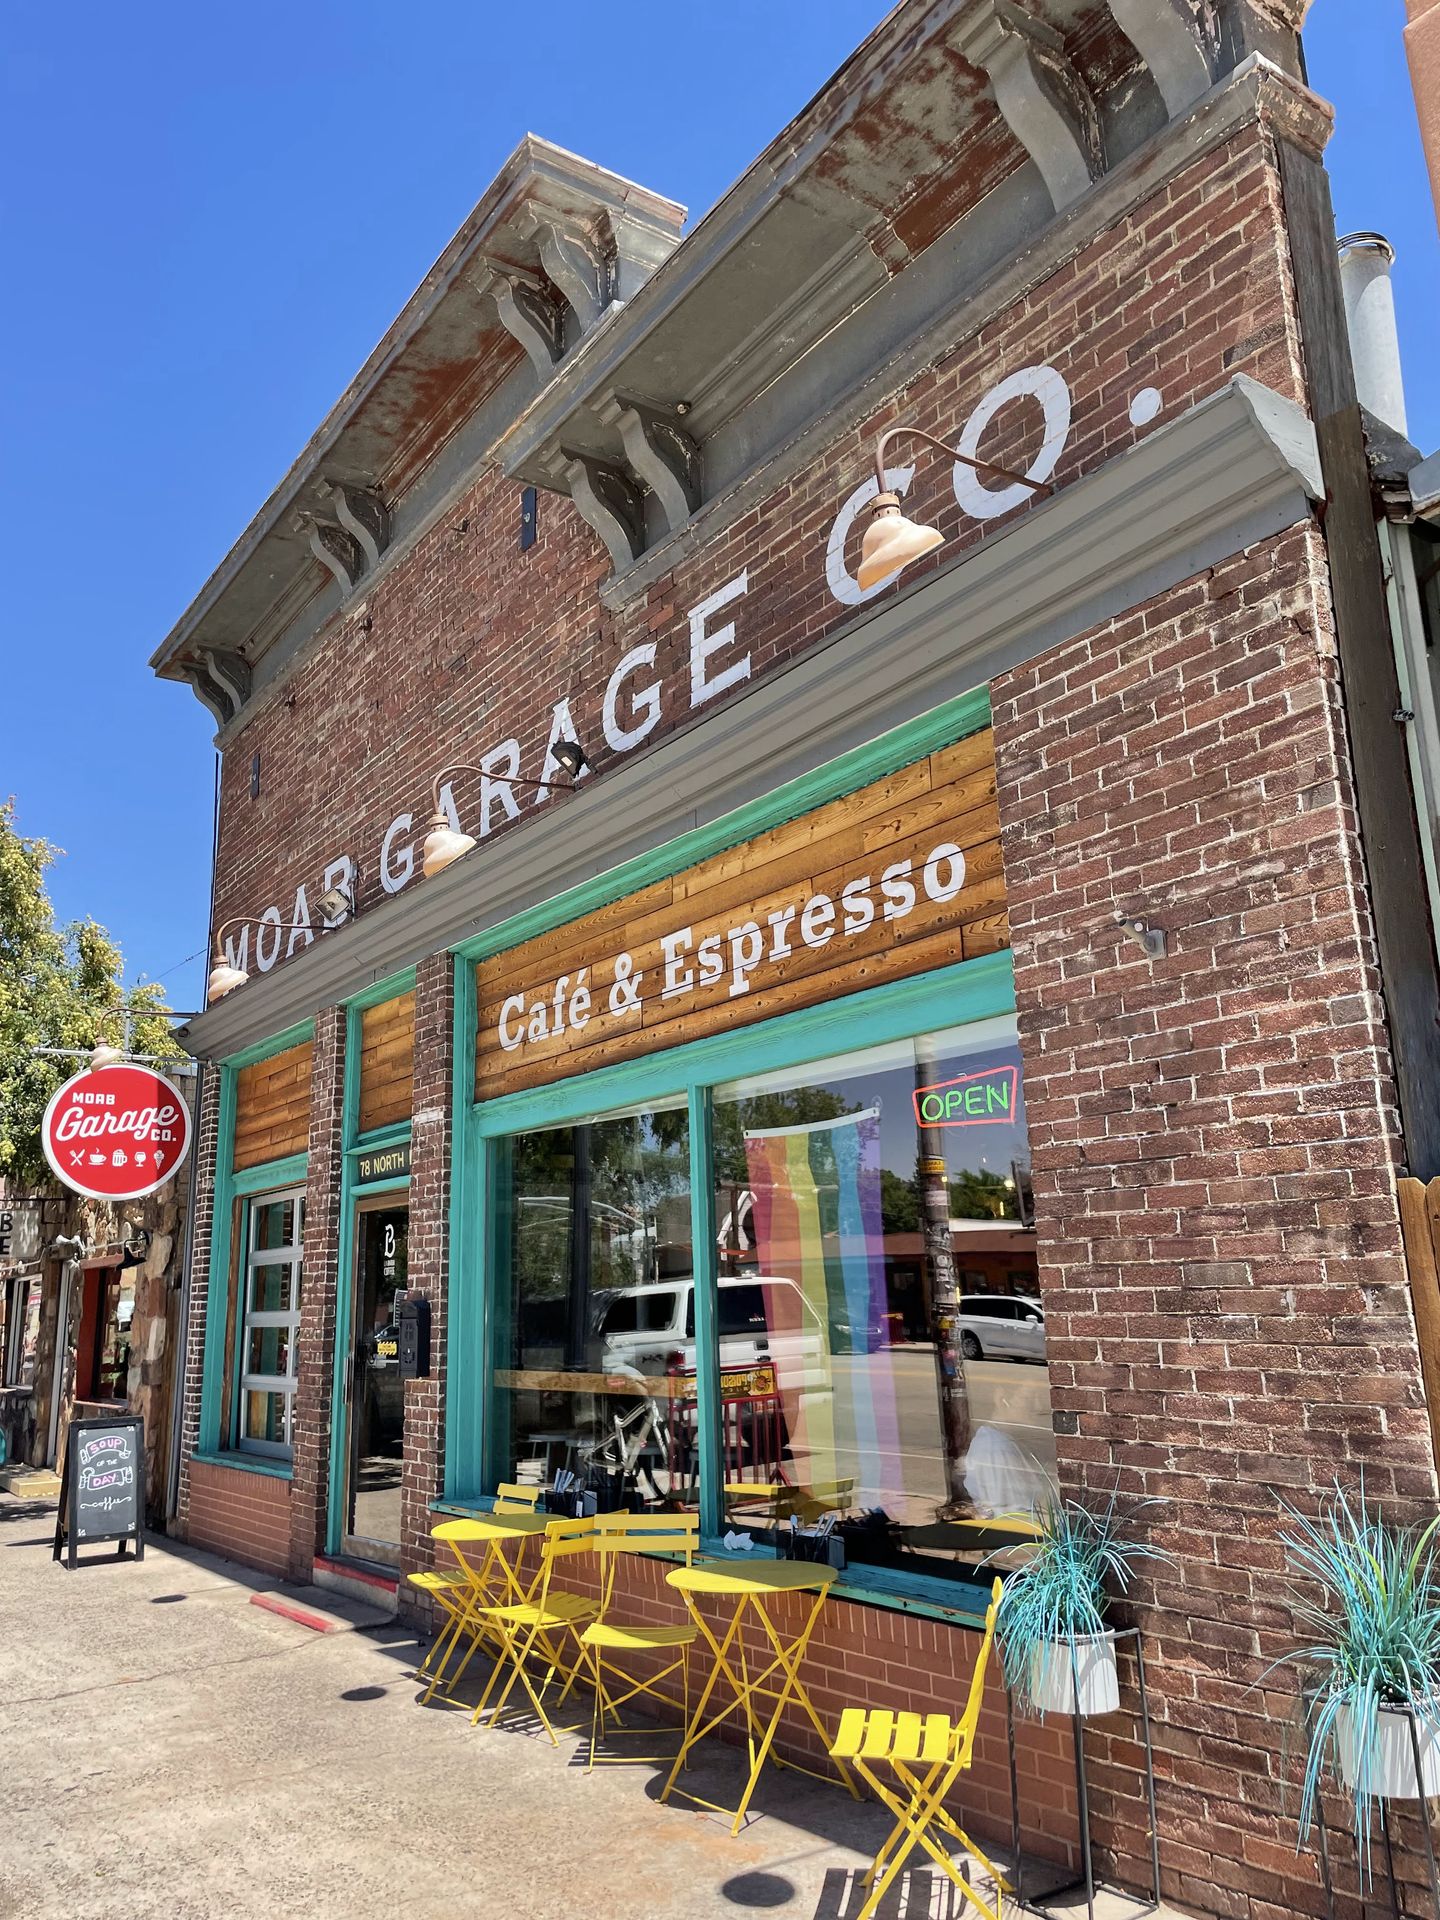

I was also really happy with the vegetarian lunch options. I visited twice and enjoyed both the vegetarian veggie ball sandwich (a vegetarian meatball sub with marinara sauce) and the vegetarian sammich packed with hummus and fresh veggies.
In addition to great food, Moab Garage Co serves coffee, sweet treats and has cute merchandise such as coffee mugs and t-shirts. If you are in town for breakfast or lunch, Moab Garage Co is a must during your time in Moab.
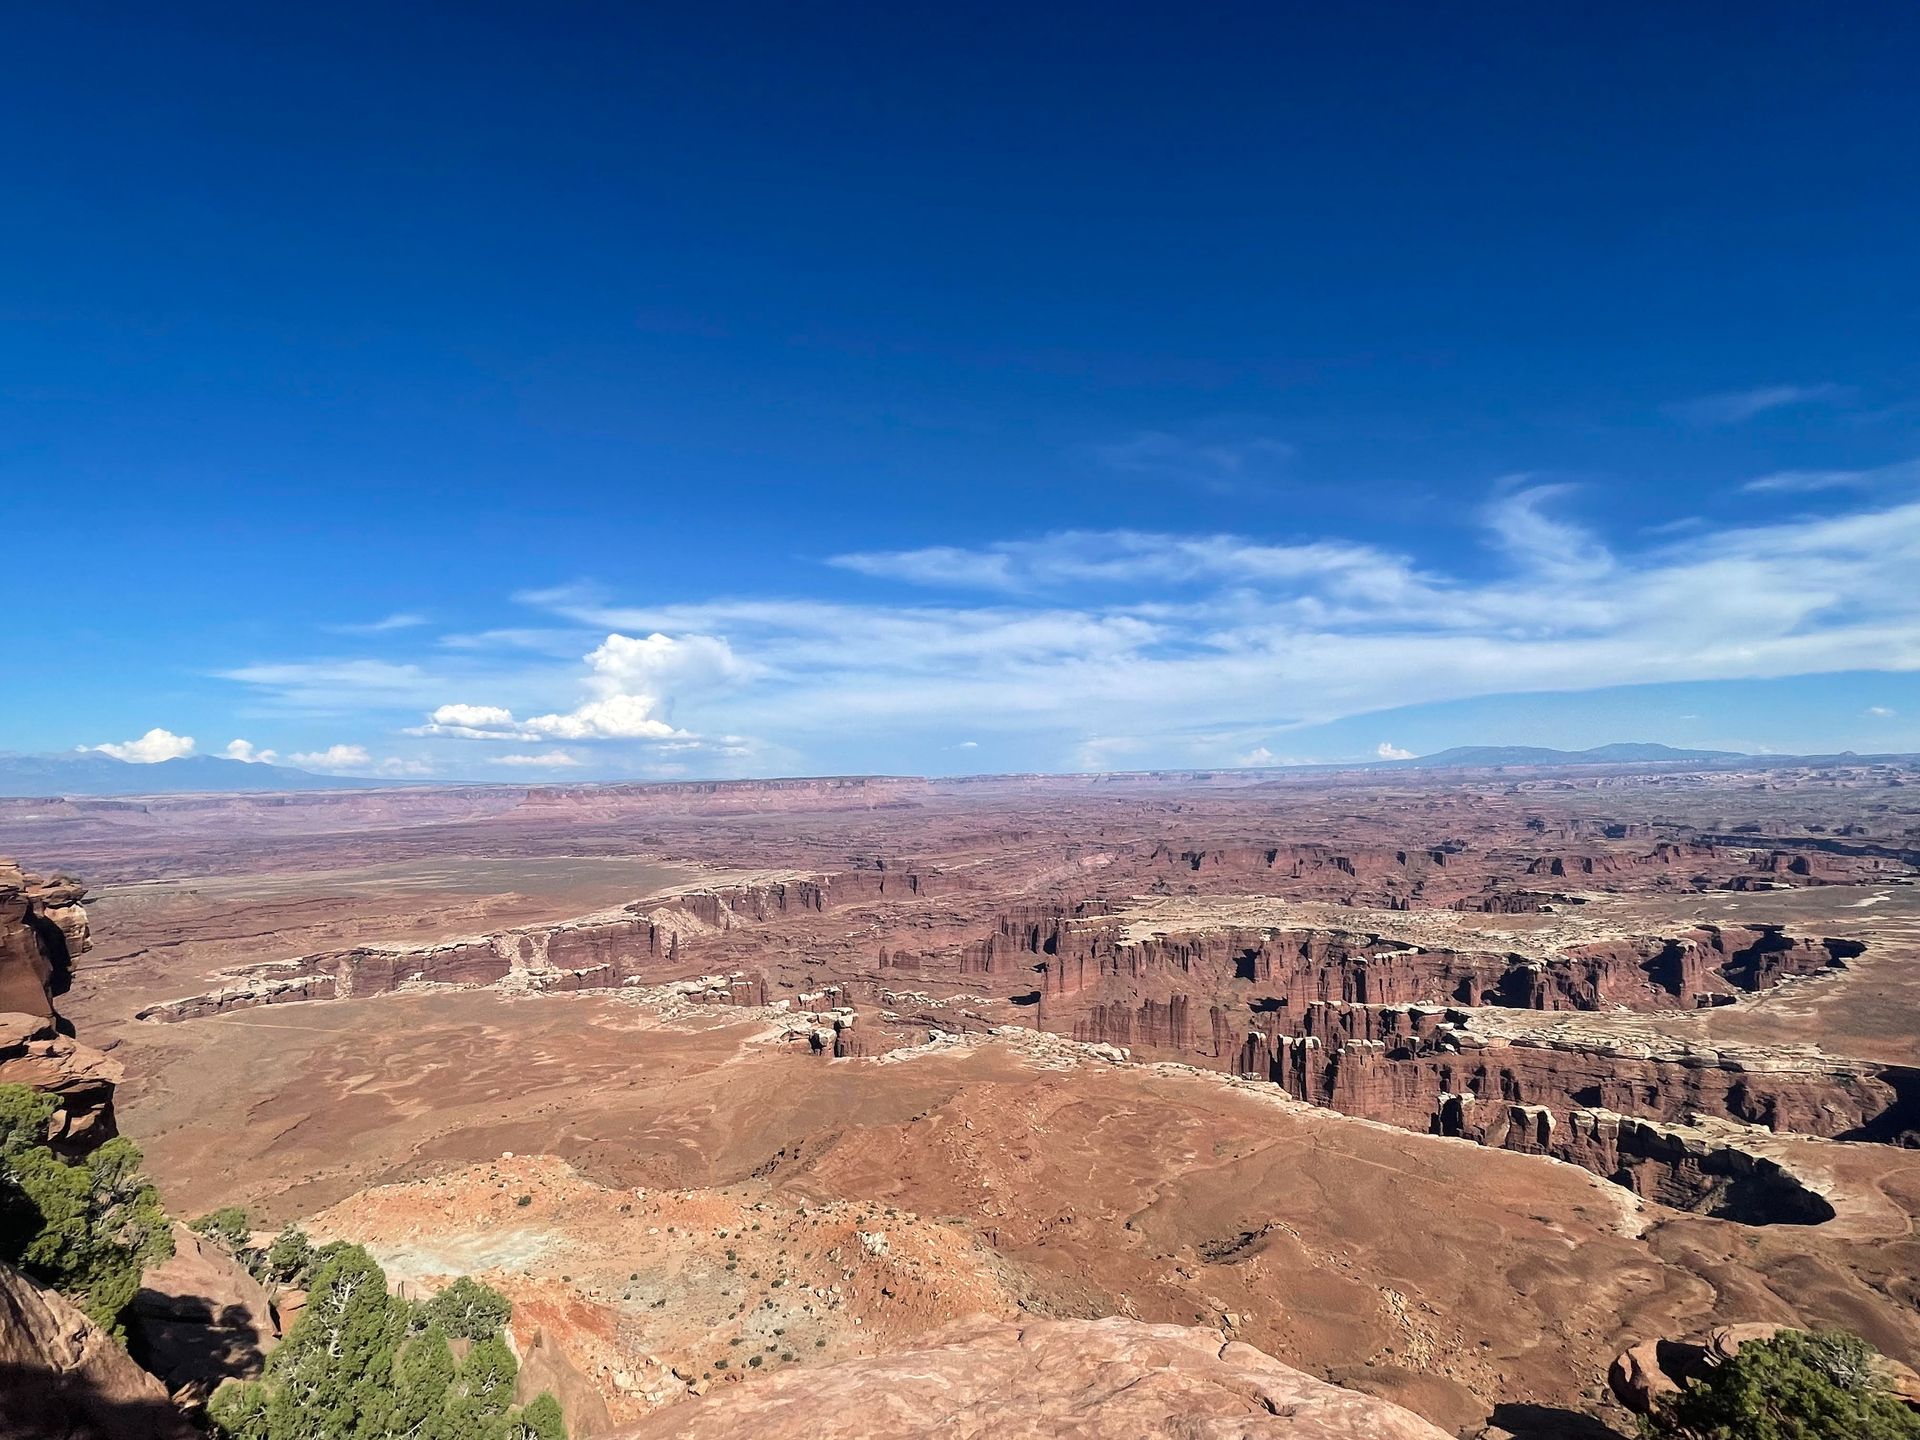
Canyonlands Island in the Sky
After lunch, head over to Canyonlands National Park to spend the afternoon. Canyonlands is made up of 4 distinct districts. If it’s your first time in Moab and you have limited time, the Island in the Sky District is the most accessible area and the closest to Moab. Plus, this district has several overlooks that you can enjoy without a lengthy hike. The drive between Moab and this part of Canyonlands takes about 40 minutes.
On your way out to Canyonlands National Park, learn about stops along the way from your Guide Along audio tour. It’s a beautiful drive and the tour mentions a few overlooks if you have time. On the way back to Moab, the tour talks about the fascinating uranium mining history in Moab. It is definitely worth having the guide to enhance your trip!
While you could easily spend much longer and add on some longer hikes, I only spent 4 hours in Canyonlands. While the Island in the Sky area is beautiful, you don’t need a ton of time to experience the big sights.
Canyonlands Visitor Center
When you first enter the park, stop at the visitor center to see the exhibits, use the restroom and get park information. Across from the visitor center, there is a great view of the canyon.
Shafer Canyon
The Shafer Canyon Overlook is a wonderful, quick stop in Canyonlands. Here you can walk out onto a large rock face for amazing views facing east. You will get a great look at the Shafer Canyon trail from here.
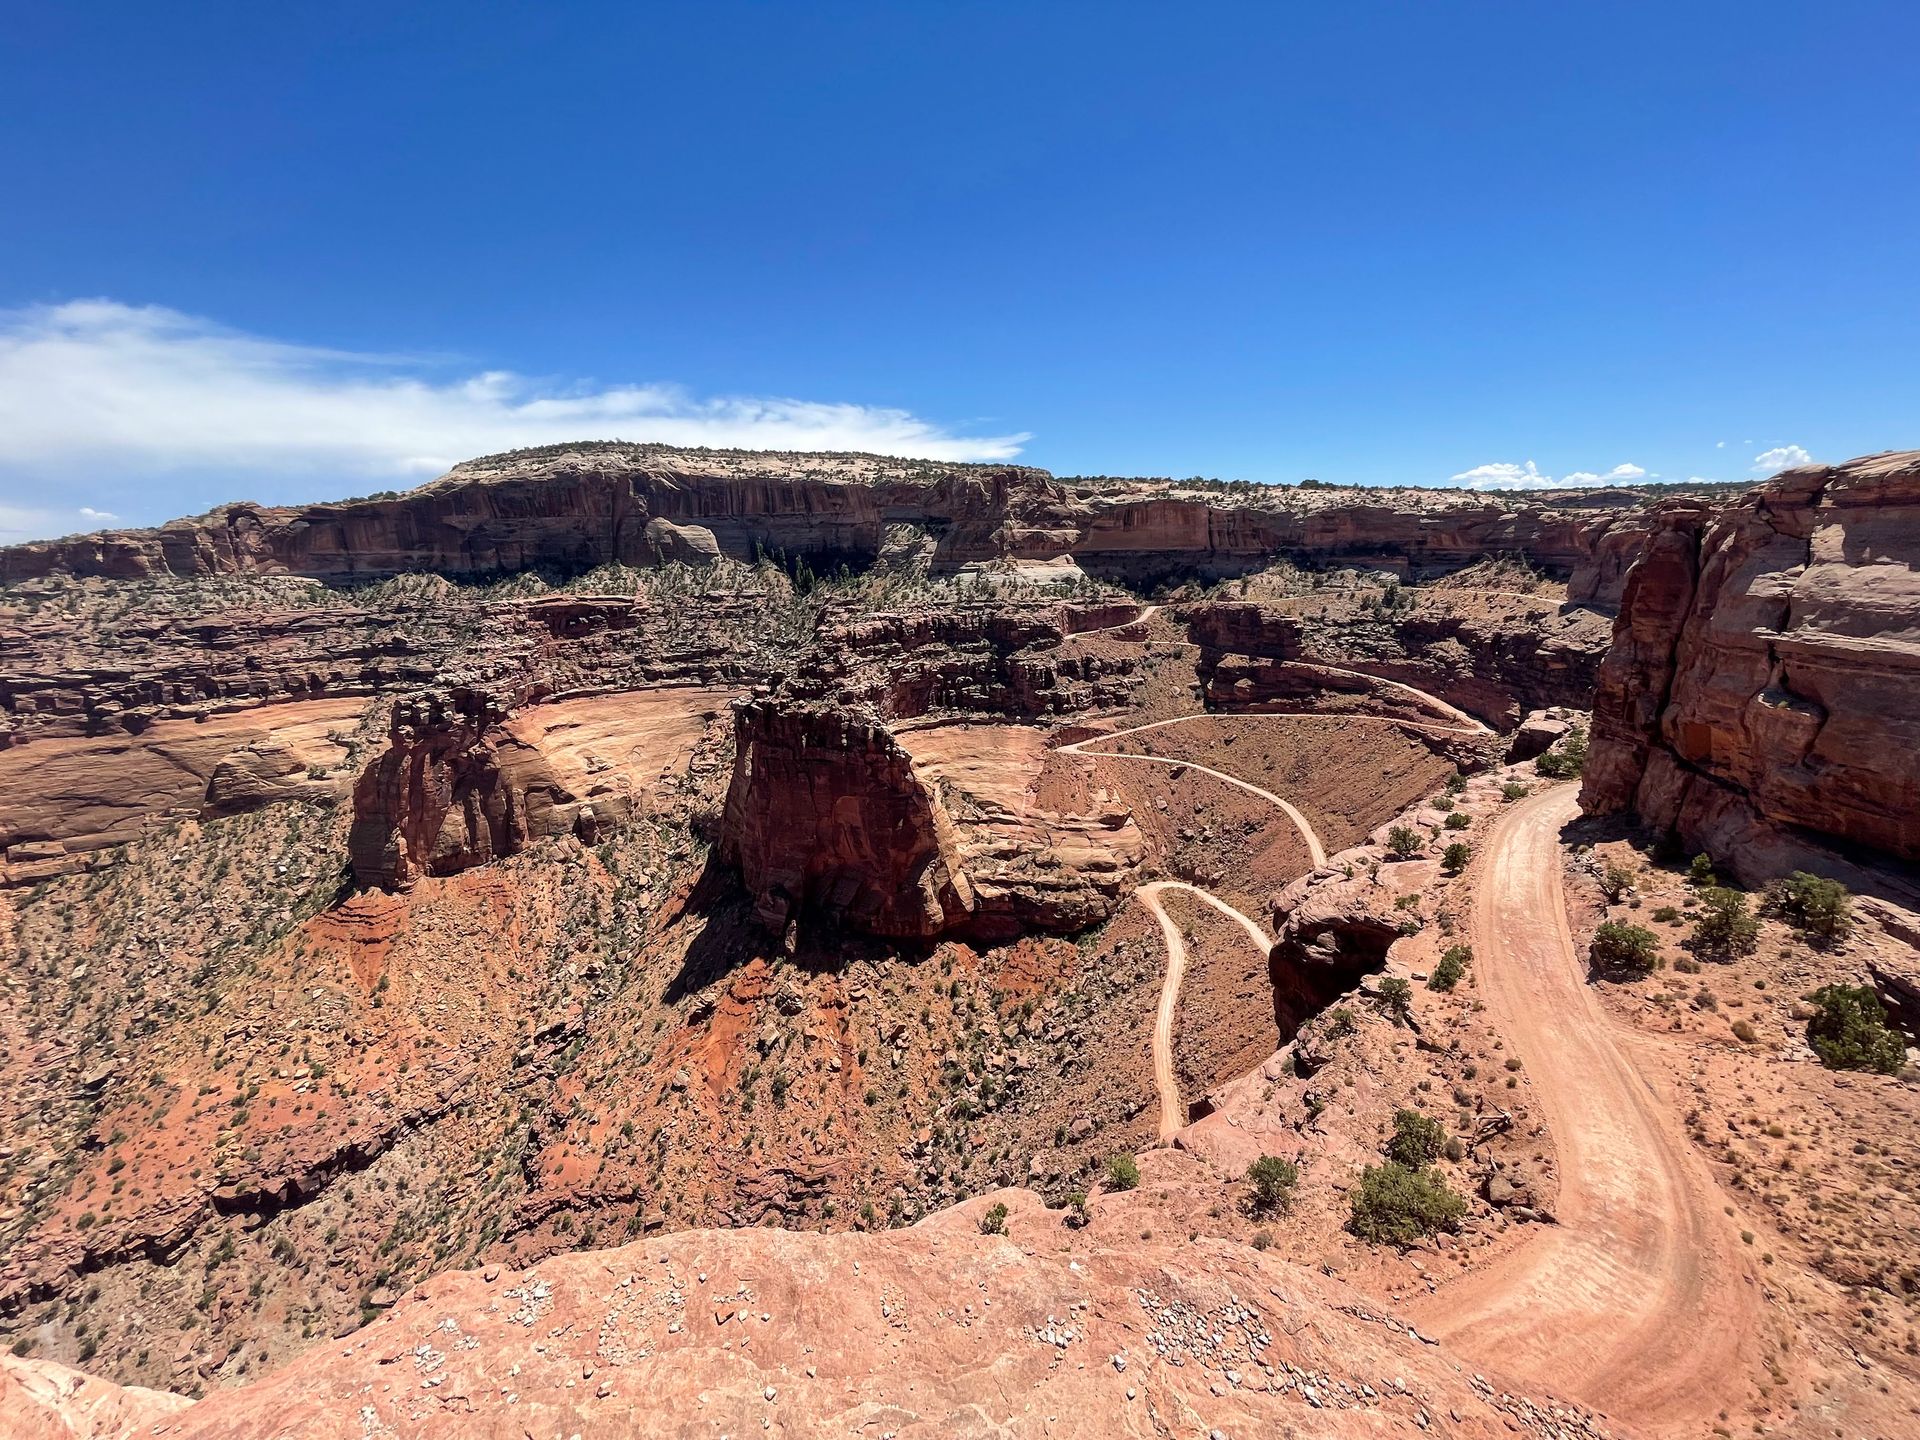
The Shafer Canyon trail is a 4x4 road that leads to the bottom of the canyon via large switchbacks. The road descends 1,500 feet and has had many uses over the years. It was originally used by Native Americans to access resources, then used by sheep herders, then used for uranium mining in the 1940’s and 50’s. If you have a 4x4 vehicle, it is definitely worth looking into driving this on your own.
Mesa Arch
The short hike to Mesa Arch is a must visit during your time in Canyonlands. While you’ve likely seen a lot of arches in Arches National Park, this arch is unique because you’ll get to enjoy canyon views through the arch opening.
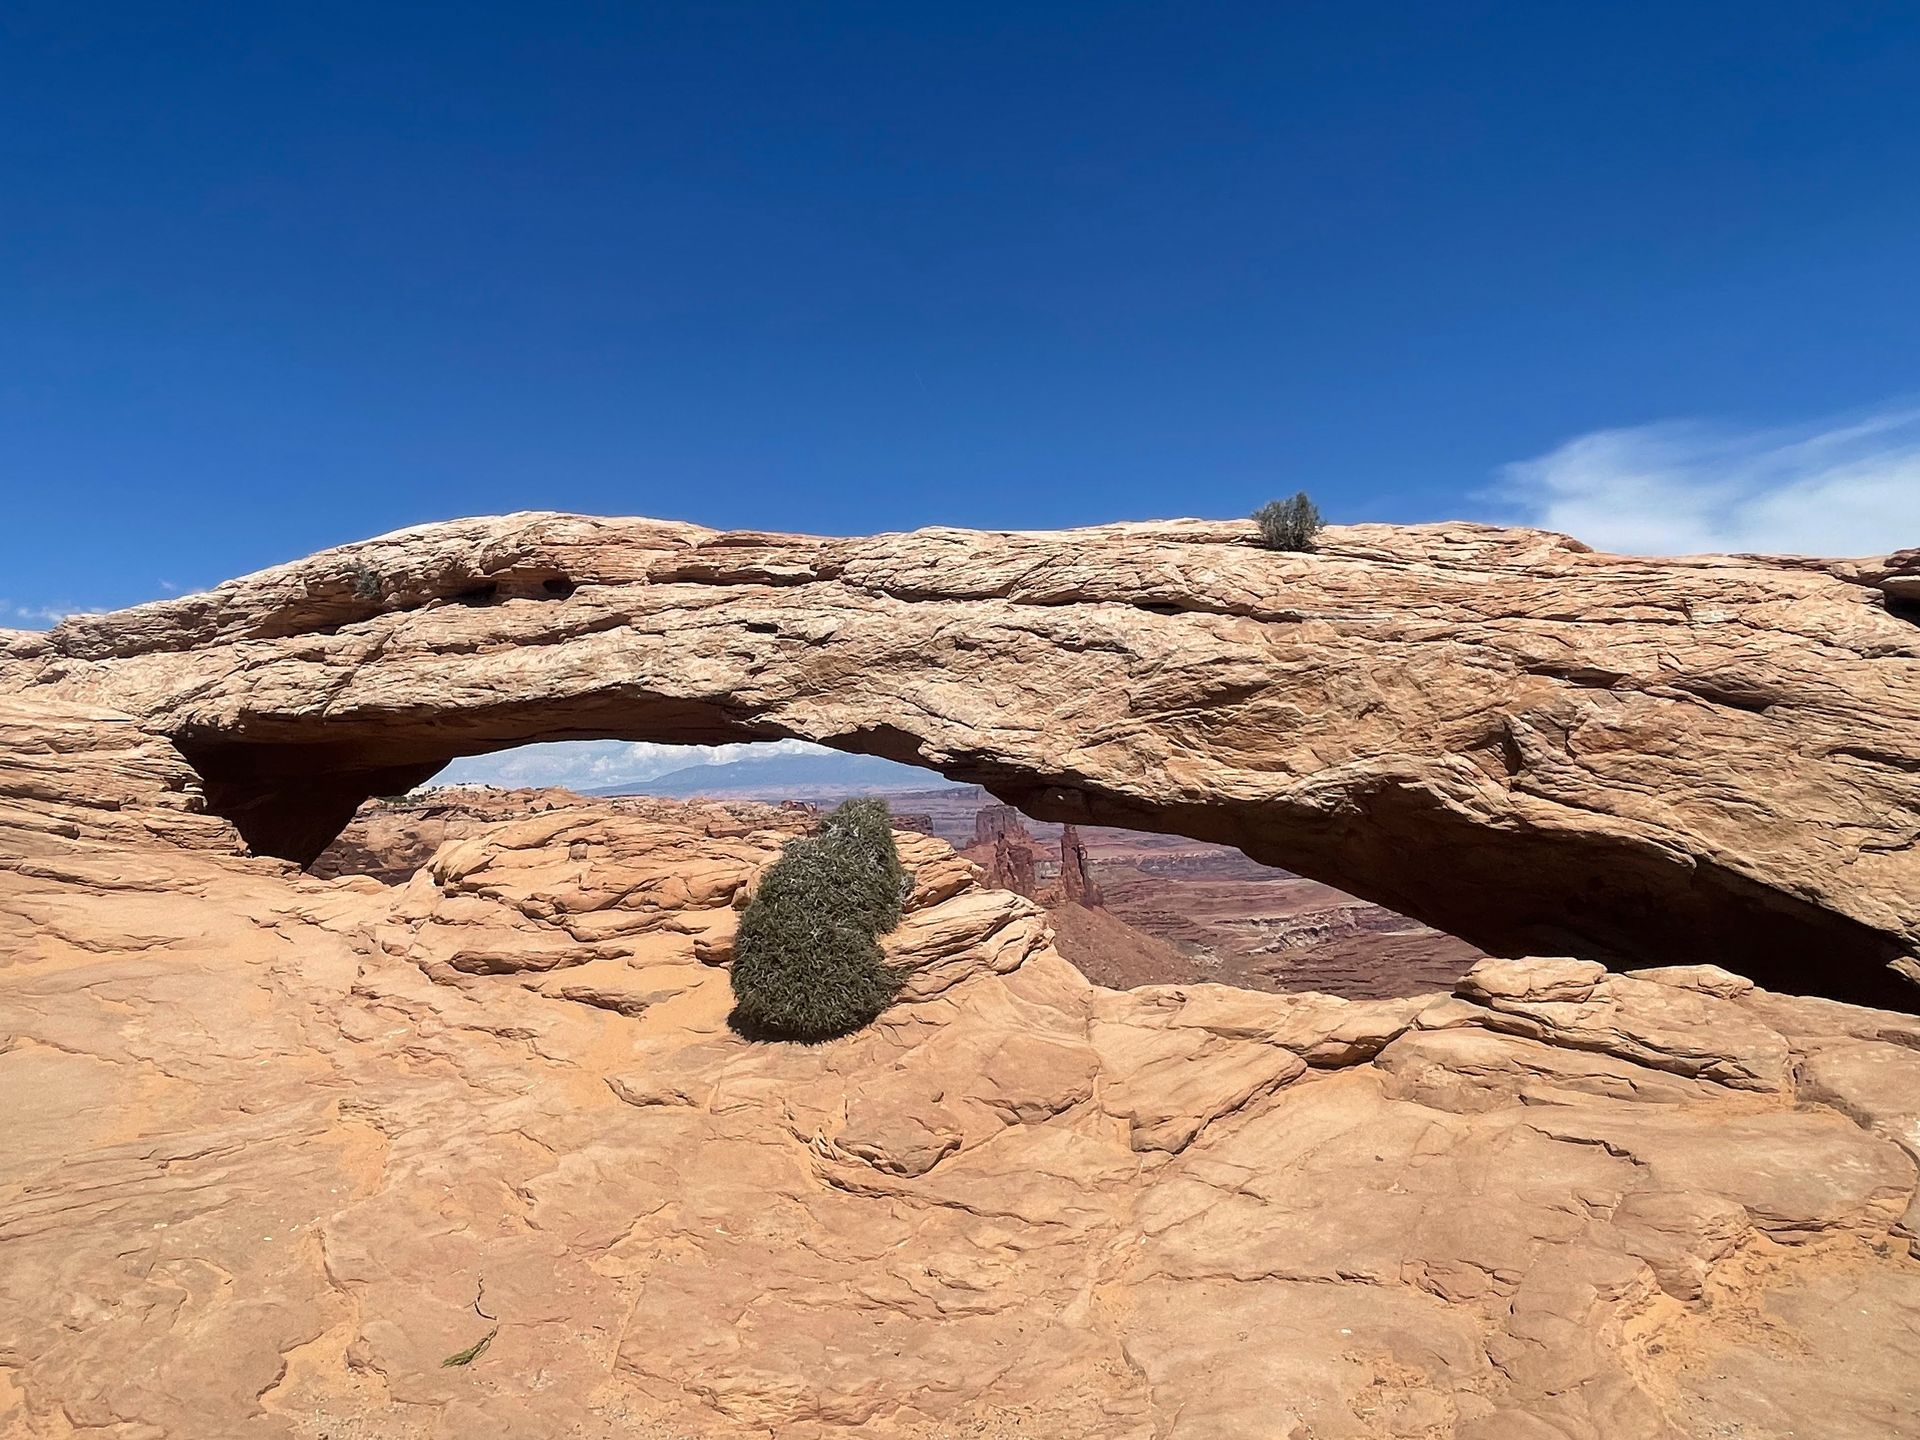
The trail is 0.7 miles and can be completed as a loop. There is minimal elevation gain and the hike is rated easy. This spot is particularly popular for sunrise because you can see the sun rise from under the arch opening.
No matter when you go, expect crowds at this popular spot. However, I found that it wasn’t unbearingly crowded in the afternoon and the arch was beautiful.
Green River Overlook
As you continue driving through the Island in the Sky, turn right on the Upheaval Dome Road and then make a left on Green River Overlook Road.
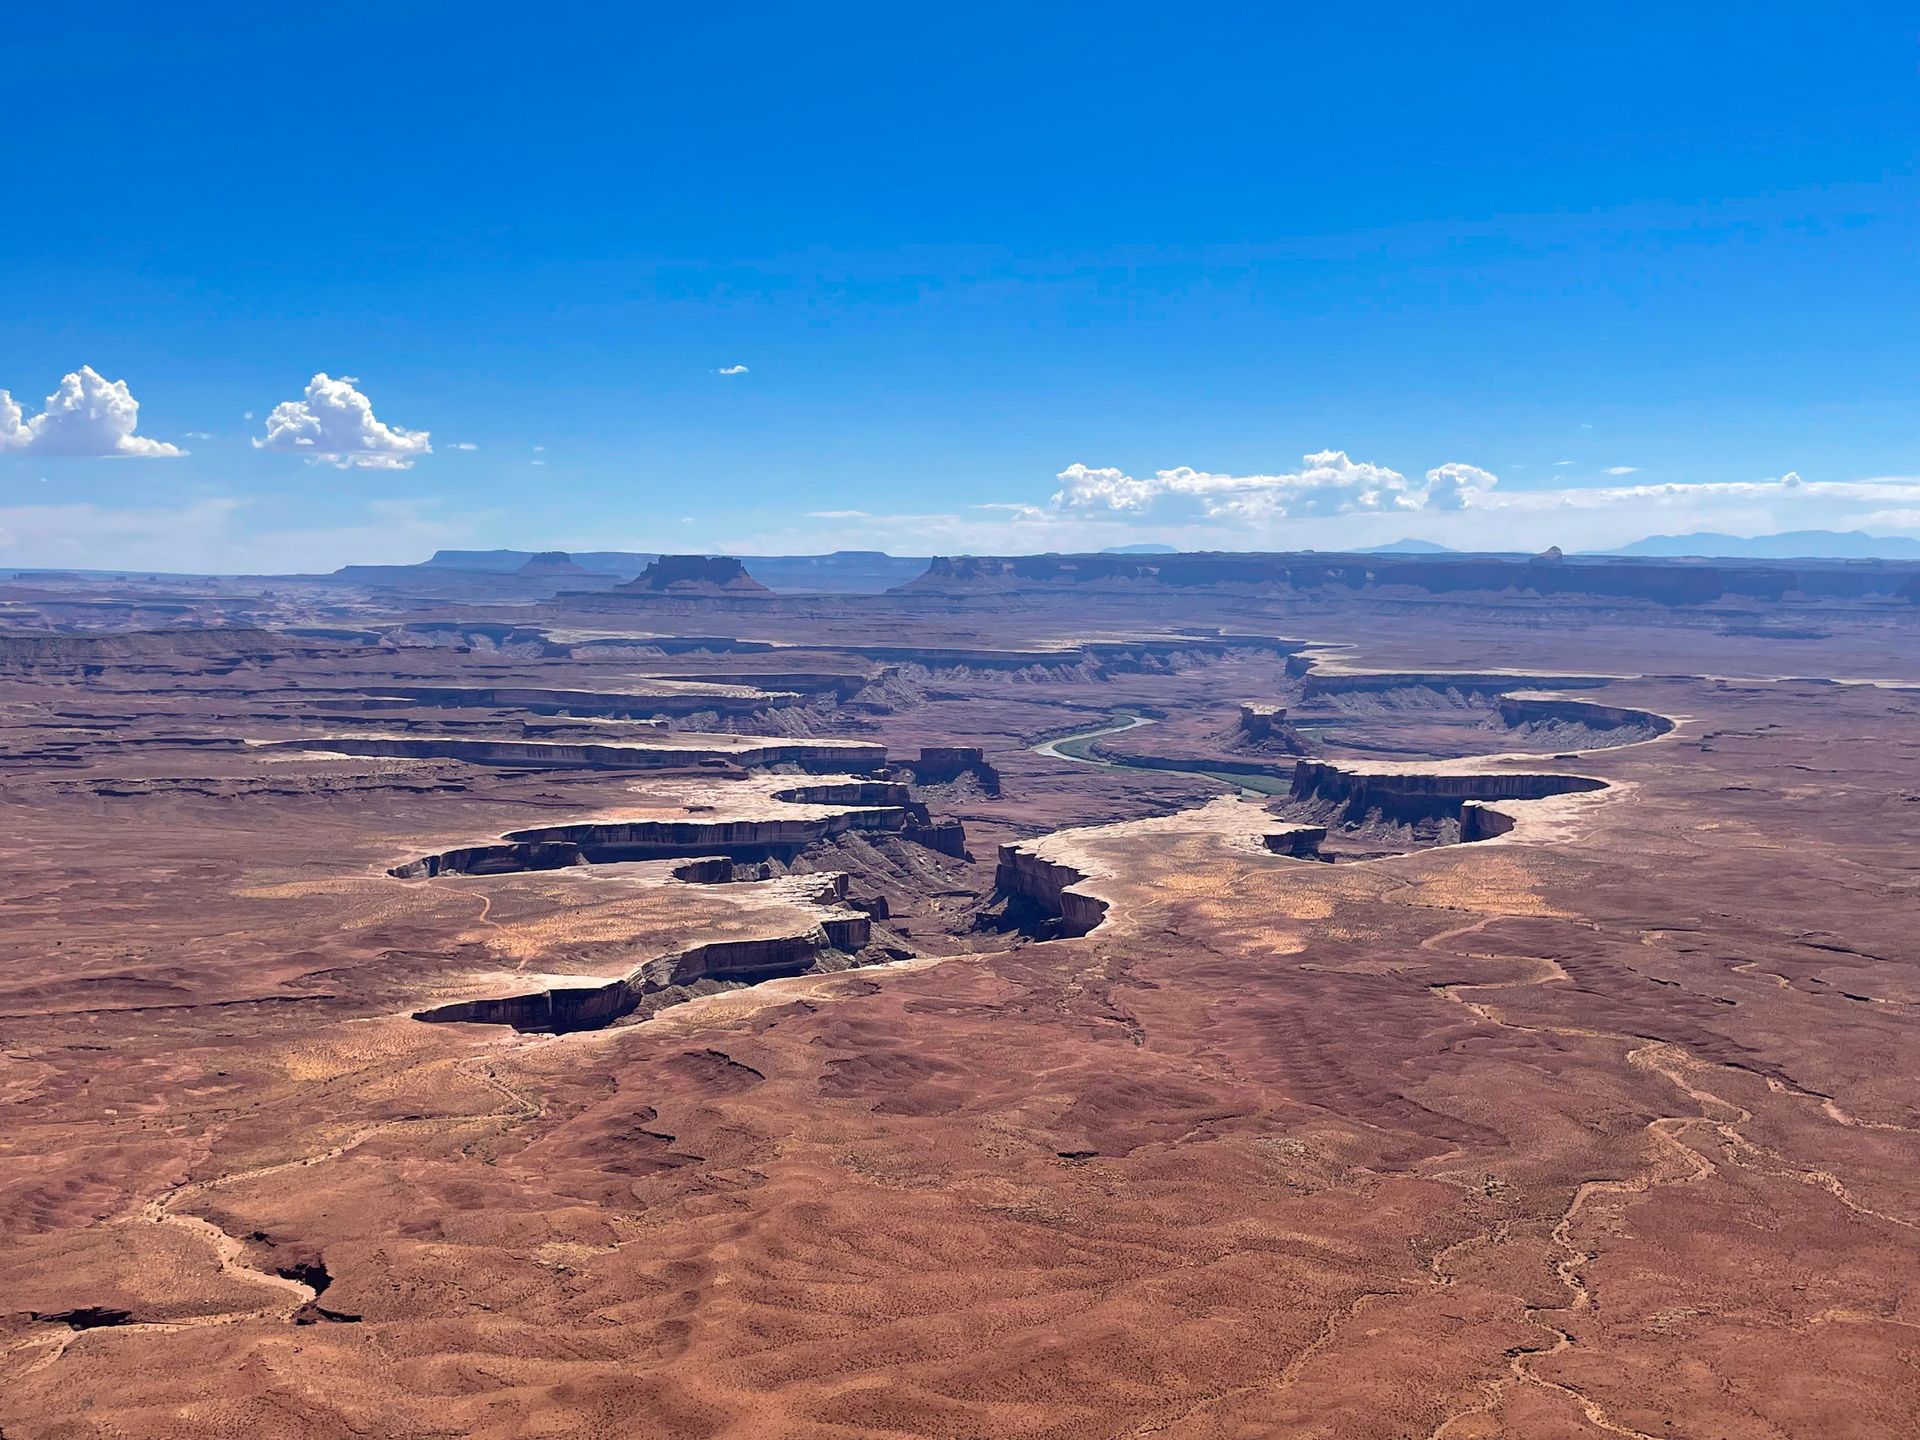
The Green River Overlook offers a beautiful view of a plateau that has been carved away by the Green River. The rim of the canyon surrounding the river is white and you can see the Canyonlands Maze District in the distance.
This was one of my favorite overlooks in the park!
Upheaval Dome
After the Green River Overlook, drive to the end of the spur road to the Upheaval Dome. On your way, you can stop for short hikes at the Aztec Butte and Whale Rock if you have extra time.
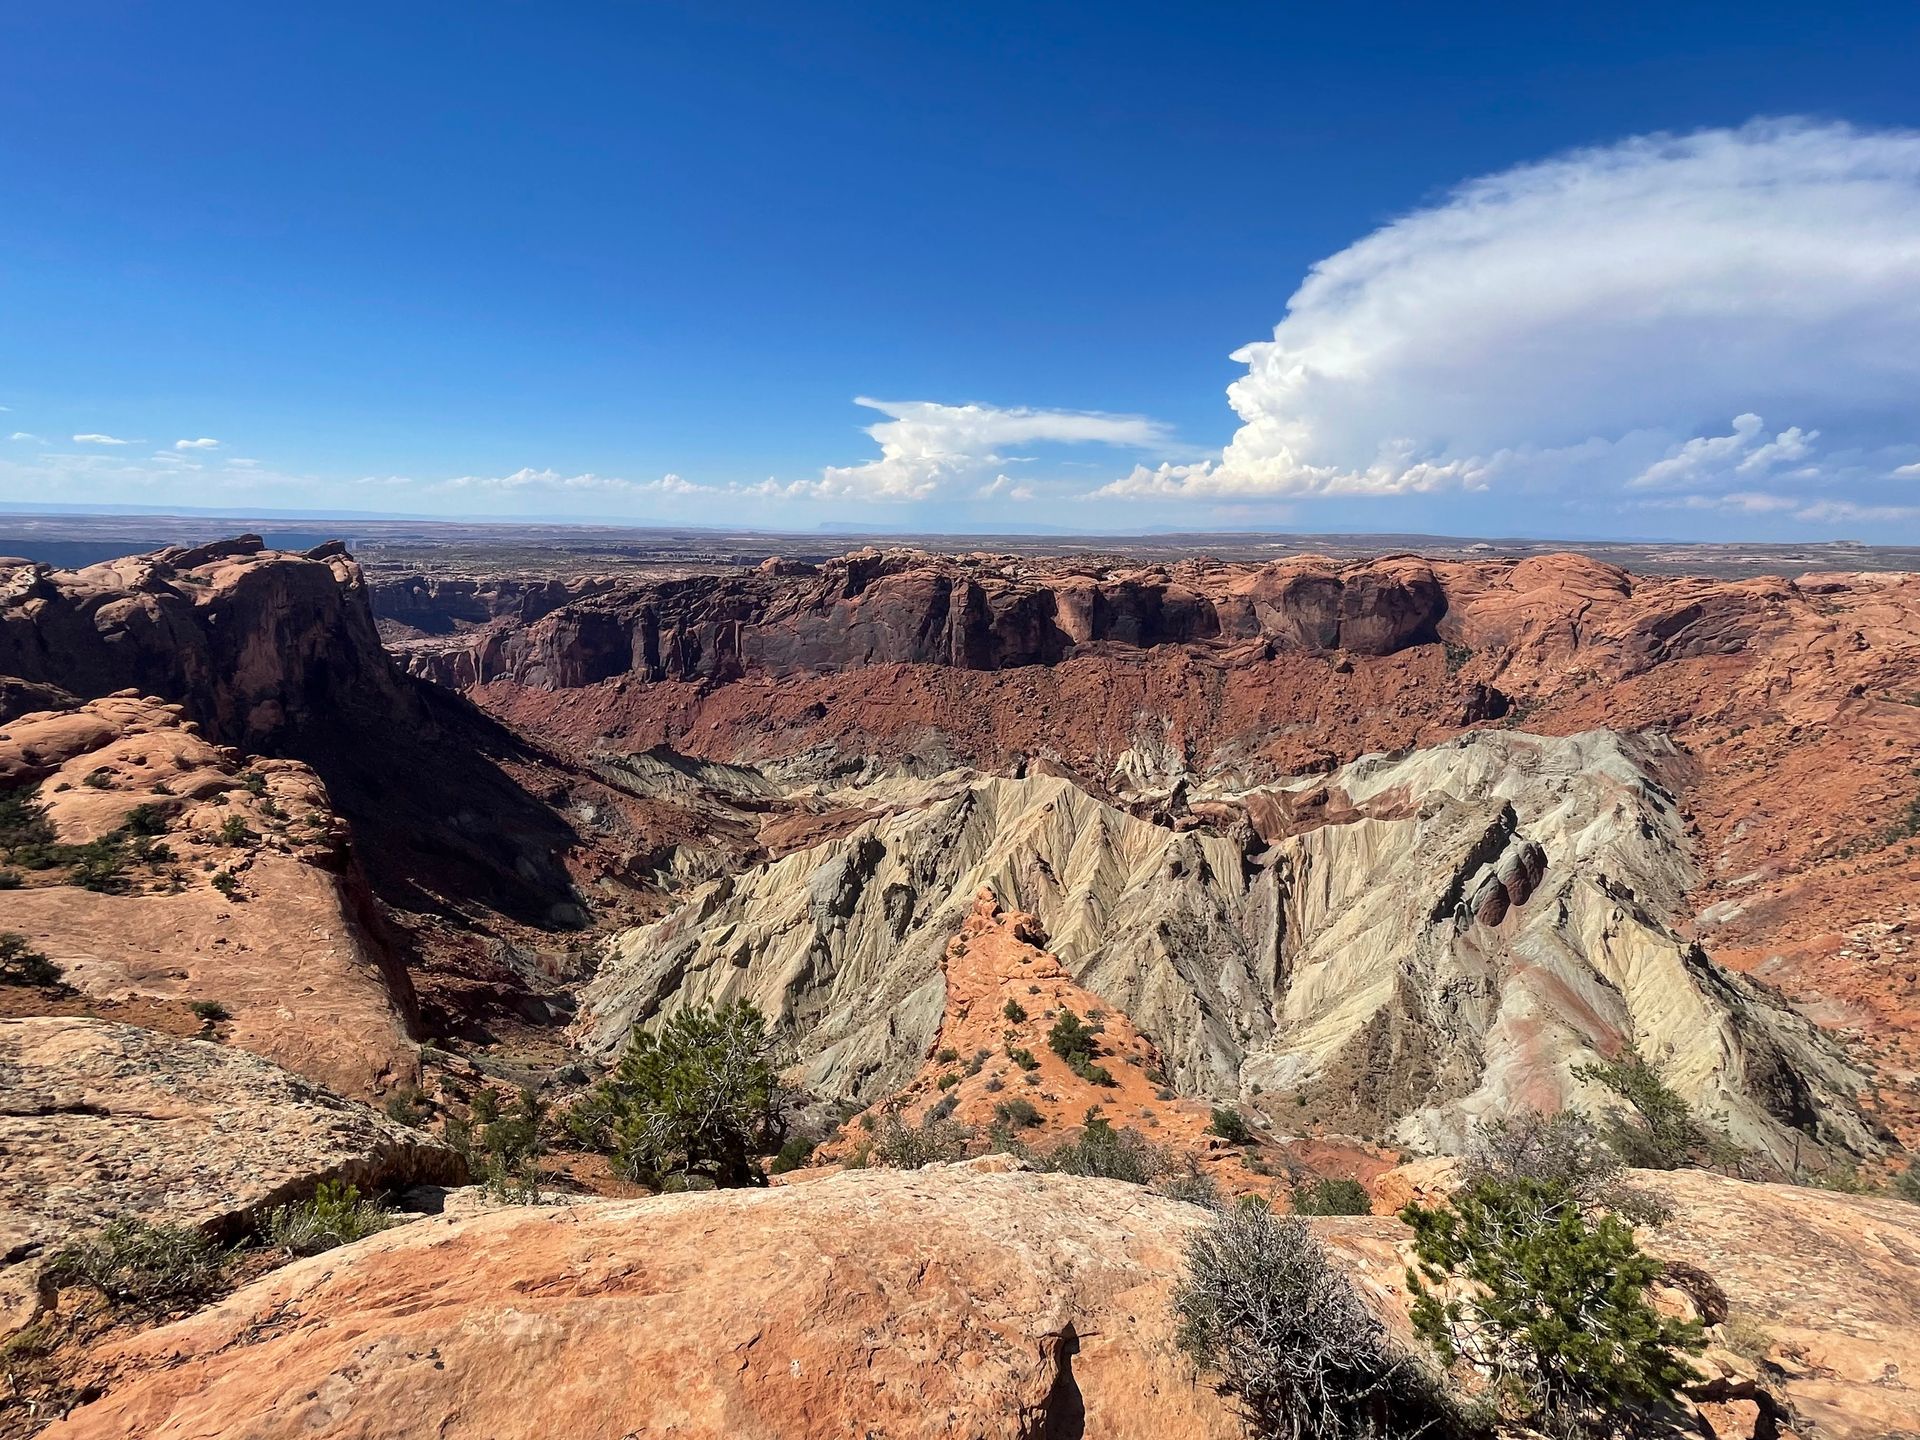
Geologists are unsure of the exact cause of the Upheaval Dome. This fascinating crater was either caused by a meteor or by the collapse of a salt dome. Either way, the crater full of white rock is a very unique feature in Southern Utah.
To get a view of the dome, you’ll need to hike about a half mile total with 226 feet of elevation gain. You can also continue on from there and see the dome from various angles. It is definitely worth the time to reach the first overlook, the view is spectacular!
Be sure to bring plenty of water and wear proper hiking shoes on the trail. There is very little shade and the trail has many steps.
Buck Canyon Overlook
After the Upheaval Dome Road, continue deeper into the Island in the Sky district. A few minutes down the road, you’ll reach the Buck Canyon Overlook. This area provides a great view of the canyon and the Colorado River. This overlook is less popular so you may be lucky enough to have it to yourself.
White Rim Overlook
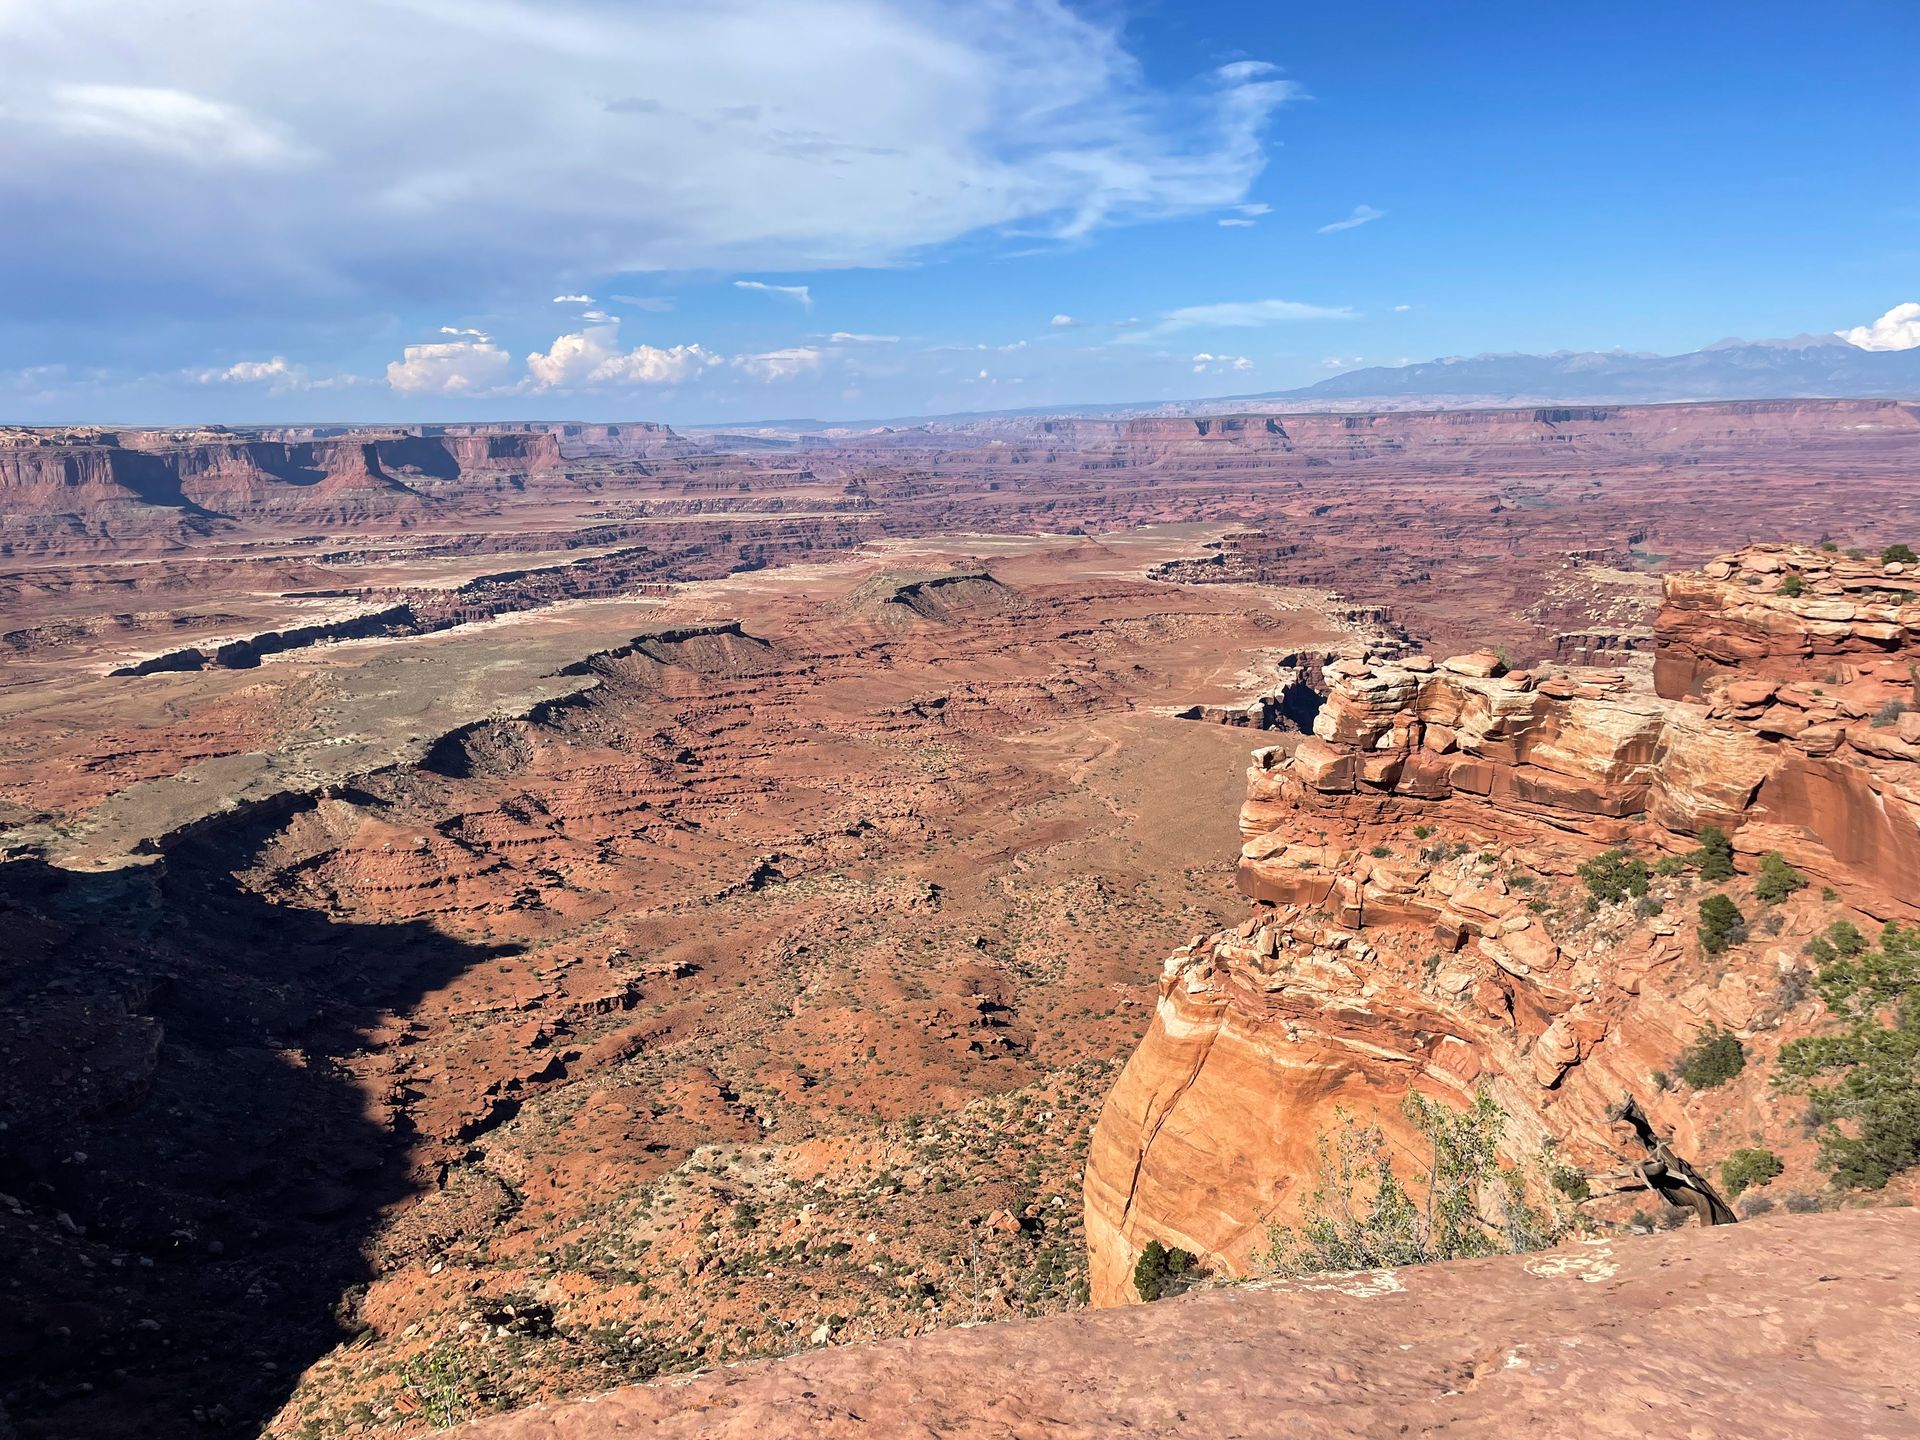
The White Rim Overlook offers a great view of the white rim surrounding the Colorado River Canyon. If you have time, there is a 1.8 mile hike here that will lead to almost 360 views of the surrounding canyon.
Orange Cliffs Overlook
The Orange Cliffs Overlook in Canyonlands faces west and provides a great view of the Orange Cliffs. The cliffs are part of the Glen Canyon National Recreation Area across the river.
Grand View Point Overlook
Grand View Point is the furthest you can drive in the Island in Sky District. This overlook offers sweeping views facing south.
You can get a great view from close to the parking lot, but there is also an easy, 1.8 mile trail that will lead you to an even better viewpoint.
Overall, make sure you don’t skip Canyonlands on your trip to Moab! This park is much less crowded than Arches and offers a completely different experience. I cannot wait to return to explore the other districts in the future.
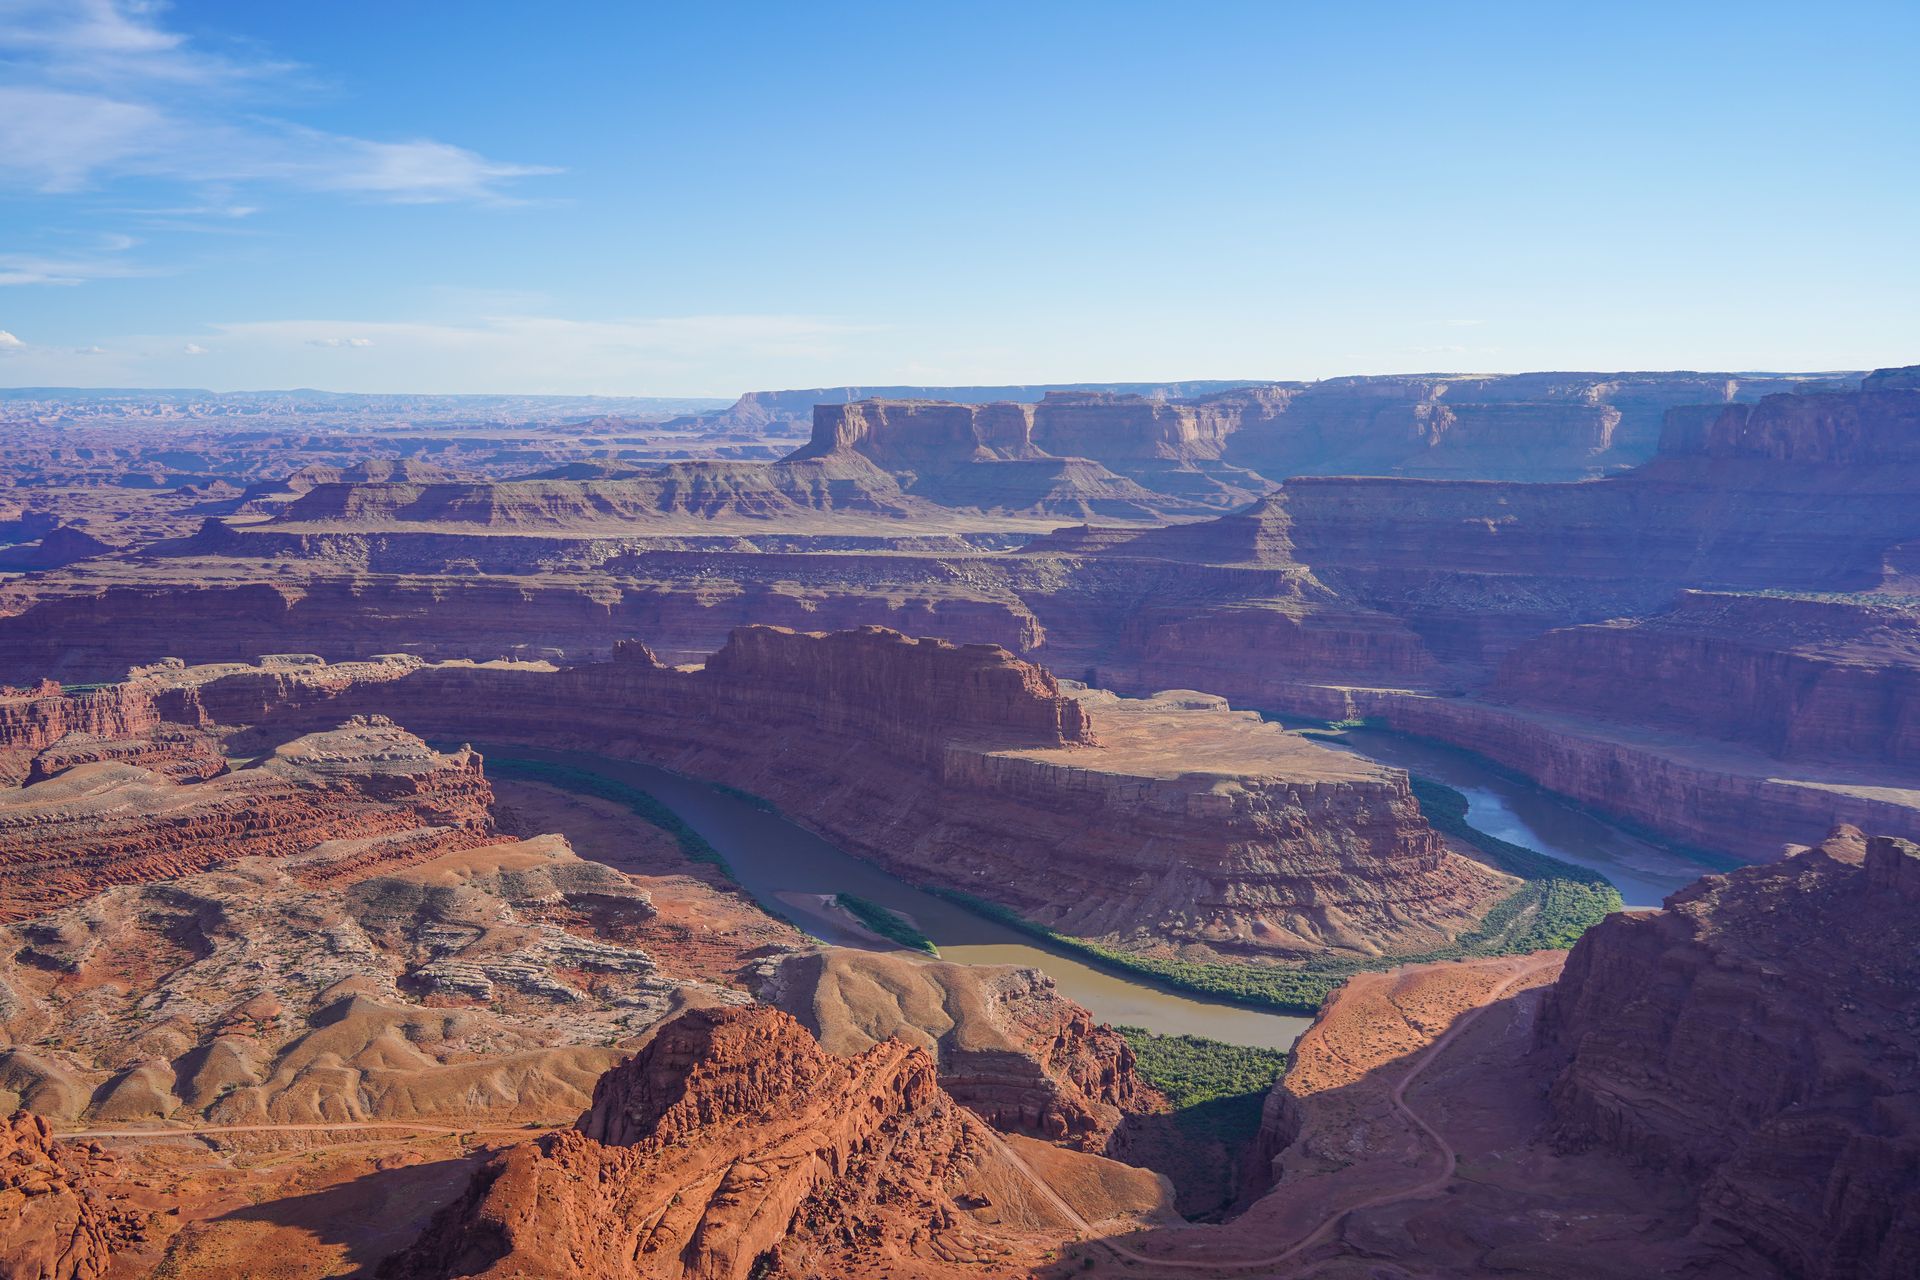
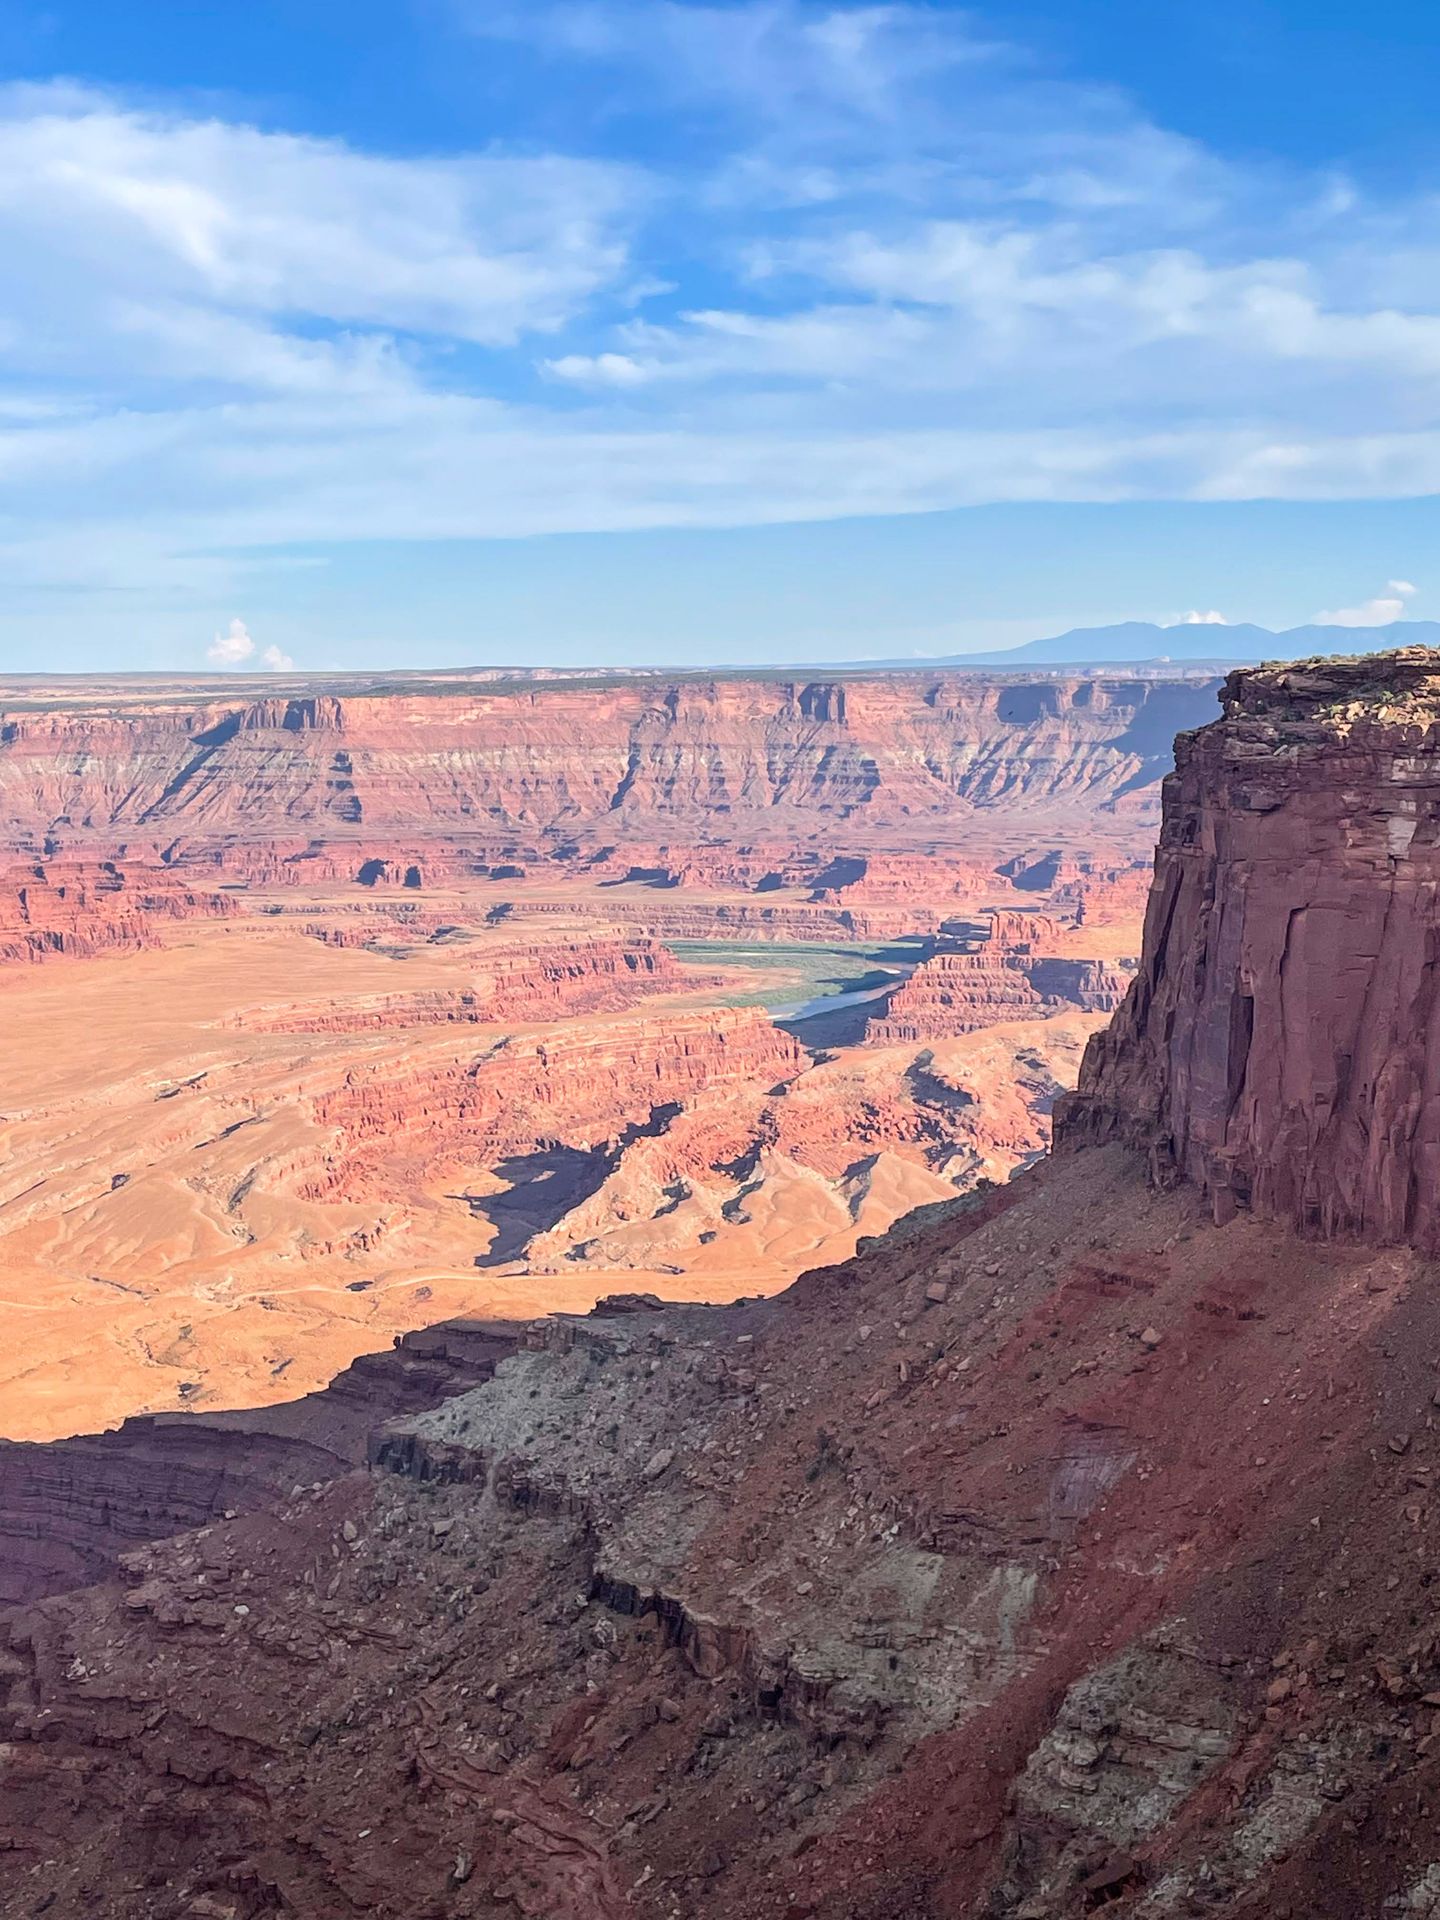
Dead Horse Point State Park
Right outside of Canyonlands, you should also visit Dead Horse Point State Park. This park offers similar views to Canyonlands but is quite a bit smaller. It is also a great place to camp and has yurts you can rent. Admission to the park is $20.
Dead Horse Point State Park gets its name from a disturbing legend. There is a narrow “neck” area of the park that leads to a wider, island area. Legend says that cowboys corralled wild horses on the point, chose the ones they wanted and then left the rest of the horses to die of thirst for an unknown reason.
To explore the park, you can drive or hike to the various viewpoints. There is a 5 mile rim trail that will lead you to all of the best views around the park. However, if you are short on time, be sure to at least stop at the visitor center and the Dead Horse Point.
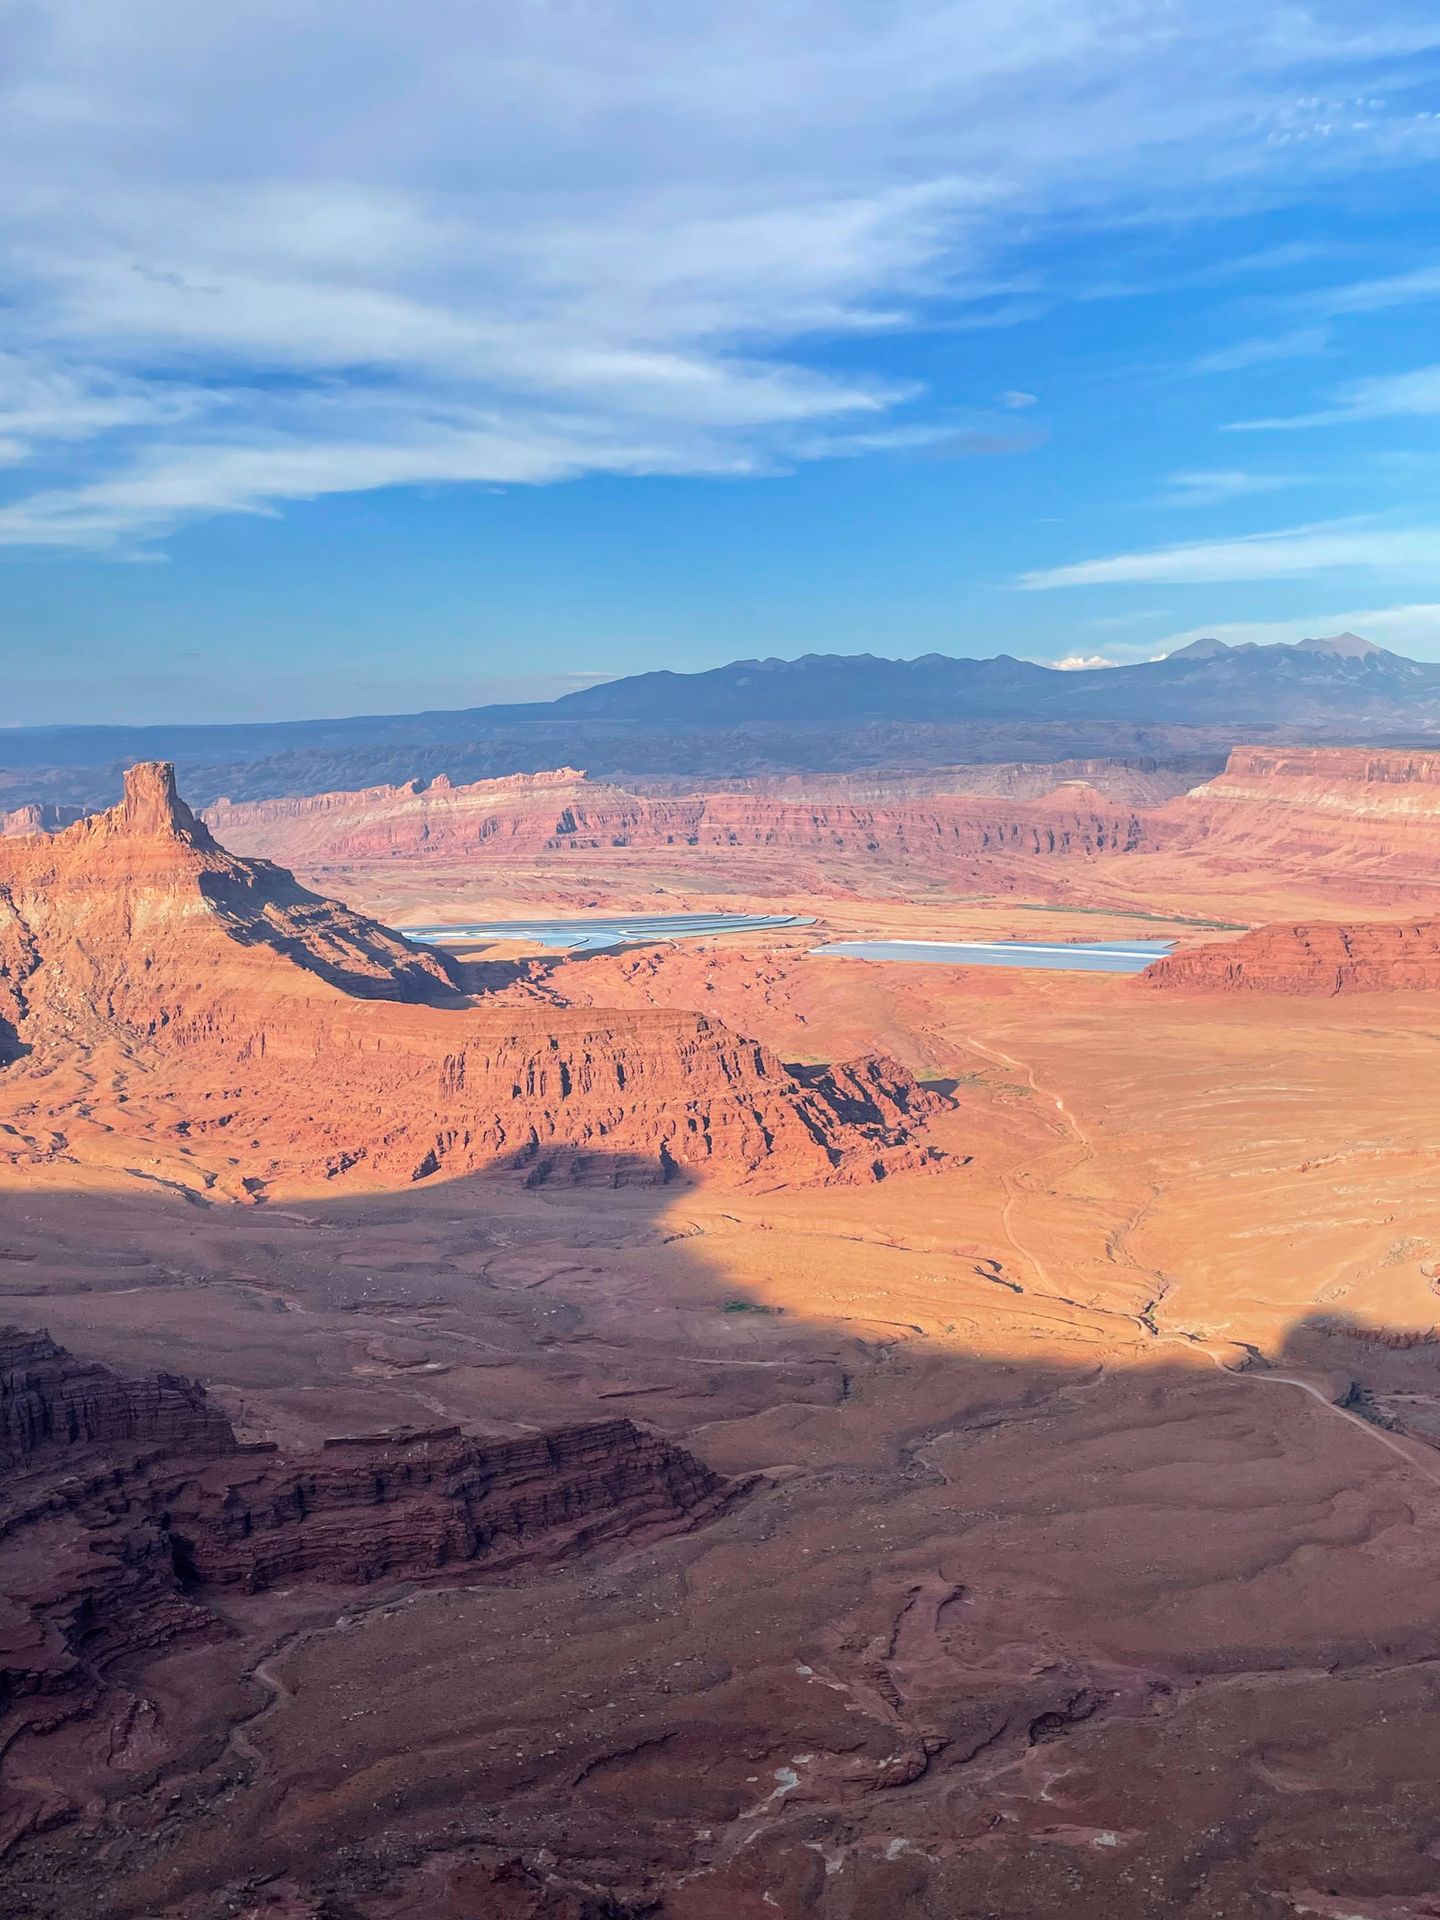
The visitor center has a short nature trail and views of colorful potash ponds in the distance. The potash evaporation ponds are dyed a vibrant blue to absorb sunlight and heat. While it looks unnatural, it’s very interesting to see the aqua blue poles surrounded by the orange and red canyons.
The Dead Horse Point offers the most iconic views in the park. You will get to see a dramatic bend in the Colorado River along with the surrounding cliffs. You can also see 4x4 roads on the floor of the canyon.
Dead Horse Point State Park is an incredible place for sunset and definitely worth including in your Moab itinerary.
Day Three in Moab
Hike a longer trail in Arches and have one more meal in Moab before leaving town.
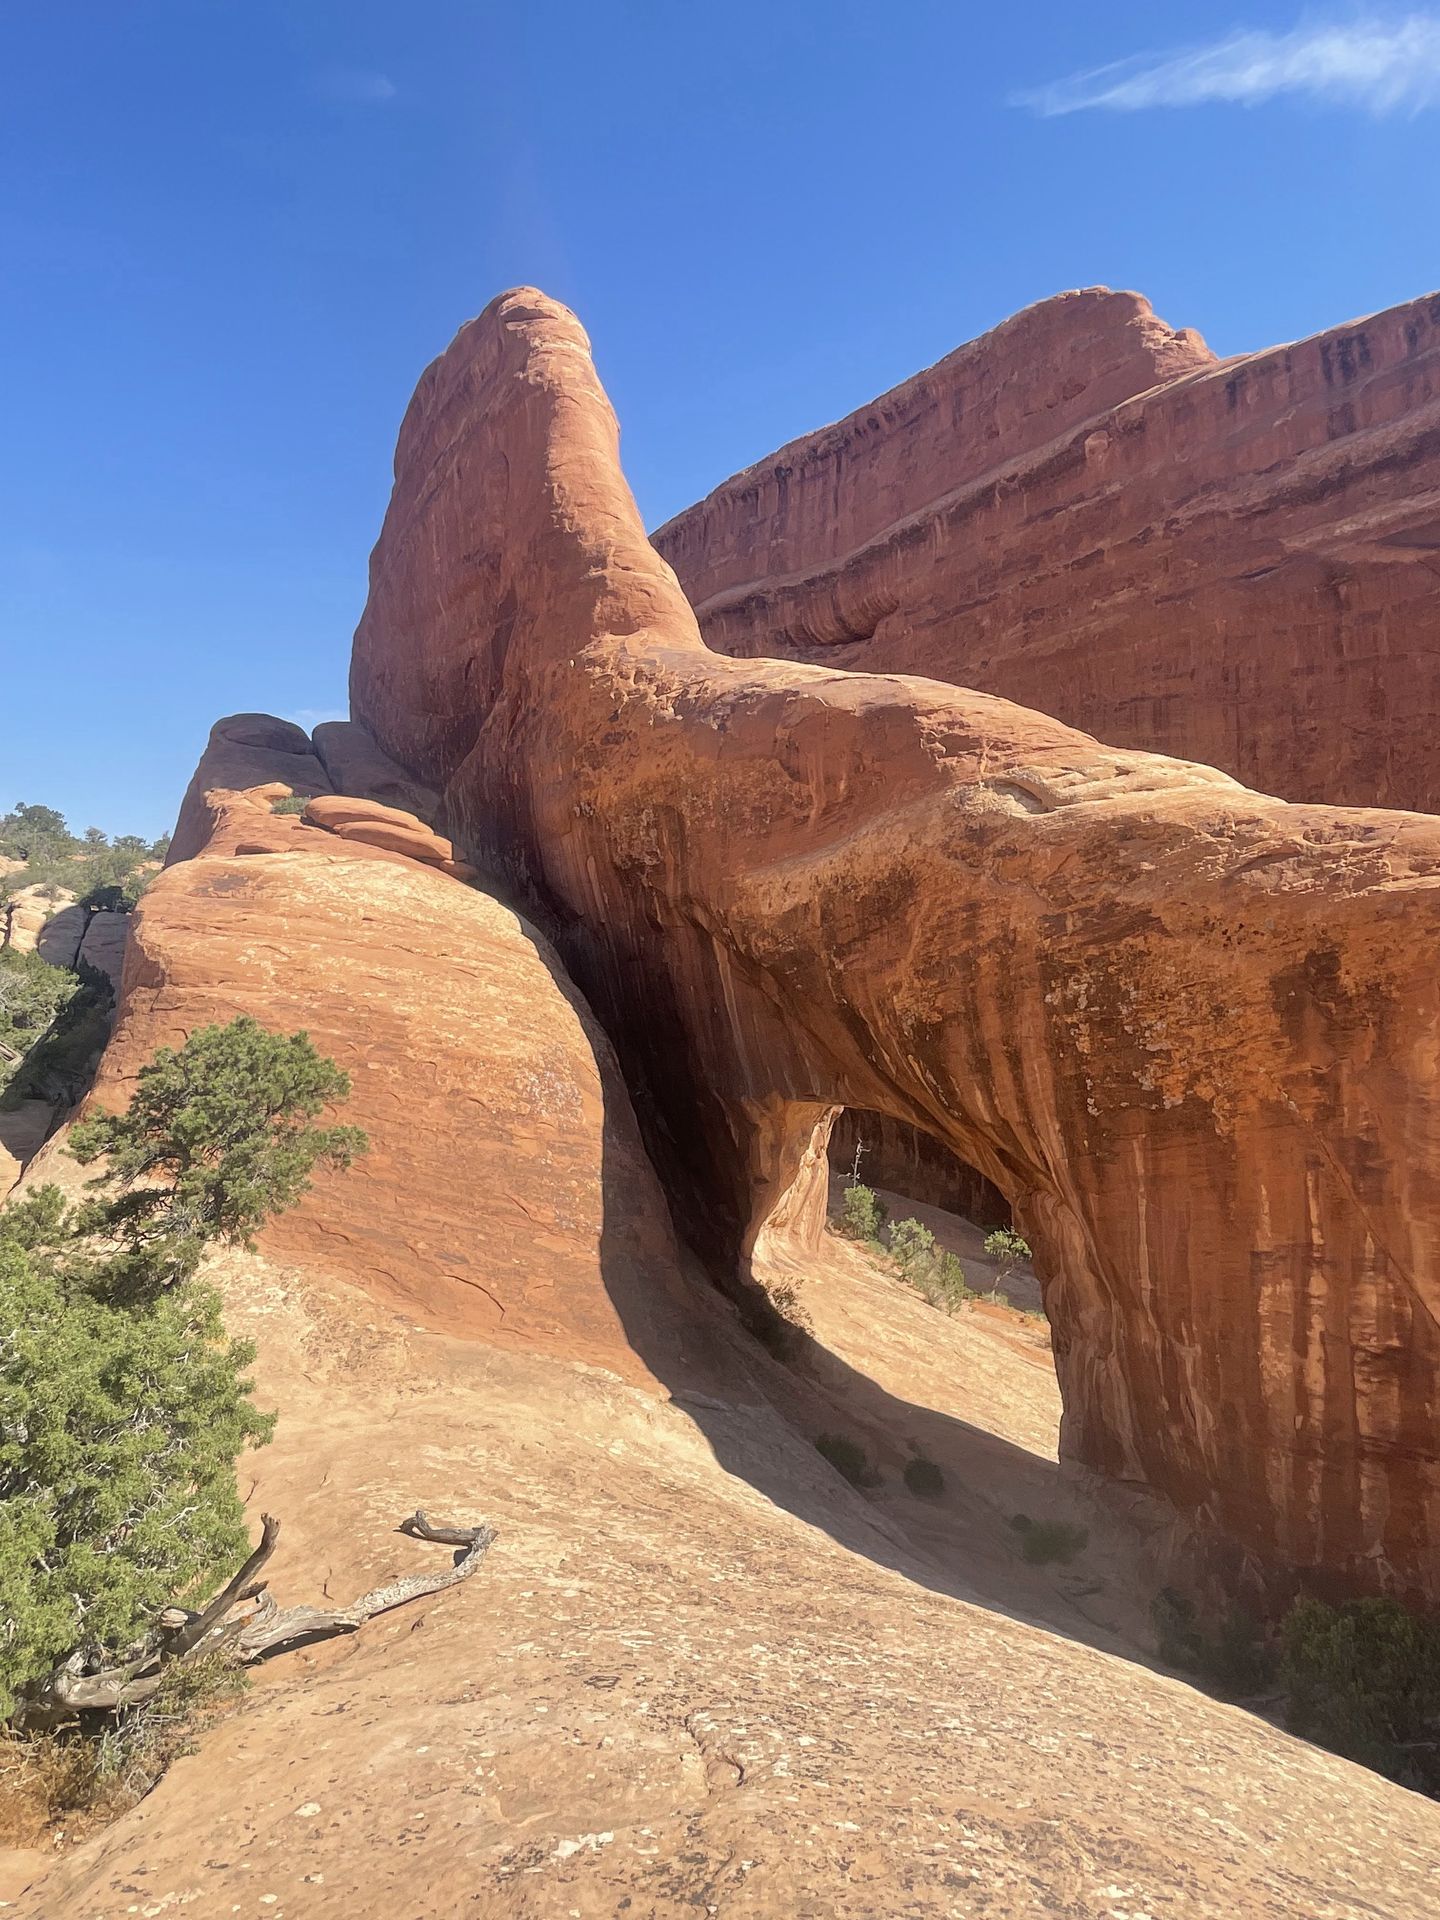
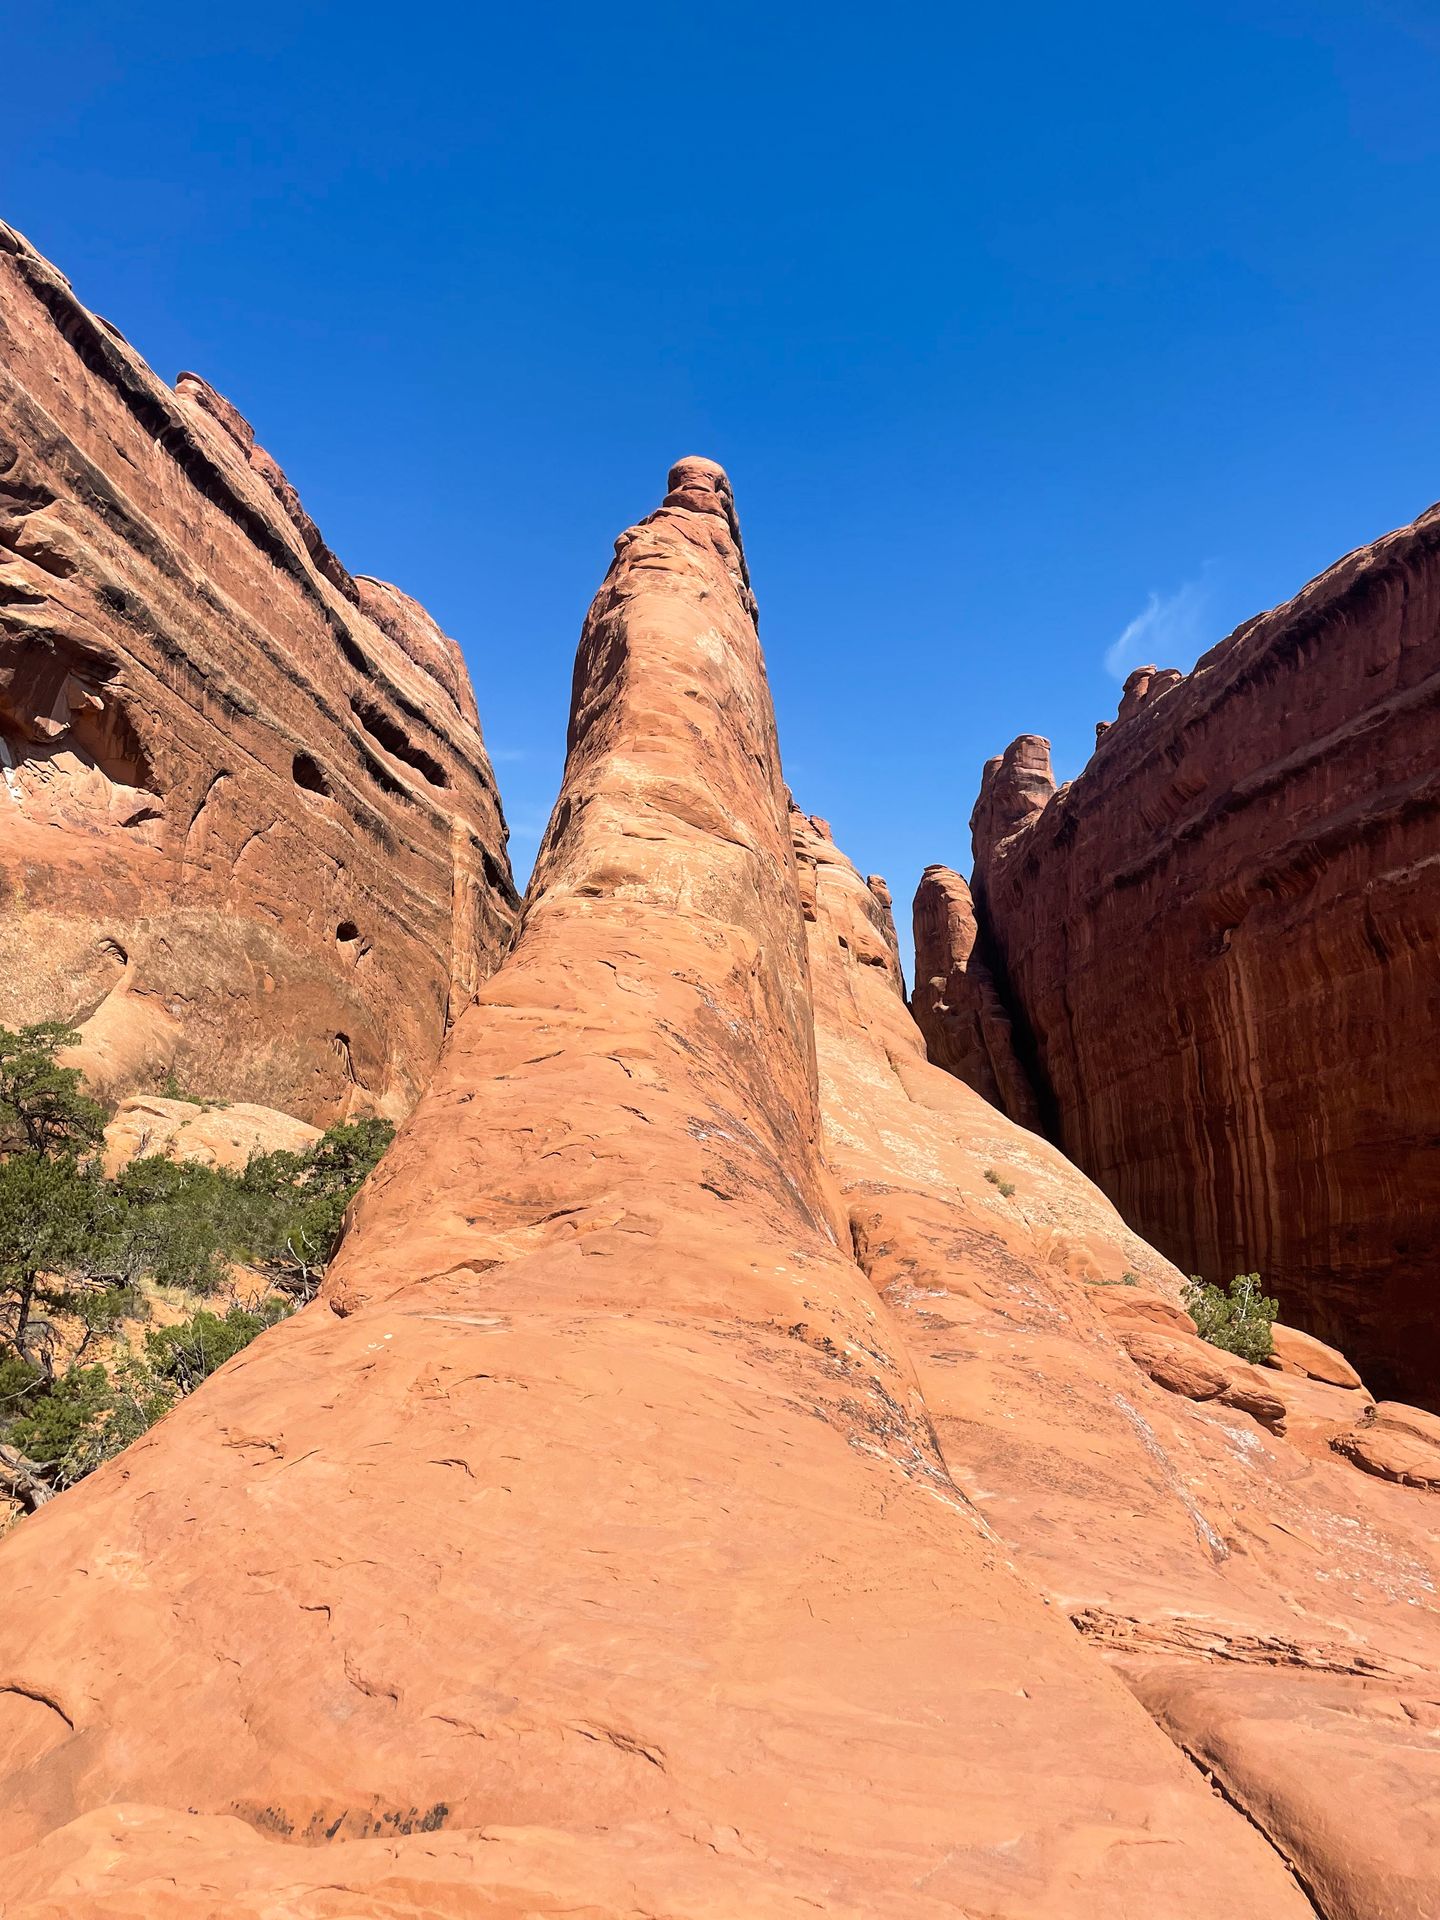
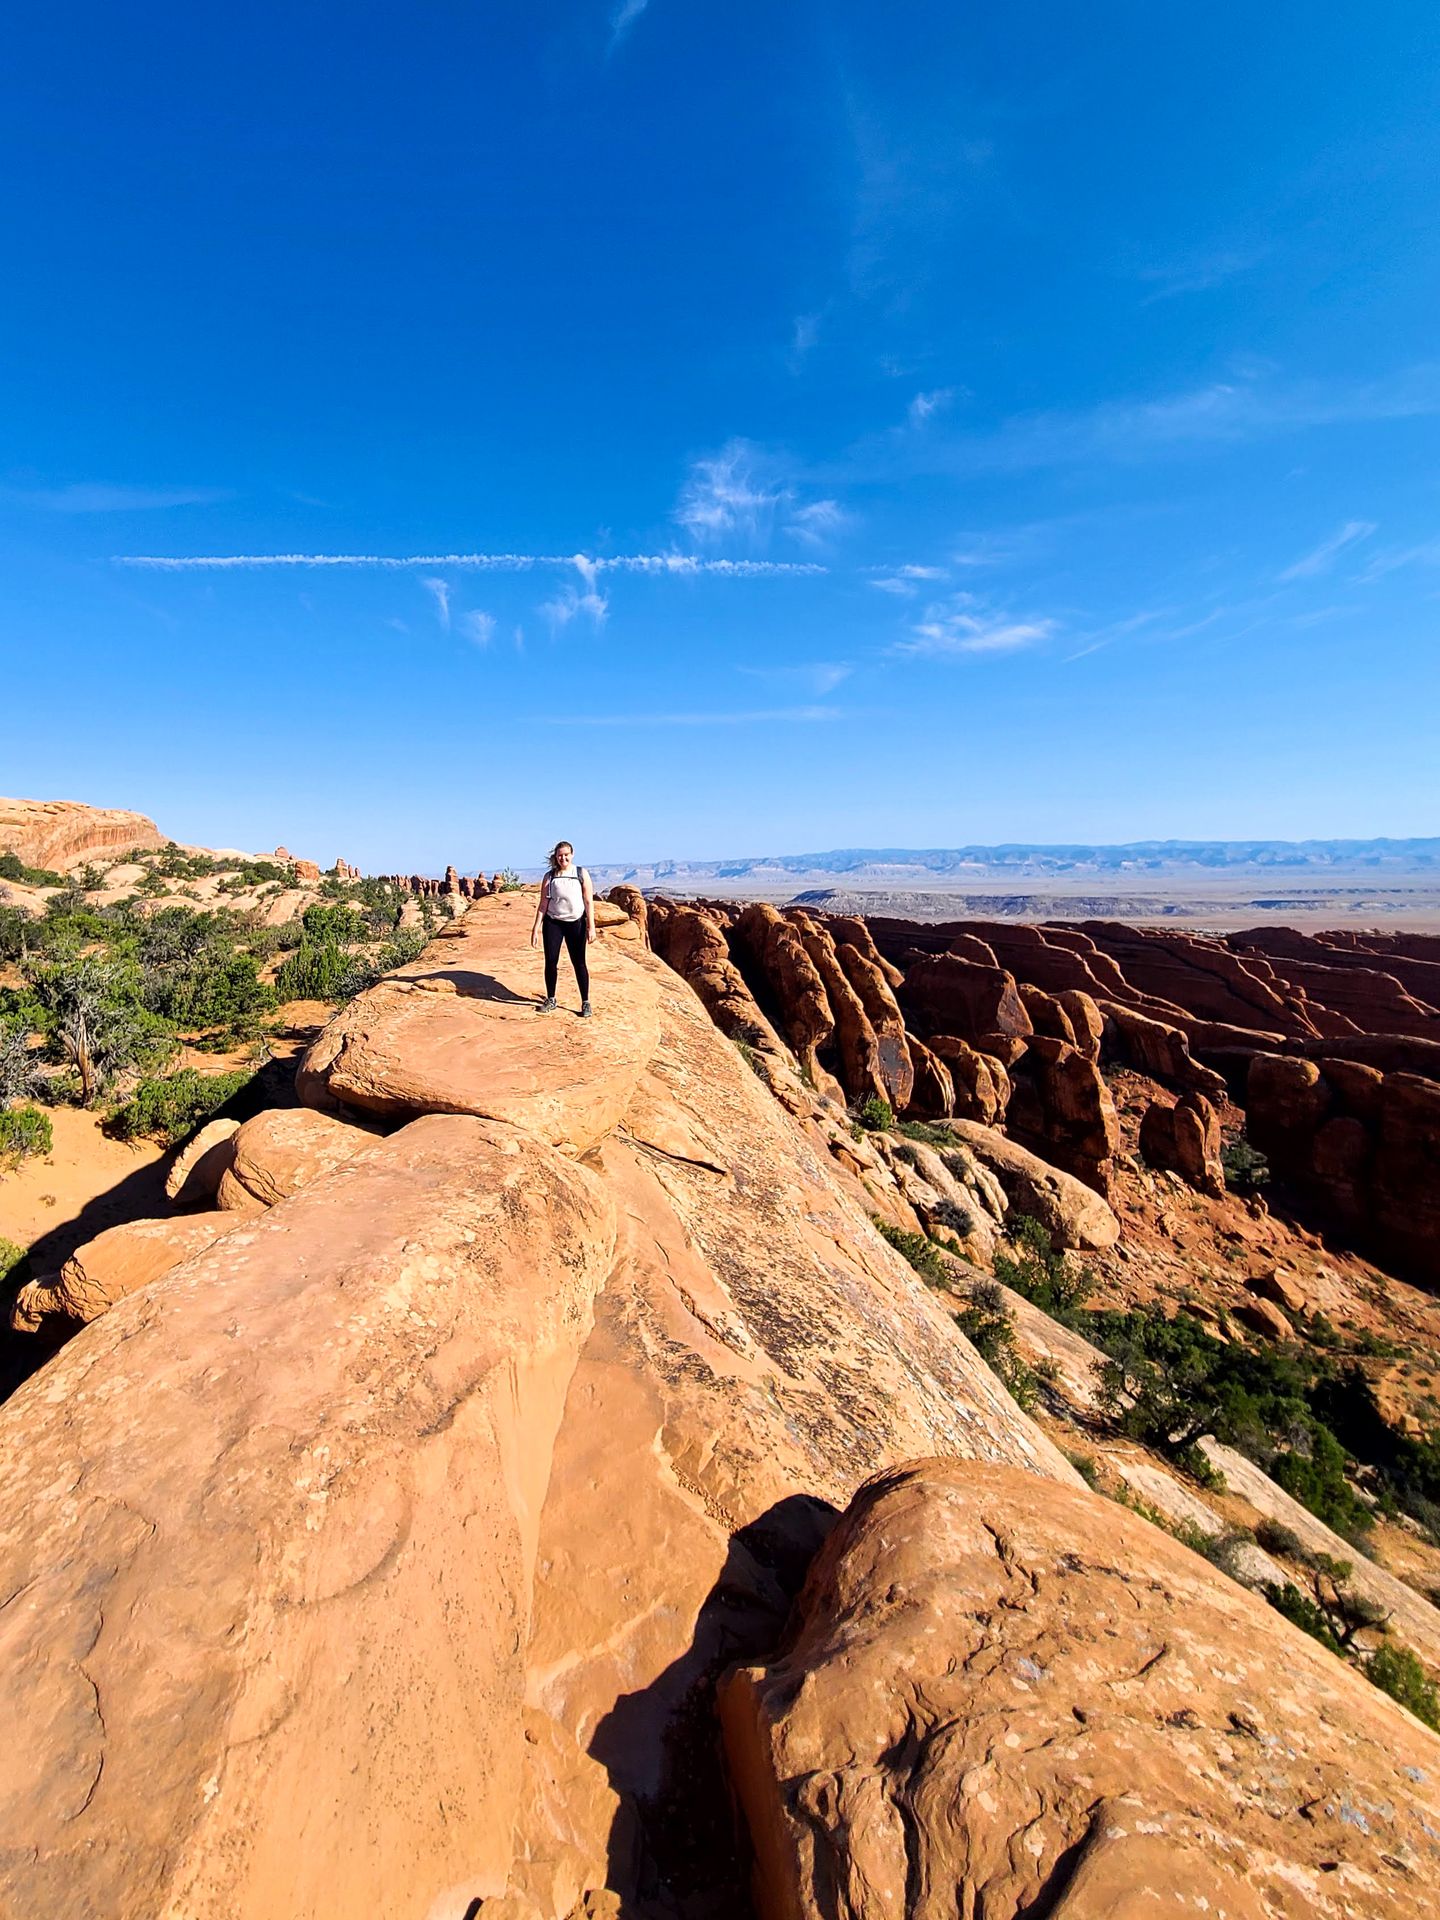
Devil’s Garden Trail in Arches
On your final day in Arches, I recommend taking the time to hike the longest trail in Arches National Park: the Devil’s Garden loop.
If you do the entire trail, it is about 8 miles with some sections of difficult scrambling. However, you can also choose to do part of the trail. Options include visiting the iconic Landscape Arch via a 2 mile trail or heading out to Double O Arch and back via a 4.1 mile trail.
I only recommend the entire loop if you have some rock scrambling experience and are comfortable navigating a primitive trail. It can be easy to get turned around. Either way, be sure to bring plenty of water and wear proper hiking shoes.
For the entire loop, I highly recommend having AllTrails Plus and downloading the offline map of the route. I did not have any trouble while using AllTrails, but many reviews mention that they got turned around during the hike.
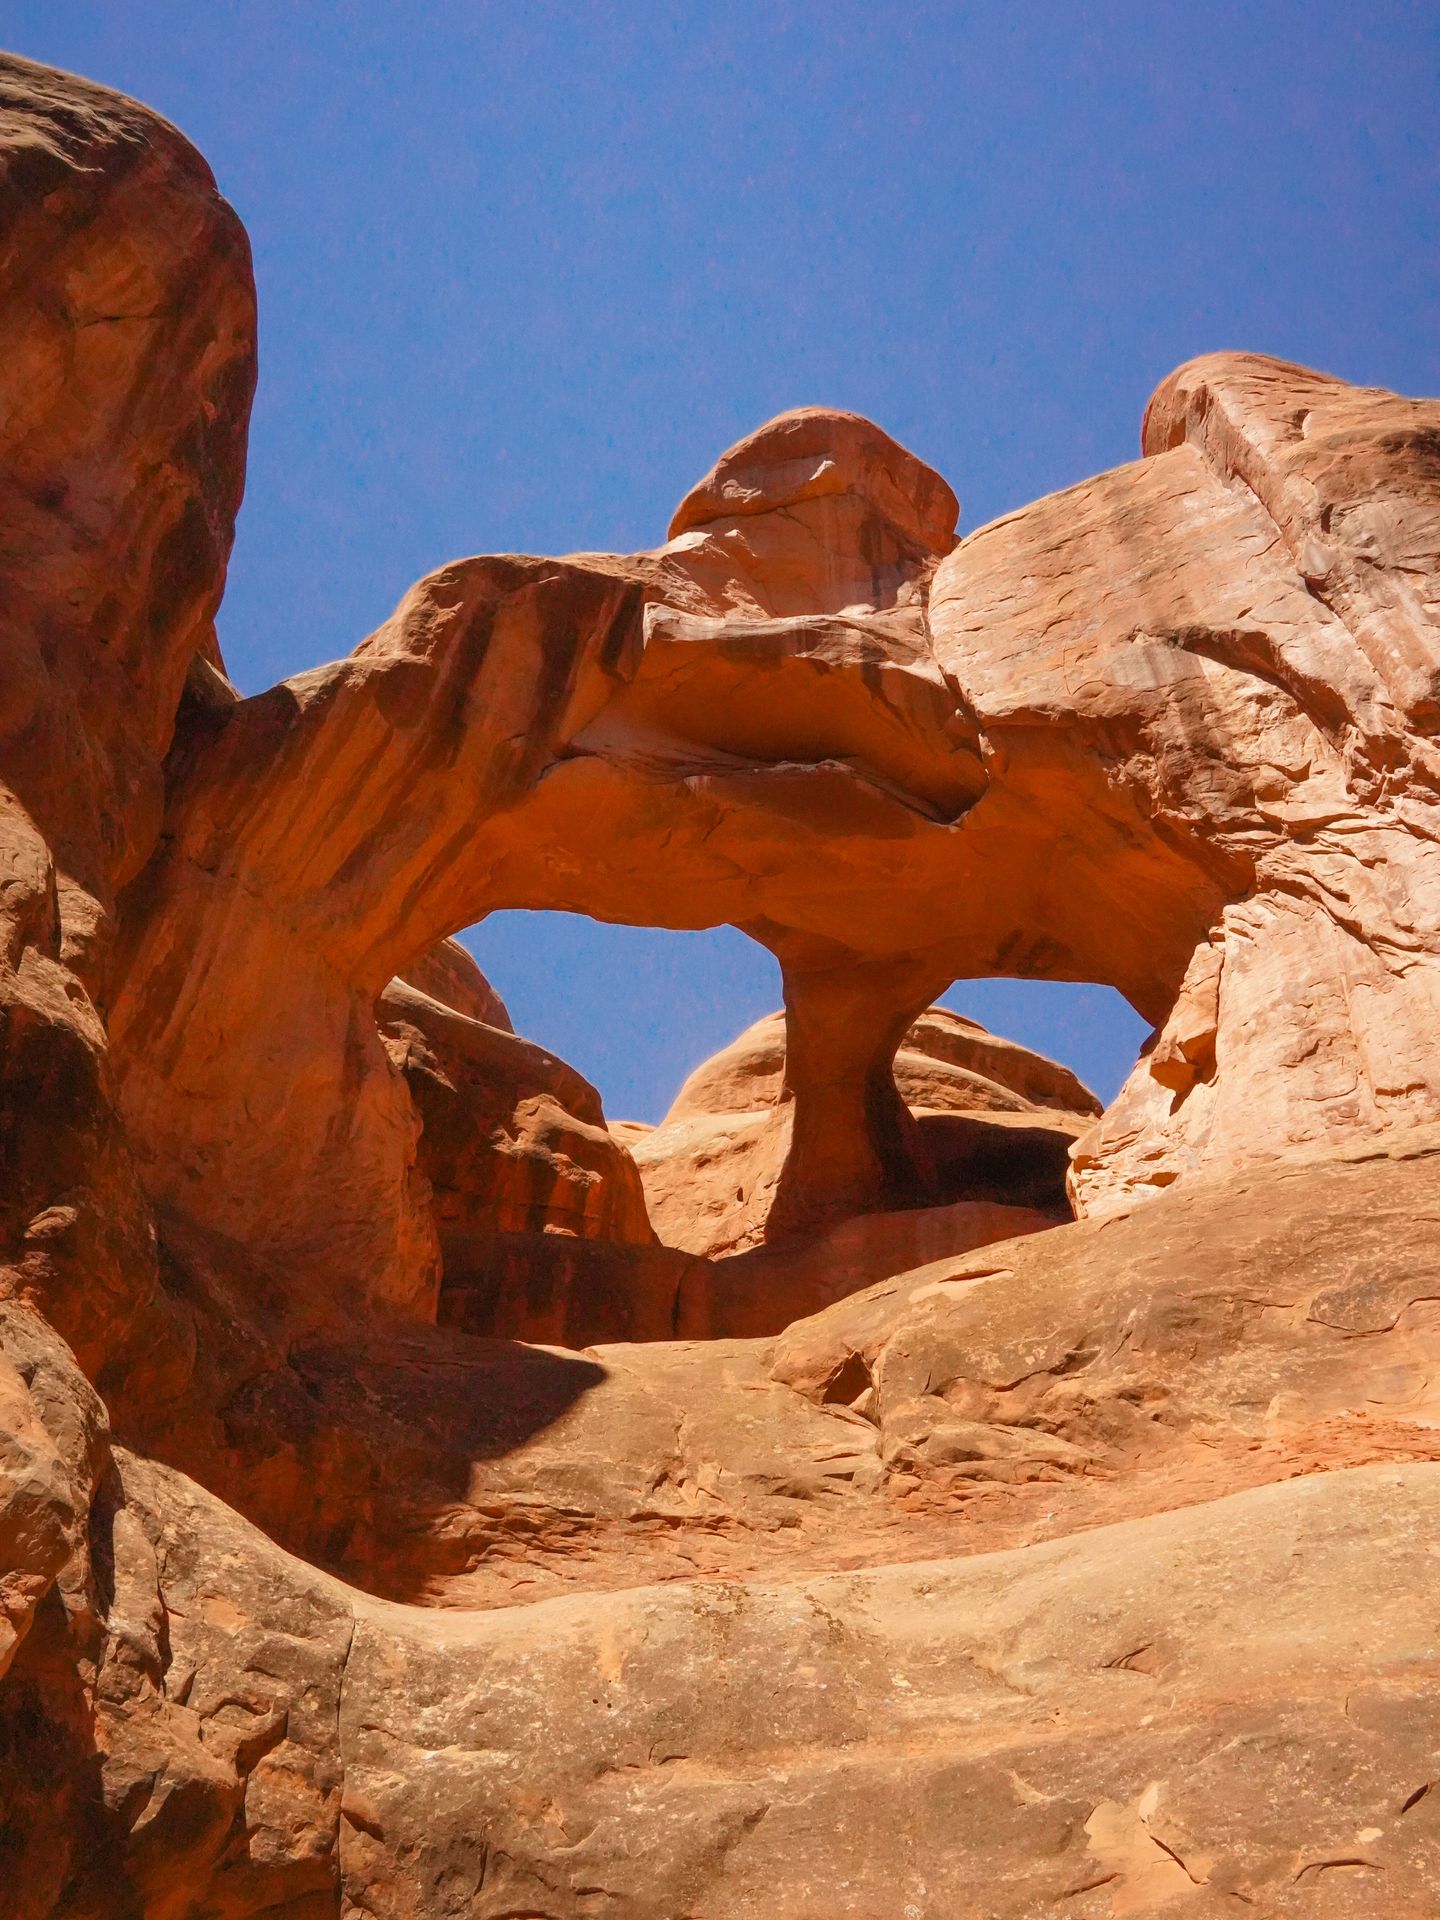
If you hike the entire loop with spurs, you’ll get to see 7 incredibly unique arches. The first ones you’ll come across are Tunnel Arch and Pine Tree Arch. These arches are located off of a short spur about a quarter mile into the trail. Tunnel Arch is up on a cliff face and resembles a tunnel due to its shape. Don’t forget to look up and to the left to see another smaller arch on the rock face next to it.
Pine Tree Arch is located on ground level to the trail and there is a grove of pine trees right in front of the opening.
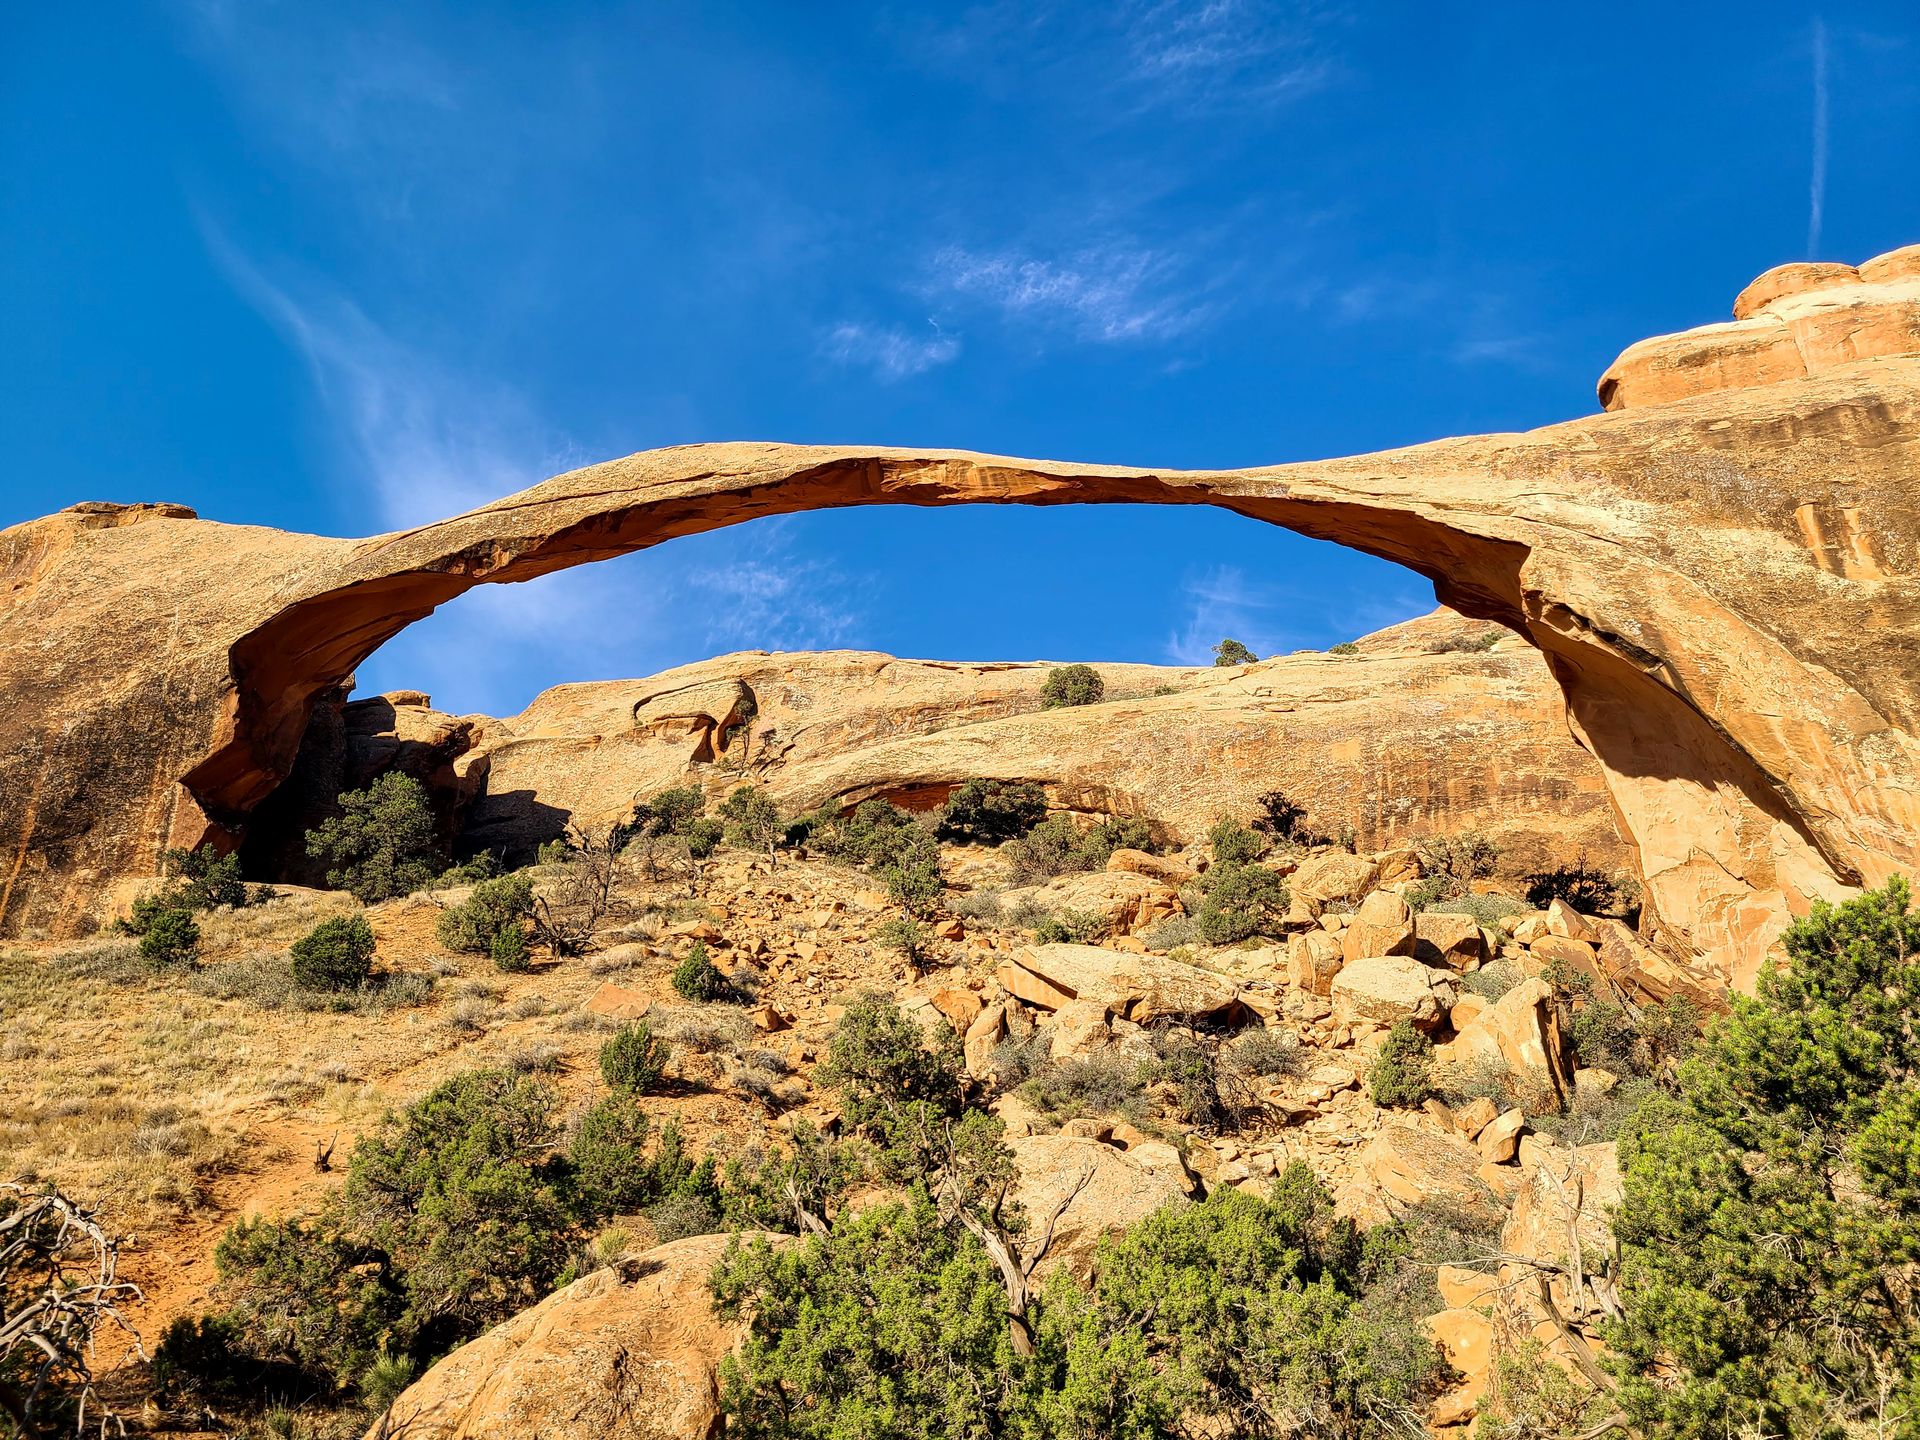
Just under a mile from the trailhead, you will reach Landscape Arch and the point where the trail splits into the loop.
Landscape Arch is the longest arch in North America with an opening that is 306 feet wide. A large chunk of Landscape Arch actually fell off of the arch in the early 90’s. This is an example of how the landscape of this national park is constantly changing, even on a human time scale.
Deciding whether to take the loop clockwise or counterclockwise is up to you. To get the hardest and most uneventful part out of the way first, take the trail counterclockwise. If you are getting an early start and want fewer people at the most popular arches, then take it clockwise. I took the trail clockwise to avoid the crowds.
Going clockwise, you will climb up a large rock fin soon after Landscape Arch. I thought this part of the trail was a lot of fun, but you will definitely need grippy hiking shoes to feel safe on the slickrock.
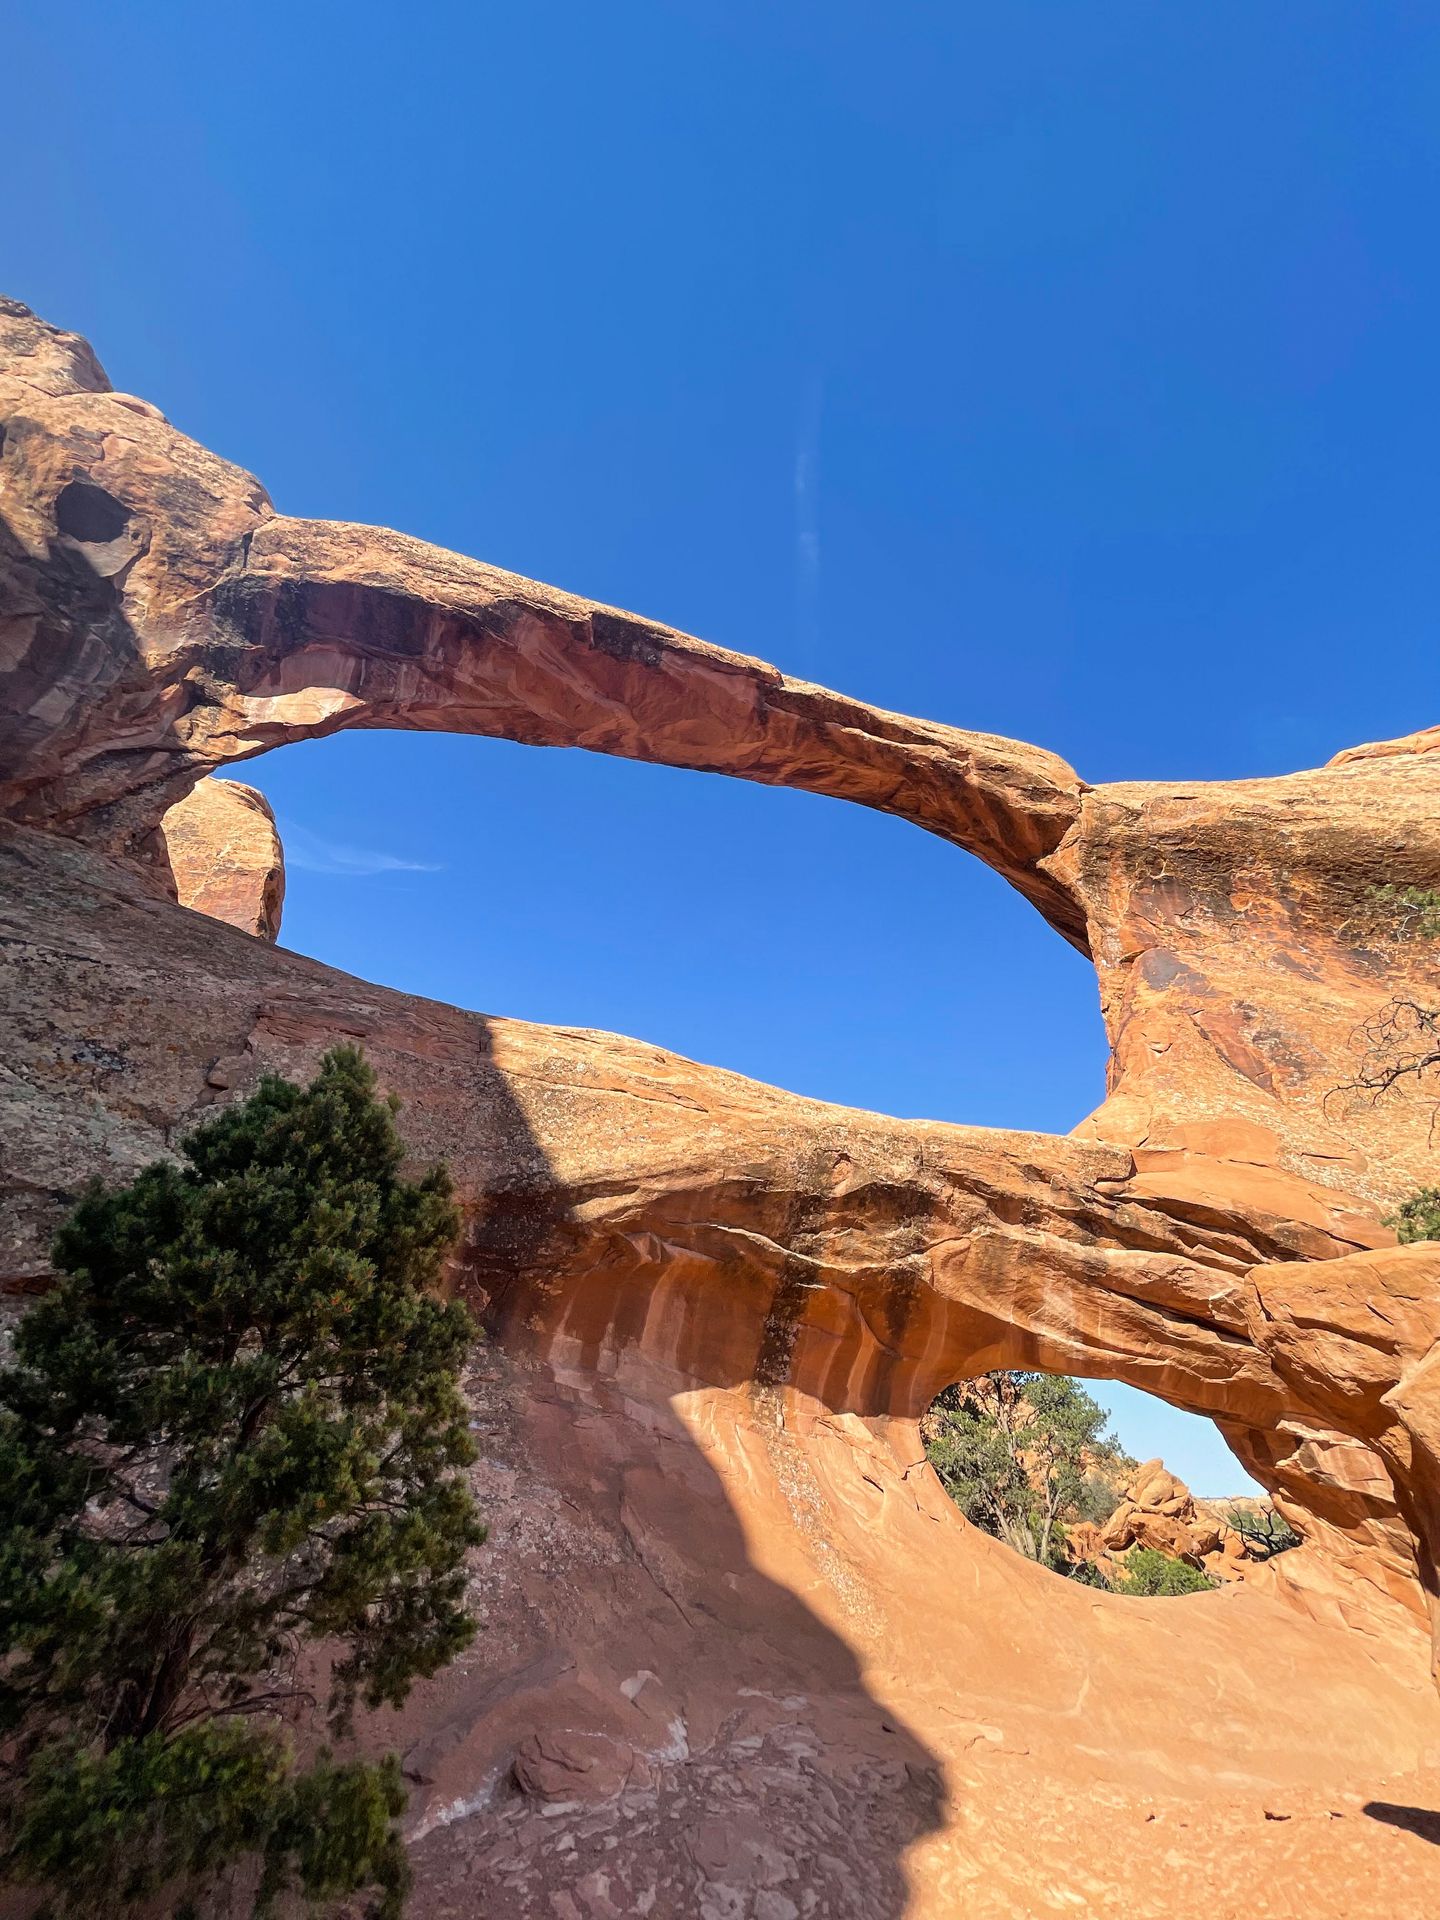
After this initial climb, there is a spur trail to the left to reach Navajo Arch and Partition Arch. Both are really neat. You can walk through Partition Arch and have a great view of the valley down below. Navajo Arch leads you into a little alcove with a tree inside it. It kind of feels like you’re in someone’s living room!
After this spur, you will climb on top of some more rock fins to reach Double O Arch. This was such a cool feature of the trail, but some areas are narrow and you may not enjoy it if you’re afraid of heights.
Double O Arch is incredible to see and looks exactly how it's named: two O-shaped arches. It is definitely one of the more unique arches in the park!
After Double O, you have the option to take a spur trail to Dark Angel, a rock spire. I opted to skip this spur because you can see the spire from a distance and it adds almost a mile to the trail.
As you continue onto the next arch, the trail starts to get more difficult to follow. It’s a good time to check your AllTrails map to make sure you’re on the right track.
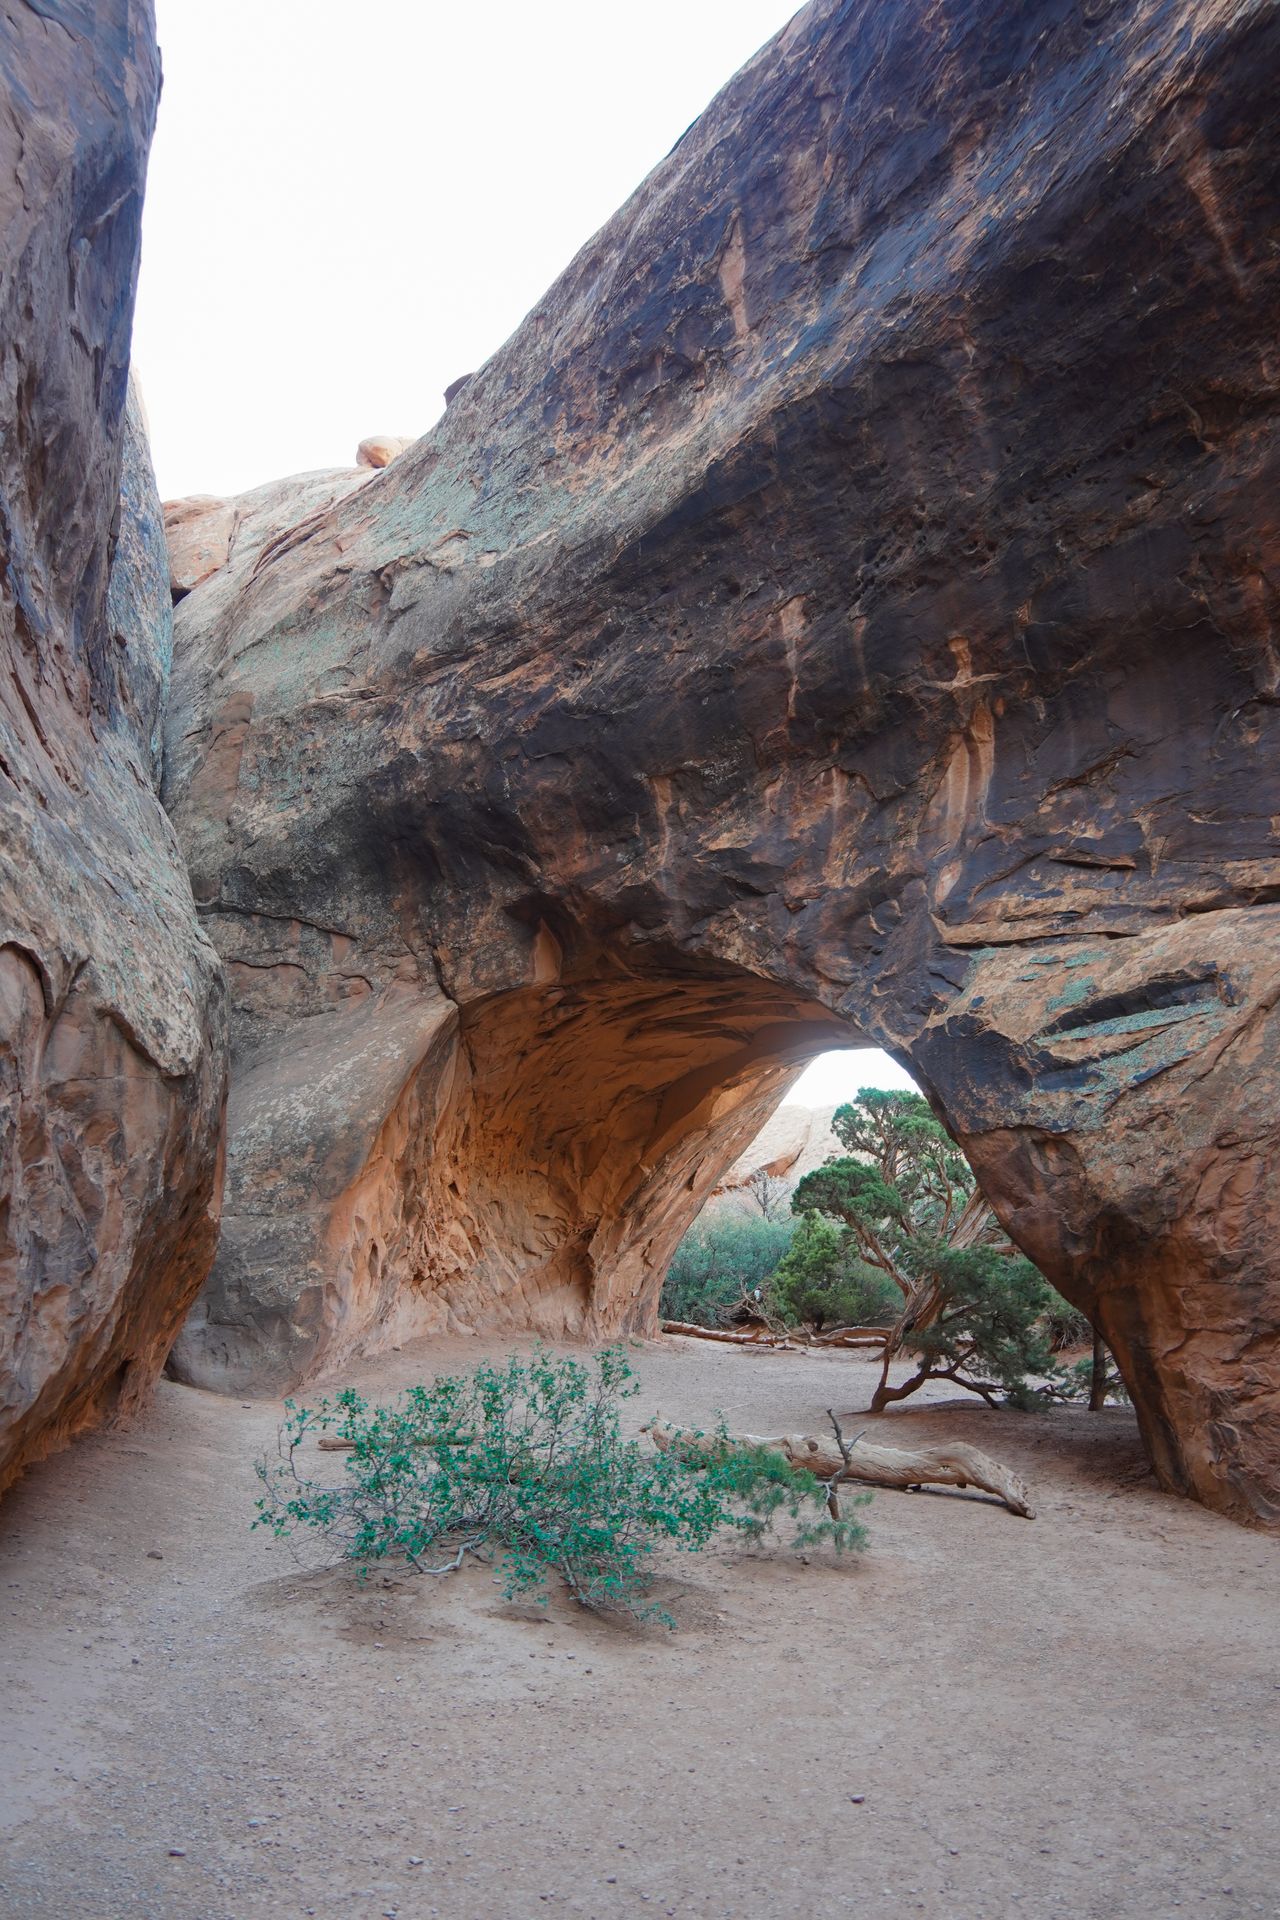
After a little under a half mile, you’ll reach the final spur trail to Private Arch. Private Arch is kind of hidden behind another rock so you don’t see it until you’re right there. This is also a less crowded area of the trail and I had this arch all to myself! It’s a great area to find some shade and have a snack.
From there, you’ll continue on the primitive loop to the hardest part of the trail. There is a rock wall about a half mile from the Private Arch spur that I thought was the most difficult part of the hike. You have to scale up a rock wall and then back down, and there is very little to hold onto. This is another area that could be really hard if you’re afraid of heights and that you really need proper hiking shoes for.
Note that at certain times of year, there is a portion of the primitive trail where you’ll have to choose between scaling a steep wall or walking through water. I did not experience this hiking in the summer so I’m not sure where it’s at on the trail.
The final part of the loop is mostly walking through sand and is a bit grueling in the heat of the sun. Overall, if you’re prepared for the rock scrambling, this hike is incredible and perfect if you’re up for a bit more of a challenge while exploring Arches!
Park Avenue
As you leave the park, stop at any viewpoints you may have missed along the way. There are several pull offs for views and the Guide Along audio tour does a great job of explaining them.
If you’re not too tired, Park Avenue is a great, quick trail to add on before you leave the park. The trail is 1.8 miles out and back, rated easy and will lead you between massive rock formations that resemble the New York City skyline.
If you don’t want to do the hike, you can get a great view of the rocks from the trailhead. In addition, I recommend parking across the street at the La Sal Mountains Viewpoint. This parking area provides an amazing view of Courthouse Rock, Park Avenue and the La Sal Mountains in the distance.
If you haven’t been yet, it’s also worth a stop at the Arches National Park Visitor Center before leaving town.
Doughbird
If you can get there before they close, enjoy a post-hike sandwich or donut from Doughbird! They are known for fried chicken sandwiches (unfortunately there is no vegetarian alternative) and massive donuts with unique flavors.
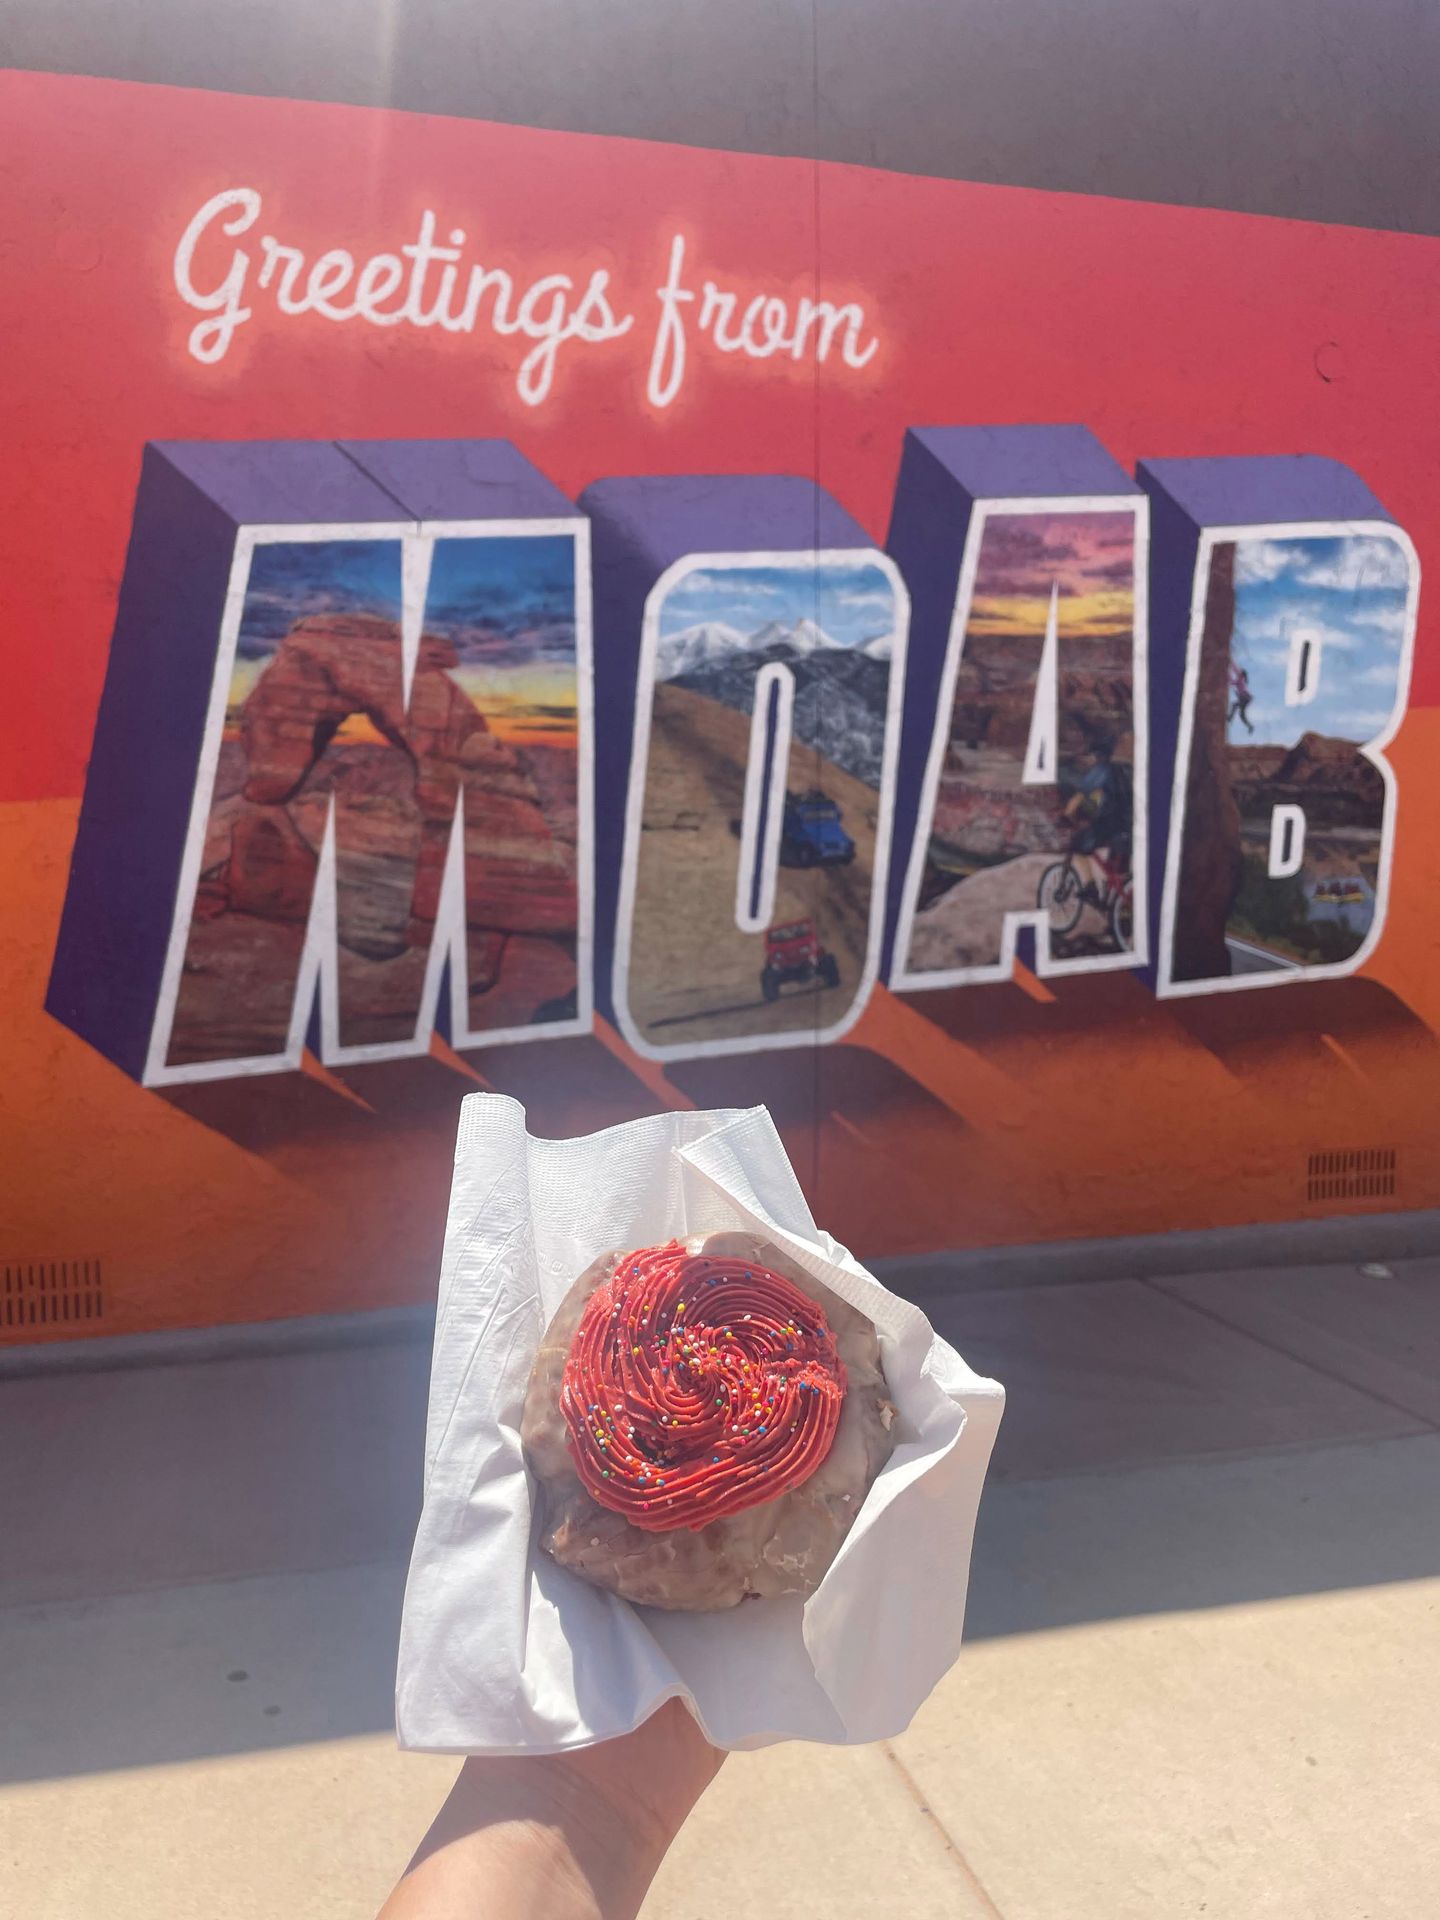

I really enjoyed the funfetti cupcake donut and my partner enjoyed the fried chicken sandwich. The shop is cute and has a neon sign that reads ‘Treat Yo Self.’
If you have more time
If you have more time in Moab, here are some more incredible places to go in Moab!
- Hike the Corona and Bowtie Arch trail. The trail is 2.4 miles, rated moderate and outside of the national parks.
- Hike to Tower Arch in Arches National Park. This arch receives fewer visitors because it is down an unpaved, improved road. The trail is 2.4 miles and rated moderate.
- Visit the Canyonlands Needles District. This area is about an hour and a half outside of Moab. If you’re up for a long hike, hike the Druid Arch trail. It is 10.4 miles and rated moderate.
- Multiple outfitters offer rafting trips on the Colorado River through Canyonlands National Park. You can find options for anything from a half day to a multi-day trip. This is an especially great activity for the hot summer months.
- The La Sal Mountains Scenic Loop Drive offers a 60 mile driving adventure through the mountains next to Moab. You will get to enjoy forested mountain views along with views of the red rock desert down below.
Final Thoughts
If you're wondering how to spend 3 days in Moab, I hope this guide helps you out! This first-timer's guide is perfect if you love hiking and are hoping to visit Arches and Canyonlands in a short amount of time.
For more information on visiting Utah, check out some of my other guides:
- The Ultimate Utah Mighty 5 Road Trip Itinerary
- Things to do in Kanab, Utah
- Two Days in Zion National Park
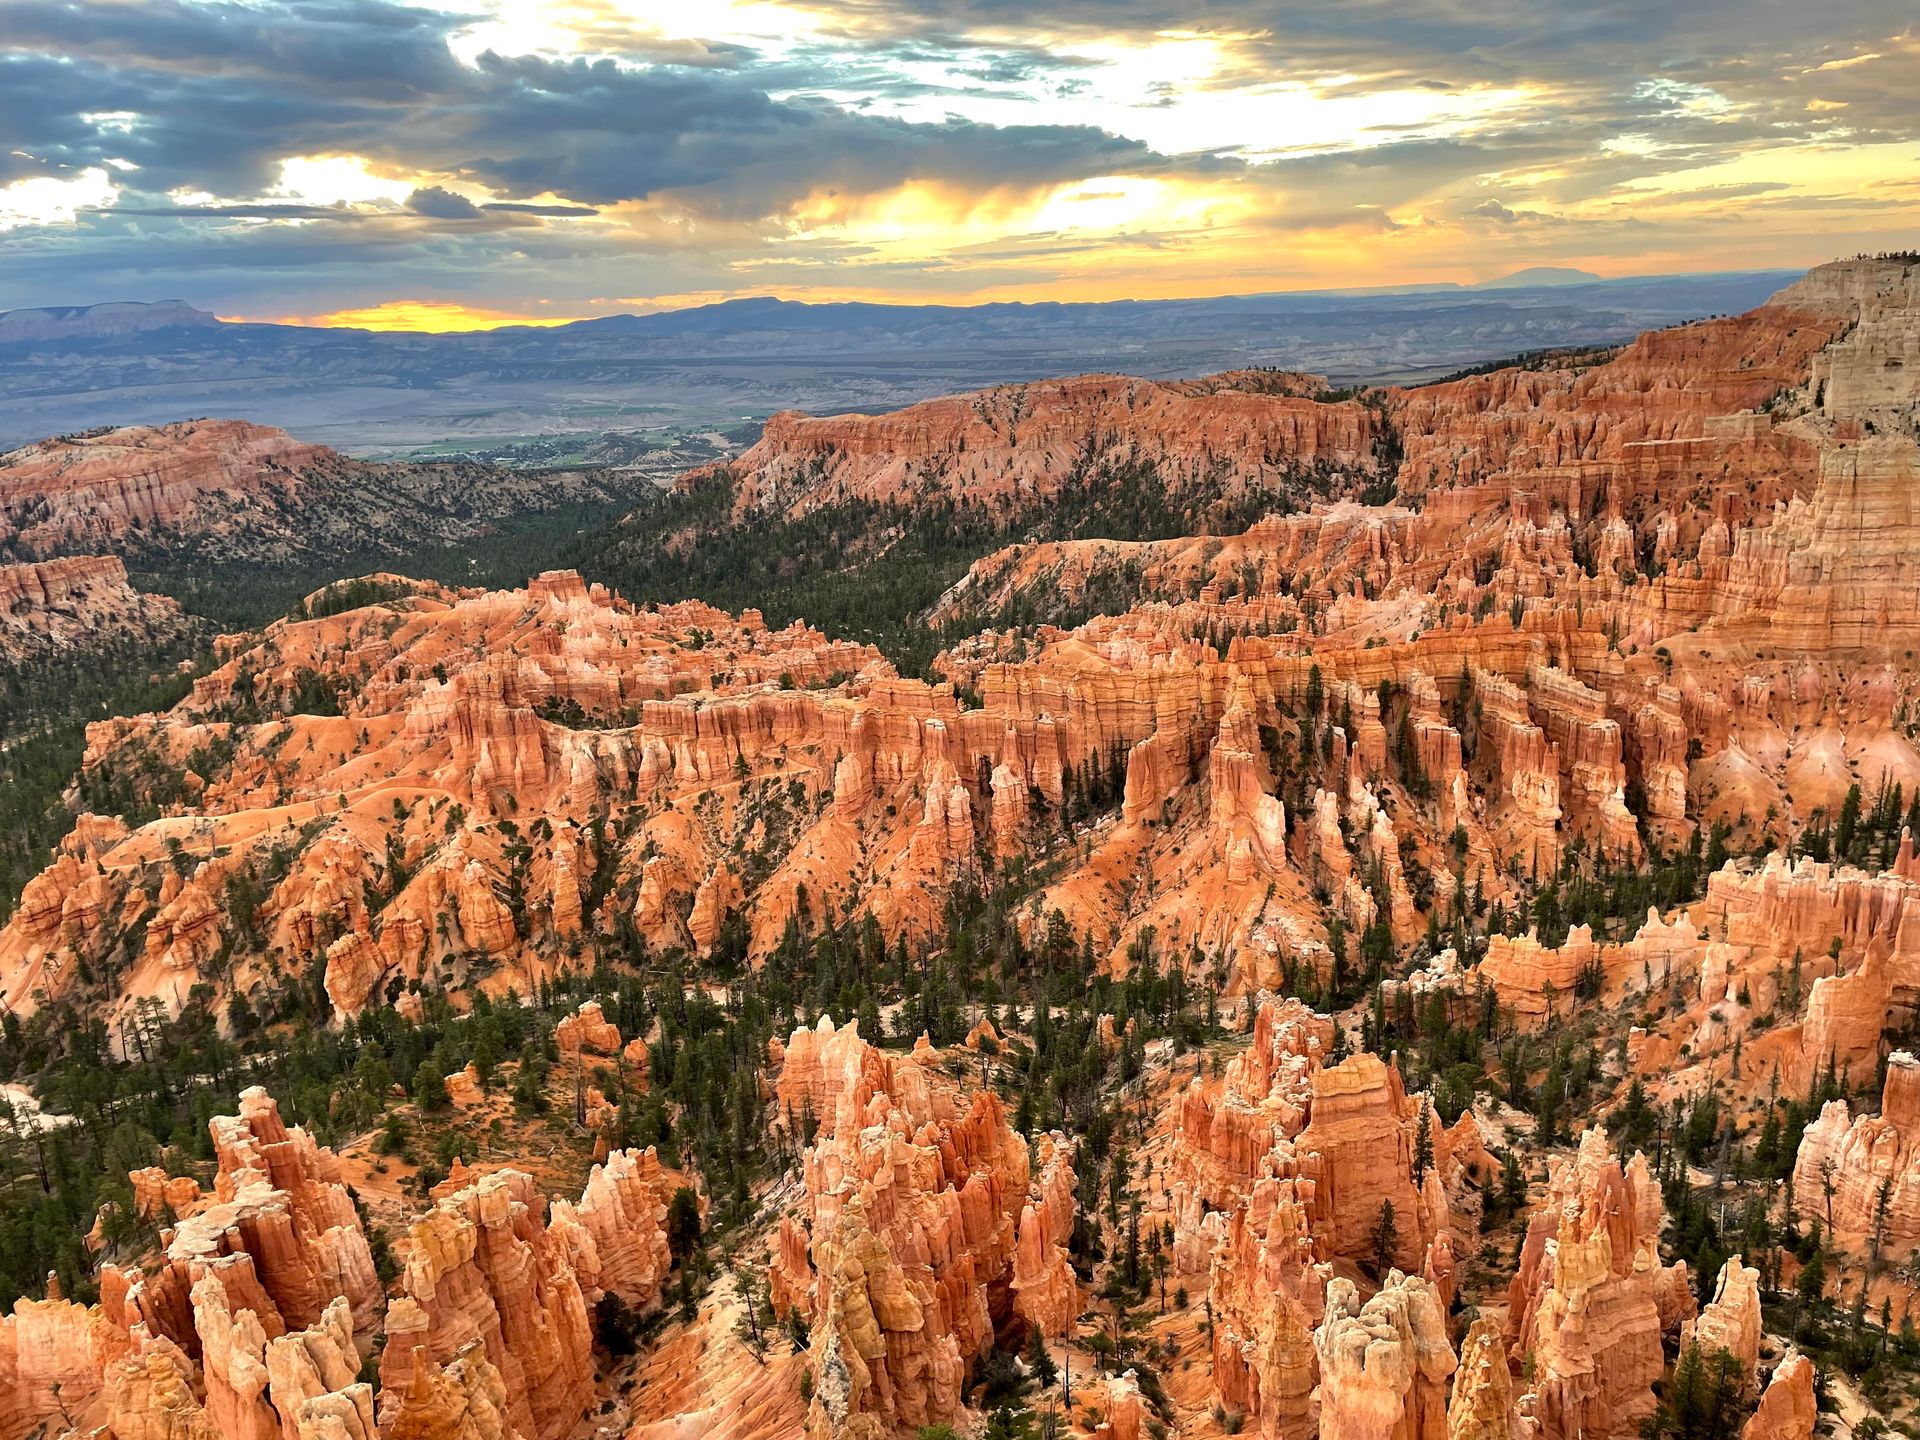
- The Top Things to do in Bryce Canyon
- How to Spend One Day in Capitol Reef National Park
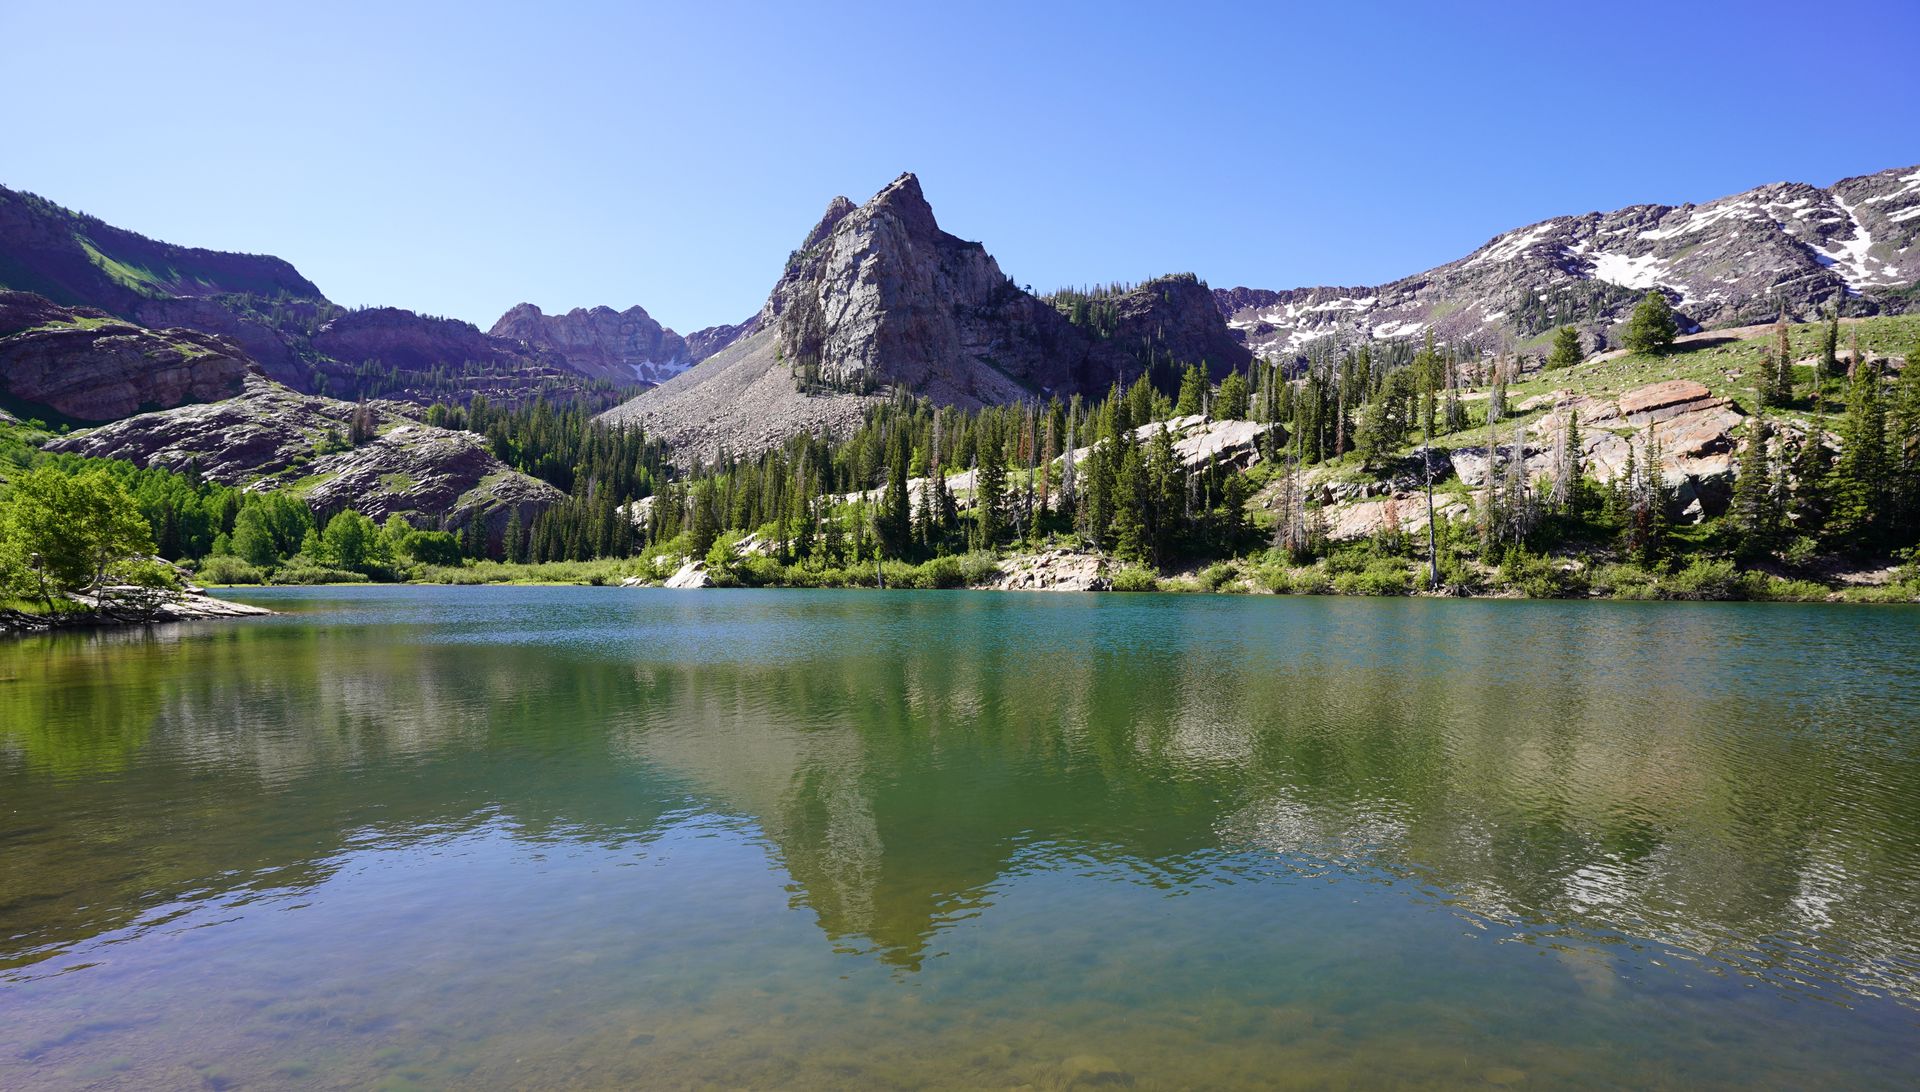
- 11 Amazing Trails Near Salt Lake City
Thanks for Reading!


Let's stay in touch!
Join the Lost with Lydia email list to get monthly travel guides and tips!